This page is to demonstrate the capabilities for populating case data using a pathology report.
You may read through this guide or hop to a specific topic using the following table of contents:
- Pathology Report Search
- Selecting A Pathology Report
- Copying the Discrete Pathology Data to the Case Data
- The Date of Diagnosis Field and Date Types
- Linking the Pathology Report
- The Reset Button
- The Validate Address Button
- Choosing What Case Type to Create
- The Full Abstract Data Panel Fields
- The Case Other Data Panel Fields
- The Create Button
- Create Full Abstract
- Create Case Other Data
- Sample Errors
- Additional Features
Pathology Report Search:
On the "Create Case" action, CPDMS will perform a quick search over the Pathology Report Database using the Patient's SSN, Date of Birth, and First and Last Name that is being accessed. In our example we are continuing on from our Create Patient from a Pathology Report example which means our search criteria are:
- SSN = 987-65-4321
- First Name = "PATFIRST"
- Last Name = "PATLAST"
- Date of Birth = "04-04-1965"
One thing different from the search in our example, is we will always have the Date of Birth for the search. Users do not have to enter a Date of Birth on patient create. However, DOB is a mandatory patient data item, so we will always have this piece of information when creating a case.
If a report matches on the search criteria, CPDMS is directed to a page similar to the image below:
CPDMS first loads the user info and searches for the matching pathology reports, and it will show the following load screen:

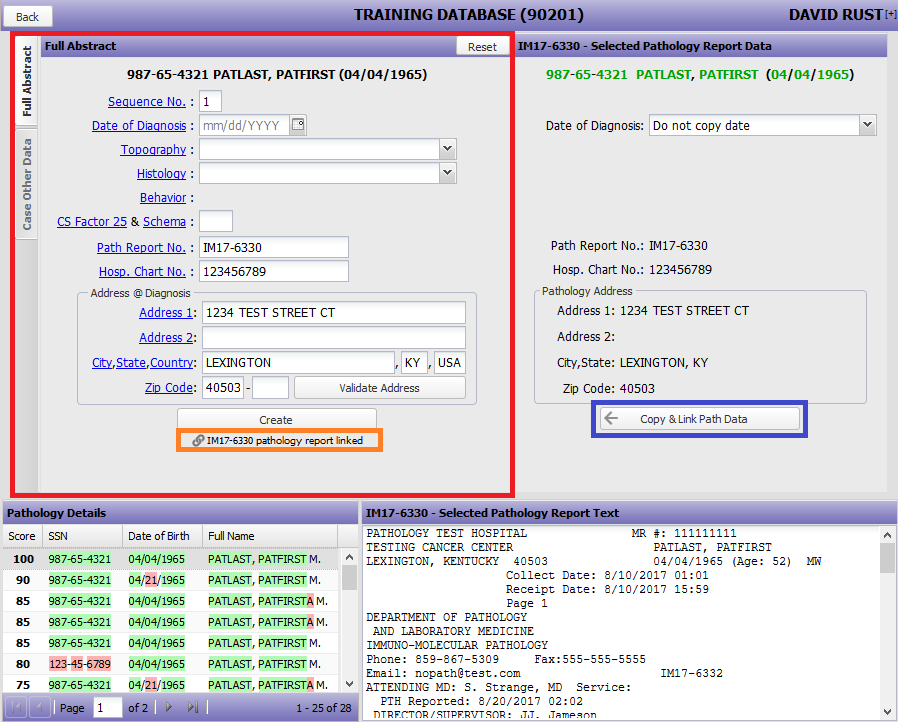
In this example we are creating a case with the patient who has the SSN, Last Name, First Name, and Date of Birth of "987-65-4321", "PATLAST", "PATFIRST", "04/04/1965" highlighted in the orange box.
The facility, username, and feedback link are also displayed in the blue boxes.
Once the search has been loaded, all pathology reports that have a relatable match are shown in the bottom left grid panel of the application denoted in purple box below:
There are 28 pathology reports found matching the patient criteria. A user will normally see a handful of pathology reports, this patient has so many to demonstrate the sorting and multitude of scores in the scoring column.
The green background shows which fields in the pathology report with the ones searched over denoted in the purple box.

The first column in this grid panel displays the match score of each pathology report. The higher the match score the more likely the pathology report matches the patient SSN, First and Last Name, and Date of Birth. These scores range from 100 (all search items match) to 20 (Partial match on first and last name). The pathology report this example uses has a score of 100 meaning all the search criteria matched exactly with the pathology report data. By default, the grid is sorted on the match score from the highest to lowest.
NOTE EXAMPLE: Sometimes the patient information doesn't match exactly with what is in the pathology report database. If the patient info is SSN = "123-45-6789", Patient Last Name="PATLAST", Patient First Name = "PATFIRST", and DOB = 19650421 as denoted by the pathology report selected in blue box. The mismatched data will show up in red in the grid row denoted in blue and the orange box. Please notice in our working example all the data is green which shows that all criteria being searched matches the pathology report selected.

If a report does not match the search criteria, CPDMS will continue with the original create case workflow (shown below):

Selecting a Pathology Report:
When a report is selected, it populates the pathology's narrative text in the "Selected Pathology Report Text Area" panel denoted in green . The discrete data items available are populated in the CPDMS Data Entry fields denoted in blue. The Pathology Report Id is inserted into the header of both blue and green panels. In this example the Pathology Report Id is "IM17-6330".

An abstractor can click through the list of reports in order to find the one that matches the case they want to create. (EDIT)
Copying the Discrete Pathology Data to the Case Data:
If we find that the pathology report in our scenario is the right one, we can copy the information over to the "Full Abstract"/"Case Other" panel denoted below in red by clicking the "Copy & Link Path Data" button denoted in blue.
When the pathology data is copied over, a few conversions happen:
- All data values are Upper Cased
- If no Date Type is selected in the Date of Diagnosis, no date is copied over.
- The Date Type for Data of Diagnosis is discussed later in this guide.
- The Country field in the "Full Abstract"/"Case Other" Data Panel denoted in red is calculated based on the pathology report's State value.
- The Zip Extension is not provided in the pathology report, so this will not be populated.
- The Zip Extension can be populated using the "Validate Address" function of this application which is discussed later.
- The pathology report will be "linked" to this case, and is shown beneath the "Create" button denoted in orange
The Date of Diagnosis field and Date Types:
In an effort to obtain the highest quality of data, CPDMS allows the user to copy over 1 of 4 different date type options from a pathology report denoted in orange below
- Do not copy date - no date will be copied over to the "Full Abstract"/"Case Other" Data Panel (User must manually fill this in via the Date Field (or calendar drop down)
- Specimen Date - Observation date / Date tissue was examined
- Report Date - Date report was last changed
- KCR Load Date - Date Report was loaded in the KCR Pathology Database
The "Full Abstract"/"Case Other" Date of Diagnosis field denoted in the green box will be populated with the respective value selected in drop down (or no value at all in the case for "Do not copy date") in the "Pathology Report Data Panel" denoted in the blue box below.
By default, the "Date of Diagnosis" field in the "Pathology Report Data Panel" is set for no date to be copied over to the case data.
In the example below the dates are made up, and they do not reflect what a user will find while creating a case.

Linking the Pathology Report:
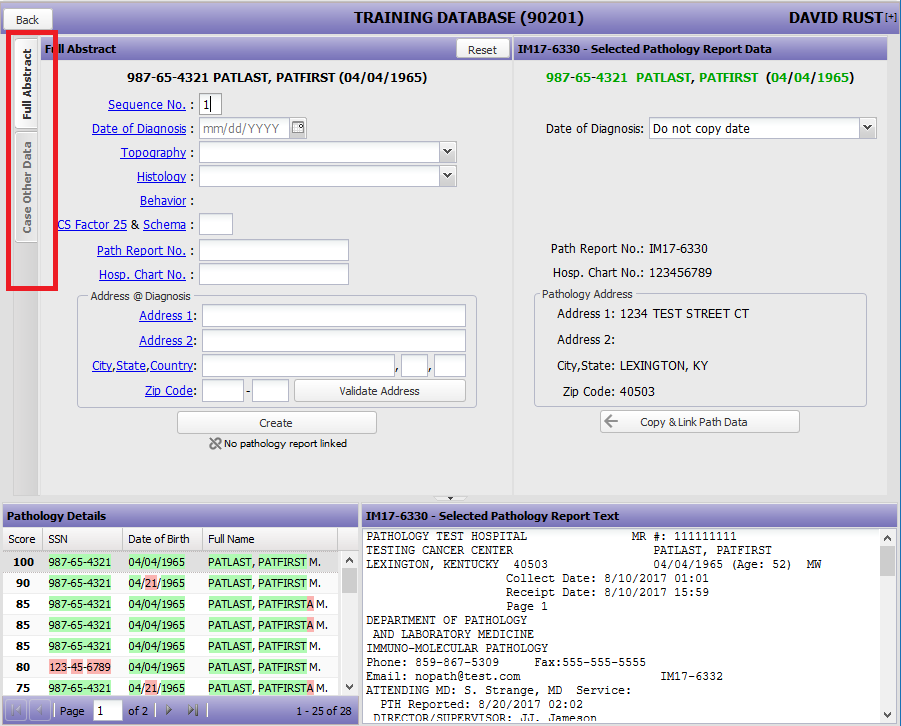
If no pathology report is linked the following will show beneath the "Create" button in the "Full Abstract" Data Panel
![]()
When a user clicks the "Copy & Link Path Data" button, it "links" the pathology report with the case being created. As described earlier, when the pathology report is link it will be shown in the "Full Abstract" data panel only with a "Chain Link" icon followed by the Path Id of the report underneath the "Create" Button. In our example, the Path Id is IM17-6330 when this is linked by clicking the "Copy & Link Path Data" button, the following is shown below the "Create" Button:
![]()
A user can unlink the pathology report in 1 of 3 ways:
- Click "Copy & Link Path Data" on another pathology report
- Click the "Reset" button
Click the "Chain Link" icon next underneath the "Create" button denoted in orange below:

Linking the pathology report at this point allows the user to bypass the section denoted in orange below in the "Personal" Tab of "Case Edit" later on.

The Reset Button:
Every field shown can be reset and the pathology report unlinked at the same time by hitting the "Reset" button denoted in orange.
The SSN, Date of Birth, Last Name, First Name, and Sequence Number will remain unchanged.

The Validate Address Button:
User's can check the address provided against the CPDMS geocoder by hitting the "Validate Address" button denoted below in green.

When this button is click it will pop up the "Validate Address" window denoted below in blue. Initially, the user will see a loading message as shown in the image below.
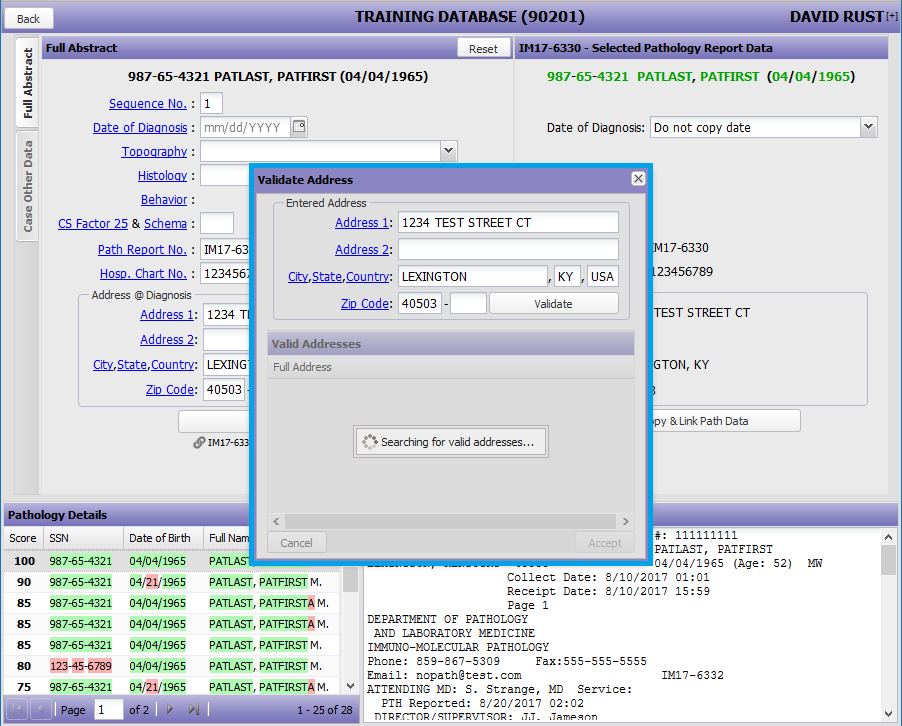
SInce this address does not exist, an error will show displaying the cause. The user is allowed to keep the original value by clicking the "Cancel" button denoted below in red

Or the user could enter another valid address, click "Validate" to search again, click the valid result and hit the "Accept" button denoted in green

For the rest of this explanation we will continue to use the original fake address provided.
Choosing what Case Type to Create:
Users can create 1 of 2 different case types
- Full Abstract
- Case Other
A user can select which case type they would like to create by selecting the "Case Type" tabs on the left side of the "Full Abstract"/ "Case Other' Data Panel denoted in red
Users can only create one case type at a time. It is possible to fill out both panels, but the case type that you hit the "Create" button on will be the Case Type that is created.
The data items included in each panel will be discussed later in this guide.
By default, the "Full Abstract" is selected and shown below:
When "Case Other Data" Panel is selected it looks similar to this image:

Notice how the "Case Other Data" tab is brought to the front when it is selected, and the "Full Abstract" is grayed out and brought to the back.
The Full Abstract Data Panel Items:
An abstractor can change the fields in the "Full Abstract" panel if necessary, but these changes will be overwritten if the "Copy & Link Path Data" button is clicked again.
- Sequence No.
- Sequence No. is a number only field that is automatically populated with the next sequential number based on the patient's amount of cases. (i.e. if a patient has 0 cases so far, the Sequence Number will be 1. If the patient has 2 cases, the Sequence number will be 3)
- Only 1 to 2 digit long numbers are allowed in this field.
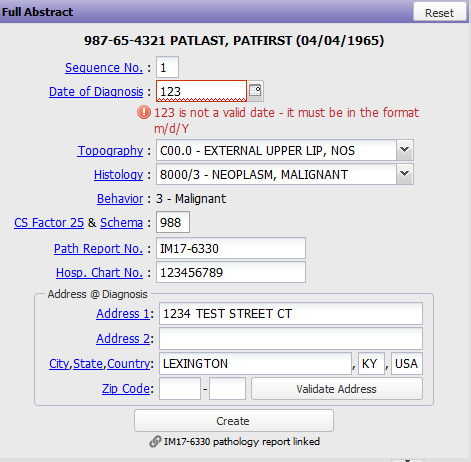
- Date of Diagnosis:
- Date of Diagnosis is a date field populated in the format of a "mm/dd/YYYY" (i.e. two digit month, two digit, daty and four digit year separated by forward slashes, "/")
- A user can click the calendar icon on the right side of the field to select a date from a drop down calendar.

- Topography
- Topography is drop down field that can be searched over by Code or Description.
- The image belows shows the drop down field when searching over the term "LIP"

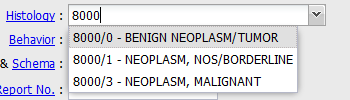
- Histology
- Histology is similar to the Topography field where you can search over option by Code or Description
- The Histology field also has the user select the value of behavior. In the example below, the user change choose between the behavior codes of "0", "1", and "3"
- Behavior
- Behavior is display field that will be populated when a user selects a histology value
- The example below shows the value displayed when the histology selected was NEOPLASM, MALIGNANT

- CS Factor
- CS Factor 25 is a 3 digit field that will sometimes be autopopulated based on the Date of Diagnosis, Topography, Histology, and Behavior selected prior to it like in the example below:

- Other times, a user must be provide the CS Factor 25 code like in the example below

- CS Factor 25 is a 3 digit field that will sometimes be autopopulated based on the Date of Diagnosis, Topography, Histology, and Behavior selected prior to it like in the example below:
- CS Schema
- CS Schema is a displayed field that will be populated based on the Date of Diagnosis, Topography Histology, Behavior, and CS Factor 25 value entered prior. The image below shows an example when all items need to be populated to obtain the CS Schema

- There will be times when it takes a little time to look up the CS Schema, and the display field will show the value below

- CS Schema is a displayed field that will be populated based on the Date of Diagnosis, Topography Histology, Behavior, and CS Factor 25 value entered prior. The image below shows an example when all items need to be populated to obtain the CS Schema
- Path Report No.
Path Report No is a textfield for Pathology Report Id
If a value is populated in the "Path Report No." field, it does not mean that path is "linked" to the case. Please use the "Copy & Link Path Data" Button to link the pathology report to the case.
- Hosp. Chart No.
- Hosp Chart No is a text field for the Medical Record Number of the patient.
- Address at Diagnosis Fields - Fields can be autopopulated by using the "Validate Address" window
- Address 1 - Text Field 40 character limit
- Address 2 - Text Field 40 character limit
- City - Text Field 20 character limit
- State - Text Field/Drop down 2 character field - user can type in field and select from a drop down field.
- Country - Text Field/Drop down 3 character field - Country can be auto-populated if provided with a US state. Country is similar to the State field where you can type in the field and a drop down field will show the options you can select from.
- Zip Code - 5 digit field
- Zip Code Ext - 4 digit field
- Path Linked - Icon and Display field showing if a pathology report has been linked to this case.
The Case Other Data Panel Fields:
- Sequence No.
- Sequence No. is a number only field that is automatically populated with the next sequential number based on the patient's amount of cases. (i.e. if a patient has 0 cases so far, the Sequence Number will be 1. If the patient has 2 cases, the Sequence number will be 3)
- Only 1 to 2 digit long numbers are allowed in this field.
- Year of Diagnosis:
- Year of Diagnosis is a 4 digit field for a Year
- Site Code:
- Site code is a drop down field that can be searched over Code or Description
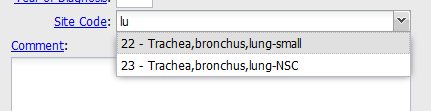
- Site code is a drop down field that can be searched over Code or Description
- Comment
- Comment is a 255 character long text area.
The Create Button:
Once the user reviews the data in either "Full Abstract" or "Case Other" Data Panel, they can hit the "Create" button denoted in green in both images below to create the Full Abstract or Case Other respectively.


Create Full Abstract:
Hitting the create button on the "Full Abstract" panel will direct the user to the "Case Data Edit" screen below. The data that had been entered in the "Full Abstract" Panel will be populated in the "Case Data Edit" tab panel. The abstractor can continue entering other necessary information for the case.

The "Personal" and "Collab Stg" tabs have multple fields populated from the Pathology Report as well.


Create Case Other Data:
Hitting the create button on the "Case Other Data" panel will direct the user to the "Data Entry Status" screen below. There is no other information necessary to populate a Case Other, so there are no other fields for the abstractor to fill.

Sample Errors:
As with all software, errors can occur; some intended, some not. This new feature does its best to display the necessary information to the abstractor when an error occurs.
Here are some examples a user may encoutner:
Invalid value in field:
- If a field has an error related to it, it will display an error description in red text underneath.
- A window will pop up displaying all missing or incorrect field information when you hit the create button.

Pop up window error:
In the example below the user's session has expired. This would only occur if the user sat at this screen for over a half hour without progressing.

Additional Features:
Field Links:
Each field has a link beside it which will direct the user via a new browser window to the Kentucky Cancer Registry's Registrar Manual to the respective field's page.


Customizable Interface Options:
Create Case from Pathology Report has the same customizable options as Create Patient. Please visit Create Patient Customizable Options for more details.
Overview
Content Tools
Activity