The reports function of CPDMS.net provides lists and tables useful to the registrar in performing routine functions, such as abstracting charts, following patients over time, reporting cancer data to hospital staff and others, and performing quality checks on the data. Please note that incomplete records are NOT included in Reports. From the Reports section of the Main Menu, any of the following may be produced:
- Registry Reports
- An accession log for any accession year
- A master patient list
- A patient abstract, which shows the codes entered for each field and the corresponding translations (where applicable)
- Patient mailing labels
- A list of records which have been key changed or deleted
- Deleted patient accession numbers
2. Follow-up Reports
- A summary report, which is a count of cases by accession year whose last follow-up contact is not within a specified time frame (i.e., 12 months)
- A control list, with the names of all patients whose last follow-up contact is not within the specified time frame (i.e., 12 months)
- Mailing labels to the follow-up contact person designated for each patient on the control list
- The ACoS follow-up report, with the percentage of analytic cases considered current by ACoS standards (last follow-up contact within 15 months)
- The SEER follow-up report, with the percentage of analytic cases considered current by SEER standards for each age group and a list of all patients who need more current follow-up
3. Case Counts
- An annual summary listing the total number of cases by site group, by sex, and by stage of disease at diagnosis
- The SEER summary report, which lists the total number of cases diagnosed in a given time interval by SEER site group, and is further broken down by sex and summary stage
- A frequency distribution, listing total number of cases by site, in order of the most frequently seen types of cancer to those least frequently seen
- An incidence report, which shows, by site group, the number of new cases diagnosed in a given accession year, as well as the number of deaths due to each type of cancer occurring for those patients accessioned during that given year
- Counts by year, showing the number of cases diagnosed for each site group for each year in a specified range
4. Quality Assurance (Q/A) Reports
- The accession number check finds any missing accession numbers between one and the highest number stored for any given accession year
- A case reporting timeliness calculation
- Counts for each facility in a multi-facility database over a specified five year period
- CoC edits report list to check cases for CoC edits that need to be made
5. Outcomes
- Cancer Program Practice Profile (CP3R) reports allow facilities to assess their compliance with national standards of treatment recommendations for bladder, breast, cervix, colon, endometrium, gastric, kidney, lung, melanoma, ovarian, and rectal cancer
6. Support Files
- A physician directory is available numerically by identification number or NPI number, or alphabetically by name
- A topography listing is available for all of the ICD-O topography codes by Edition and then in code number order, OR alphabetically by the English description of the topographic site
- A histology listing is available for all of the ICD-O histology codes by Edition and then in code number order, OR alphabetically by the English description of the histology
- ICD-9-CM and ICD-10 codes may be listed numerically by code number or alphabetically by the English description of the code number's meaning
- An institution list includes all Kentucky healthcare facilities, in order numerically by the code number assigned to each or by NPI number, or alphabetically by the name of the institution
To select a specific report from the Main Menu, move the cursor to "Reports" and the submenu will appear:
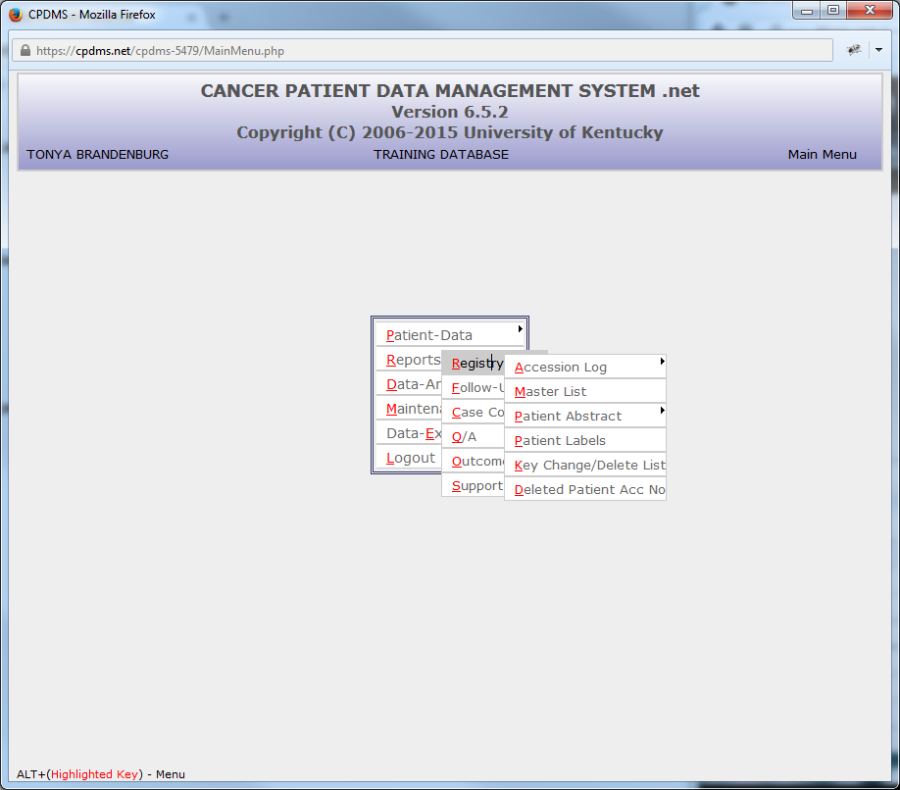
1.Registry Reports
To create a registry report, highlight Registry and then click on the desired type of report within the Registry subcategories.
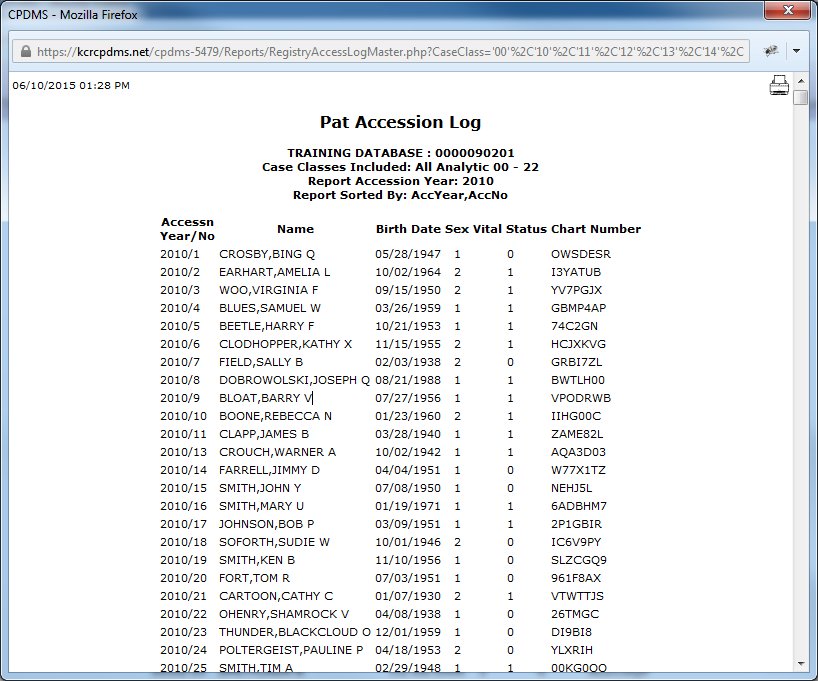
a. Accession Log
To create this report, highlight "Accession Log" and another submenu appears. The two options indicate what type of headings may appear on an accession log—either Patient Data items or Case Data items.
The Patient Data option includes the headings: Accession Year/Number, Name, Birth Date, Sex, Vital Status, and Chart Number.
The Case Data option includes: Accession Year/Number, Name, Sequence Number, Date of Diagnosis, Class of Case, and Site Group.
Select the desired headings (Patient or Case) and the following screen appears:
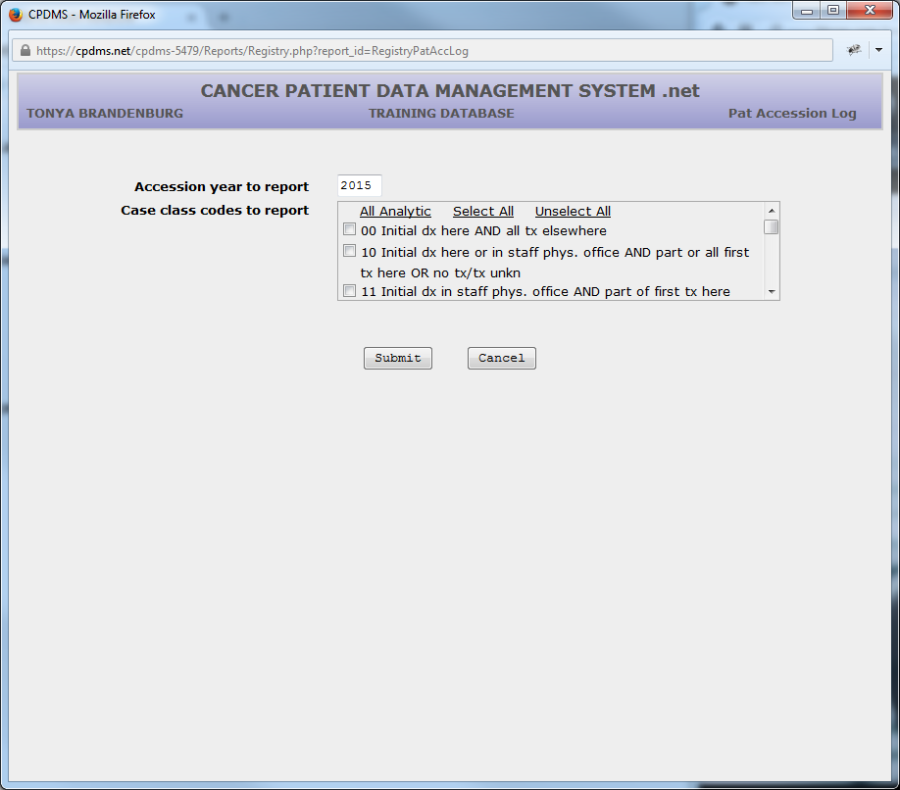
Accession year to report defaults to the current year. This field may be overwritten with a different year, or press ENTER to accept the default value and go on to the next field.
Up to five case class codes may be included in the report. Each of the five fields has a Choice List that may be accessed using F4. If all classes are to be included, all five fields may be left blank by pressing ENTER through them.
Users of multi-facility institutions will have the option to choose which facility's records to include in the report. See Appendix B for instructions.
An example of a Patient Accession Log with Patient Data is shown below:
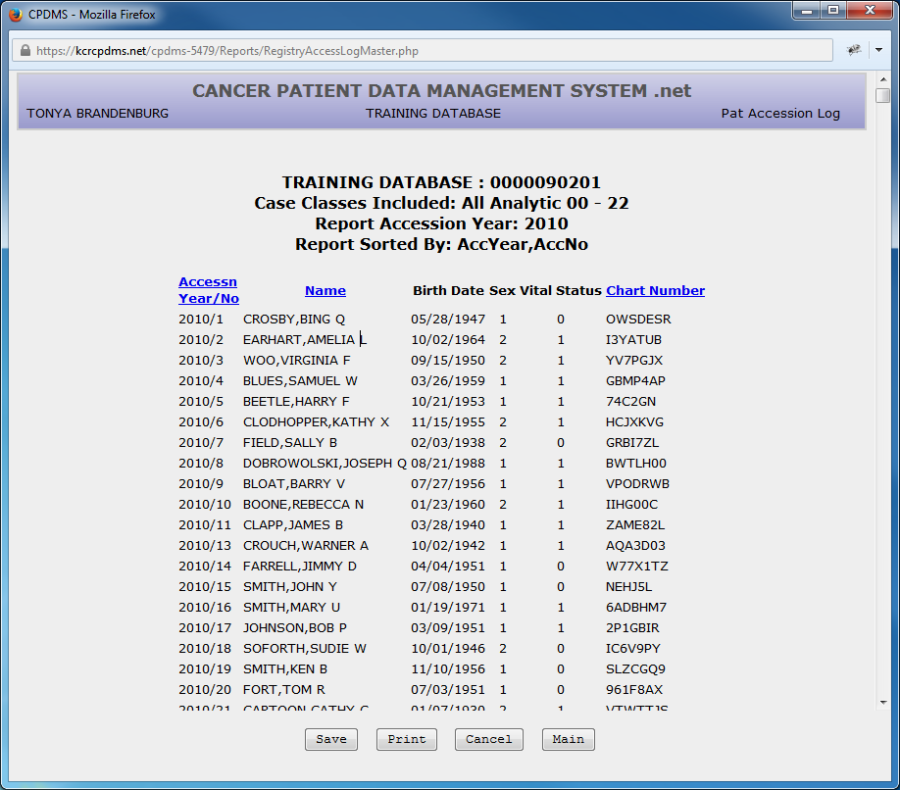
The Accession Log may be ordered by Accession Year/Number (the default setting), Patient Name, or Chart Number (fields that can be used to sort are indicated by blue text in the column heading). The sorting criteria may be changed by clicking on the desired field. Clicking once sorts a field in ascending order, while clicking a second time sorts it in descending order. In the above example, the patient log is sorted in ascending order by Accession Year. Clicking on Name will cause the list to re-load and be displayed sorted in ascending order by last name. Clicking again on Name re-orders the list in descending order by last name.
From any report results screen, four options are available—"Save," "Print," "Cancel," and "Main." In order to change the parameters and run the report again, use the "Cancel" button to return to the report criteria screen. Select the "Main" button to return to the Main Menu.
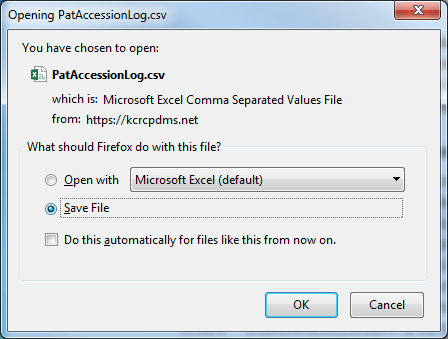
"Save" will download the report to the user's computer or network drive. Word processing or spreadsheet programs may then be utilized to manipulate, save, or print the report. When the "Save" button is selected, a dialog box opens which allows selection of the file format (see below).
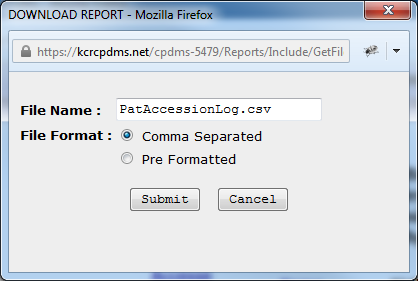
The file may be saved as either a comma separated file or a pre-formatted file. Comma separated files are useful for working with spreadsheet applications such as Excel. Pre- formatted files can be opened with word processing applications such as Word. The file will have a default name based upon the report title; however, this may be overwritten with another name. Once the format and name have been specified, click "Submit" to continue the download process or "Cancel" to escape and return to the report.
The File Download dialog box appears with the option to open or save the file. Always select "Save" rather than "Open."
Next the location in which the file will be saved is specified:
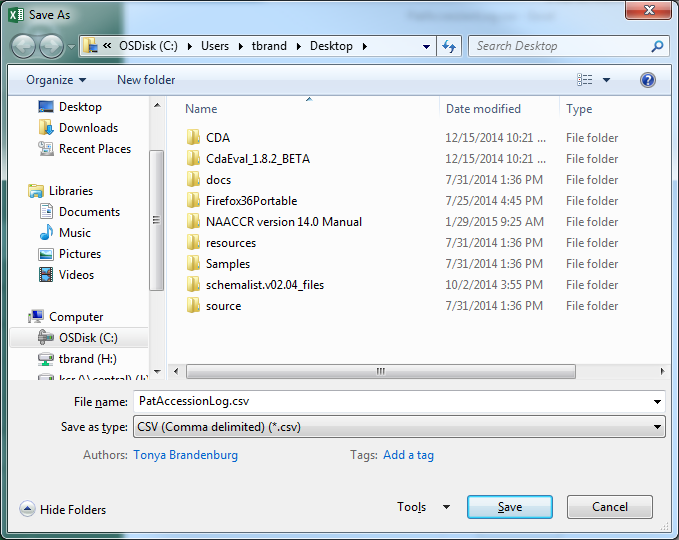
From the "Save in" drop down menu at the top of the box, a location on the local computer or hospital network may be selected. The filename may be edited if desired. Select "Save" to save the file. If the report is saved as a comma separated file (with the file extension .csv), the file may be opened using a spreadsheet application. If it is saved as a pre-formatted file (extension .rpt), use a word processing application to open the file. (Some versions of Word may require a file conversion method to be chosen; select the default Windows option.)
The final option for reports is "Print." When the "Print" button is selected, a printer- friendly version of the report opens in a new window. See below for an example.
Click on the printer icon in the upper right corner of the screen in order to print the report. A print dialog box opens and the printer, print settings, etc., may be specified. The print version of the report may be abandoned by closing the window.
These four options (Save, Print, Cancel, and Main) are the same for all reports, regardless of type.
b. Master Patient List
A Master Patient List may be produced through this option of the Registry reports menu. This report contains all patients in a particular accession year whose names fall within a specified range. The variables printed include name, SSN, accession year/number, diagnosis date, chart number, sequence number, sex, laterality, topography, birth date, date of last contact, and survival status.
To produce this report, select Master Patient List from the Registry Reports submenu and the following screen appears:
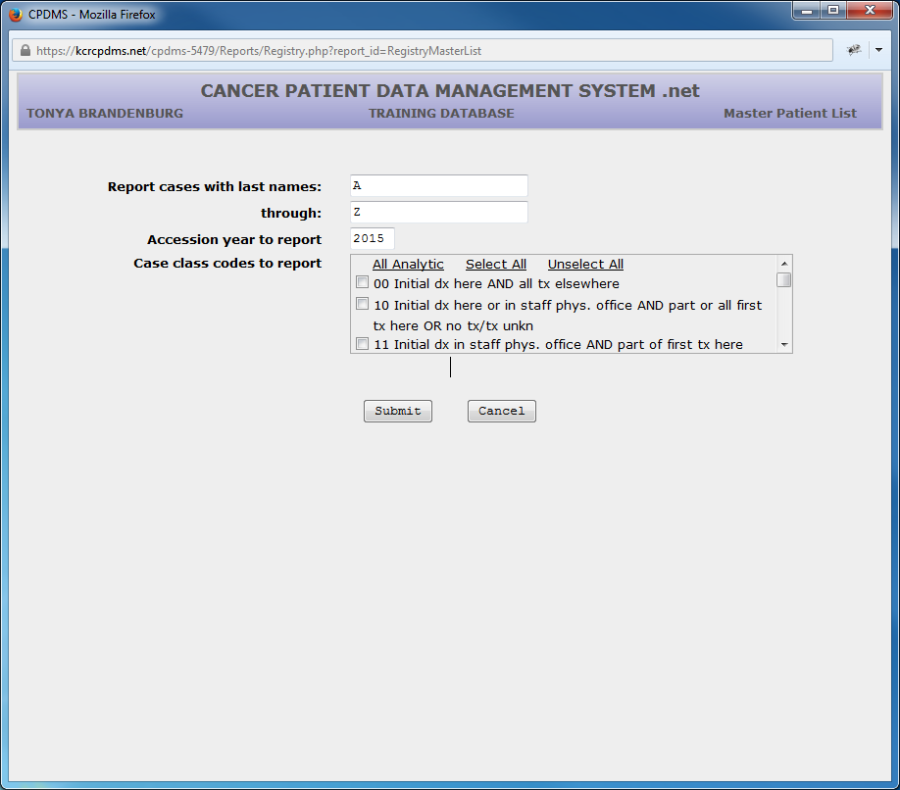
Enter the lowest last name (alphabetically) that is to be included in this report, or press ENTER to accept the default value "A." Then type in the highest last name (alphabetically) that is to be included, or press ENTER to accept the default value "Z." Press ENTER to advance the cursor to case accession year. This field defaults to the current year, but may be overwritten with a different year. Hit ENTER and move to Case Class Codes.
Specify up to five Class of Case codes to include in the master list. If all classes are to be included, press ENTER through all five fields to leave these fields blank.
Select "Submit" and the Master Patient List be will be generated. An example is shown below:
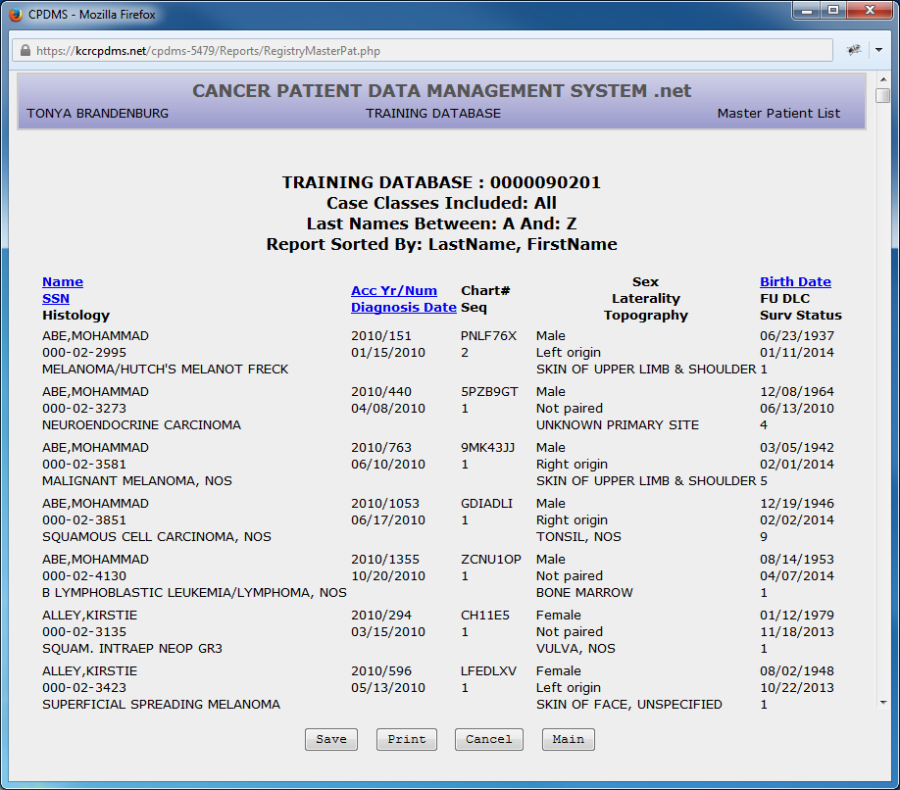
The default sorting criteria is Accession Year and Number, but the list may also be sorted by Name, SSN, Diagnosis Date, or Birth Date. Simply click on any word that is highlighted in blue to sort according to that field.
c. Patient Abstract
This report provides a hard copy of the data values and corresponding translations (where applicable) that are stored in the computerized patient record. To produce a Patient Abstract report, select Patient Abstract from the Registry submenu. Patient Abstracts may be reported using one of two methods-- either by the date the abstracts were first entered into the computer, or by patient social security numbers. If Date Entered is selected, the following screen is displayed:
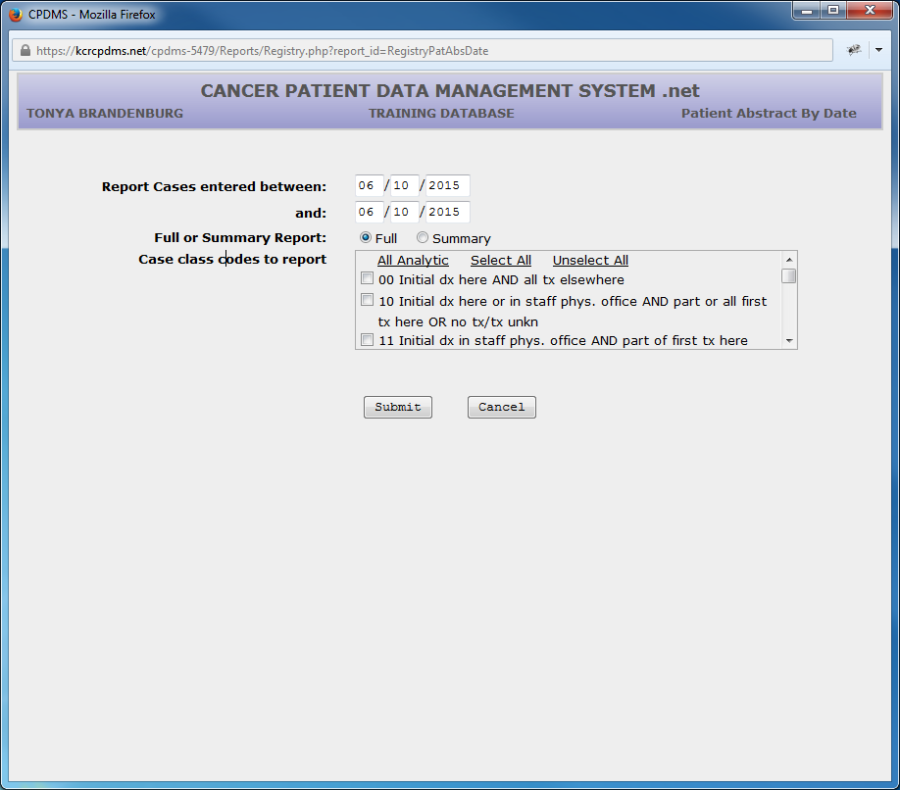
Enter the beginning date for data entry of patients for whom abstract reports are to be generated. This field defaults to the current date. This date may be overwritten with any valid date prior to the default date. Press ENTER to move the cursor to the next line.
Now enter the last date for data entry of patients for whom abstracts are to be generated.
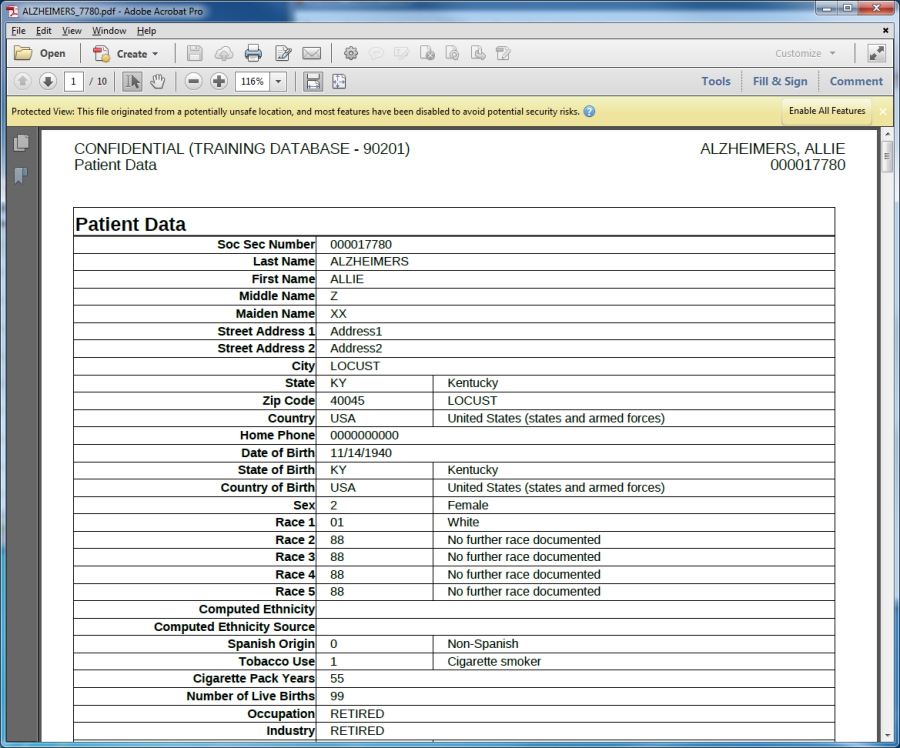
Next choose either a full or summary report. A full report contains the actual data values stored in every field of the patient records being reported (i.e., a data dump). A summary report consists of an abbreviated version of the abstract, with many fields and text excluded.
Specify up to five Class of Case codes for the patients for whom abstracts will be generated. If all classes are to be included, press ENTER through all five fields to leave these fields blank.
Users of multi-facility institutions will have the option to choose which facility's records to include in the report. See Appendix B for instructions.
Press "Submit" and a list of all the patient abstracts that fit the search criteria will be displayed.
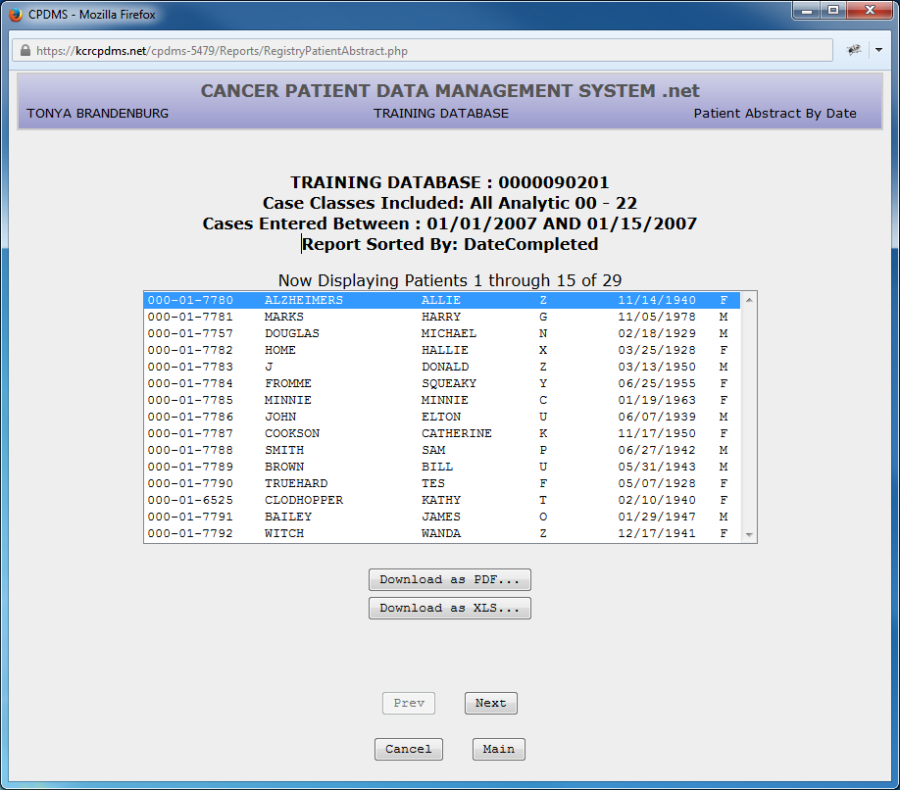
In order to print abstracts, highlight the first patient abstract to be printed and select either "Download as PDF..." or "Download as XLS…" A printable version of the abstract will then open in a separate window.
The next example demonstrates how to produce abstract reports for specific patients by entering their social security numbers. After selecting Patient Abstract from the Registry reports submenu, highlight and click on Social Security Number. The next screen to appear is shown below:
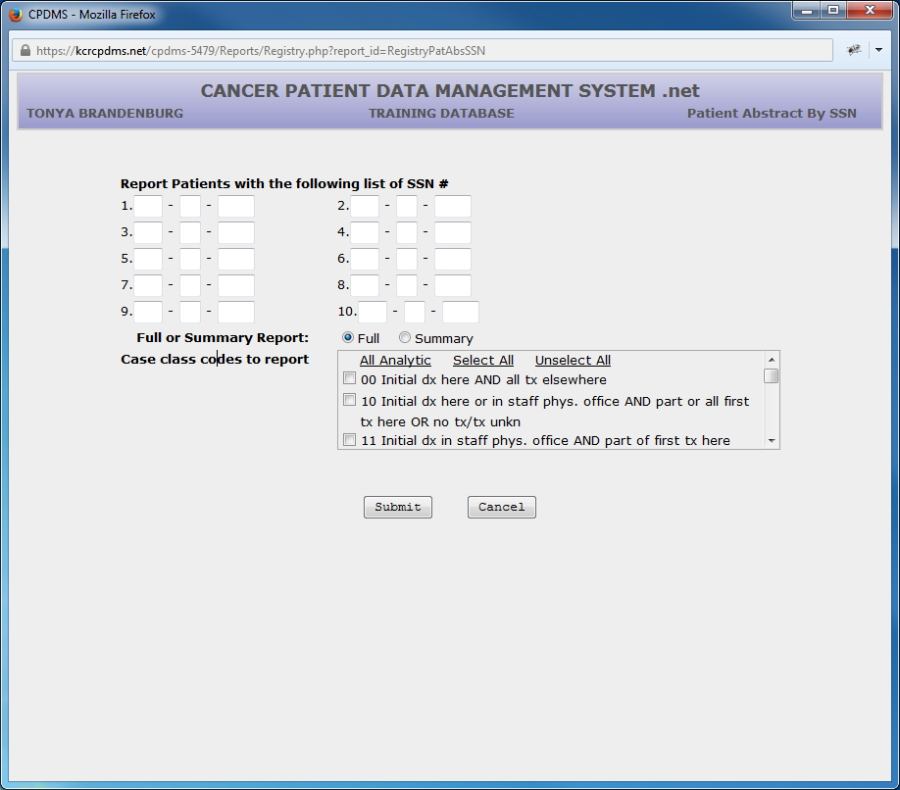
Enter the social security number of each of the patients for whom abstract reports are to be generated. Up to ten numbers may be entered.
Choose either a full or summary report. A full report contains the actual data values stored in every field of the patient records being reported (i.e., a data dump). A summary report consists of an abbreviated version of the abstract, with many fields and text excluded.
Specify up to five Class of Case codes. If all classes are to be included, press ENTER through all five fields to leave these fields blank.
Users of multi-facility institutions will have the option to choose which facility's records to include in the report. See Appendix B for instructions.
Select "Submit" and a list of the patients with the social security numbers that were specified will be displayed.
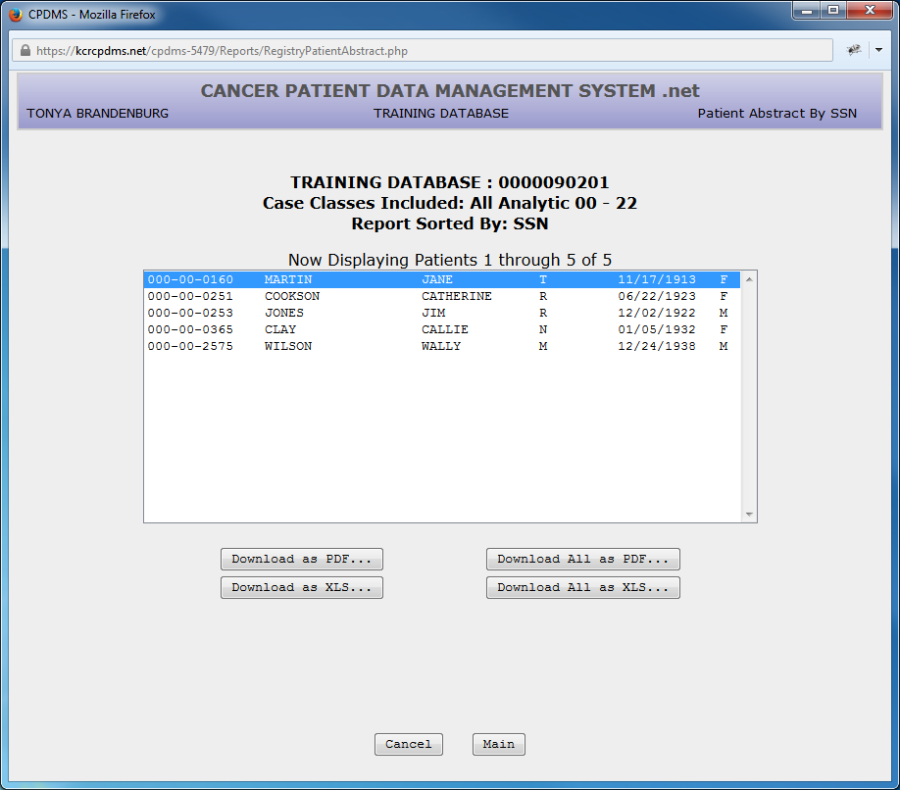
As with the list of Patient Abstracts by Date Entered, individual abstracts may be selected and viewed. Because there is a limit of only 10 patients in the Patient Abstract by SSN report, all the abstracts may be viewed (and thus printed) at once using the "Download All" button.
d. Patient Labels
This feature from the reports menu allows the creation of mailing labels to any group of living patients specified by site code or class of case. To initiate this report, select Patient Labels from the Registry submenu and the following screen is displayed:
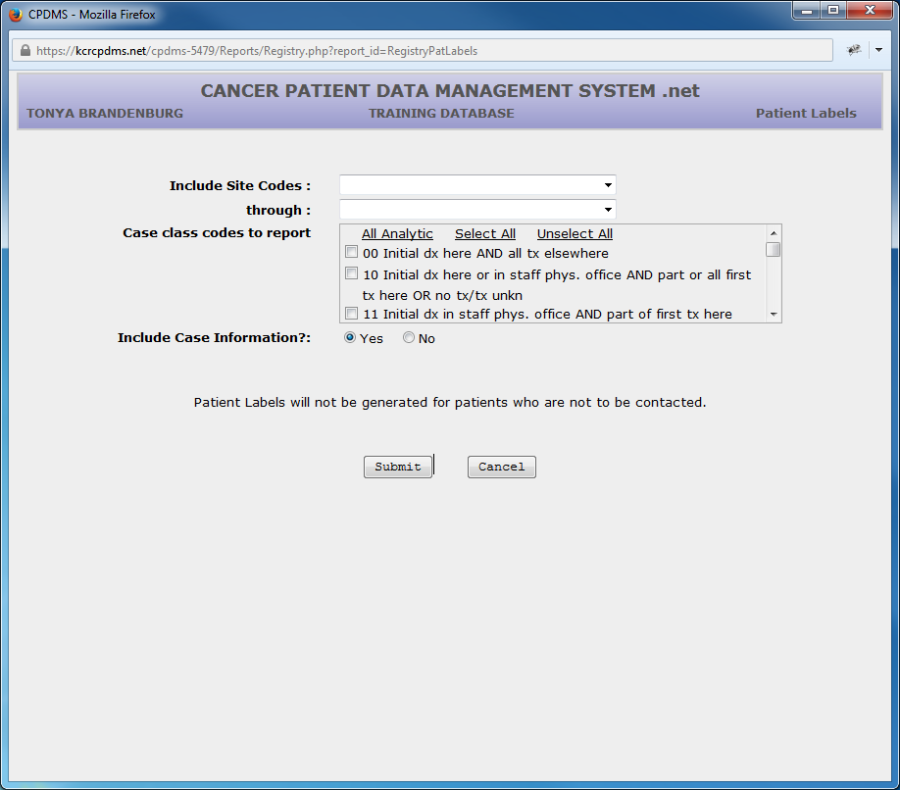
Enter the first and last site codes for the range of patients for whom mailing labels are to be generated (a Choice List is available using F2 or the drop down menu). For example, to generate mailing labels for all lung cancer cases in the database, the first code would be 22 and the last code 23.
Specify the Class of Case does for the patients for whom mailing labels will be generated. If all classes are to be included, these fields should be left blank.
If case information is included in the report, the patient's name, site group, date of diagnosis, accession number/year, sequence number, birth date, and date of last contact will appear to the right of each patient label.
This field defaults to "Yes." If "No" is selected, the report consists of two rows of patient labels per page with no case information.
Users of multi-facility institutions will have the option to choose which facility's records to include in the report. See Appendix B for instructions.
Click on "Submit" and the labels will be displayed. An example (with case information) is shown below:

Choose "Cancel" to return to the Patient Label criteria, "Main" to exit to the Main Menu, "Save" to save the report to a local computer or network drive, or "Print" for a hard copy.
Note: Due to the wide variety of printer and label types, many labels will not print with the proper alignment when using the "Print" function directly from CPDMS.net.
However, this issue may be resolved by saving the labels and printing them using Microsoft Word Mail Merge. See Appendix E for special instructions regarding label printing using this method.
e. Key Change/Delete List
This report lists all key changes and deletions which occurred during a specified time period. Users may choose to include only key changes, only deletions, or both.
To generate this report, select Key Change/Delete List from the Registry reports submenu. The screen below is displayed.
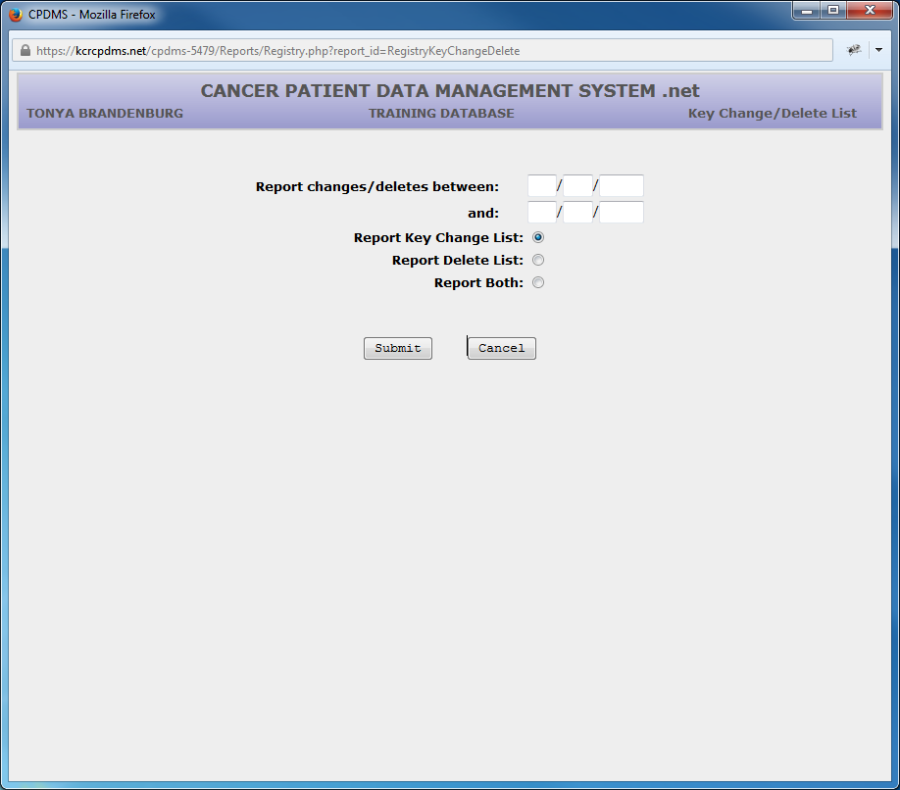
Specify a range of dates to be included in the report. Then choose whether to include key changes, deletions, or both. Click "Submit" to generate the report.
Below is an example of a key change/delete list.
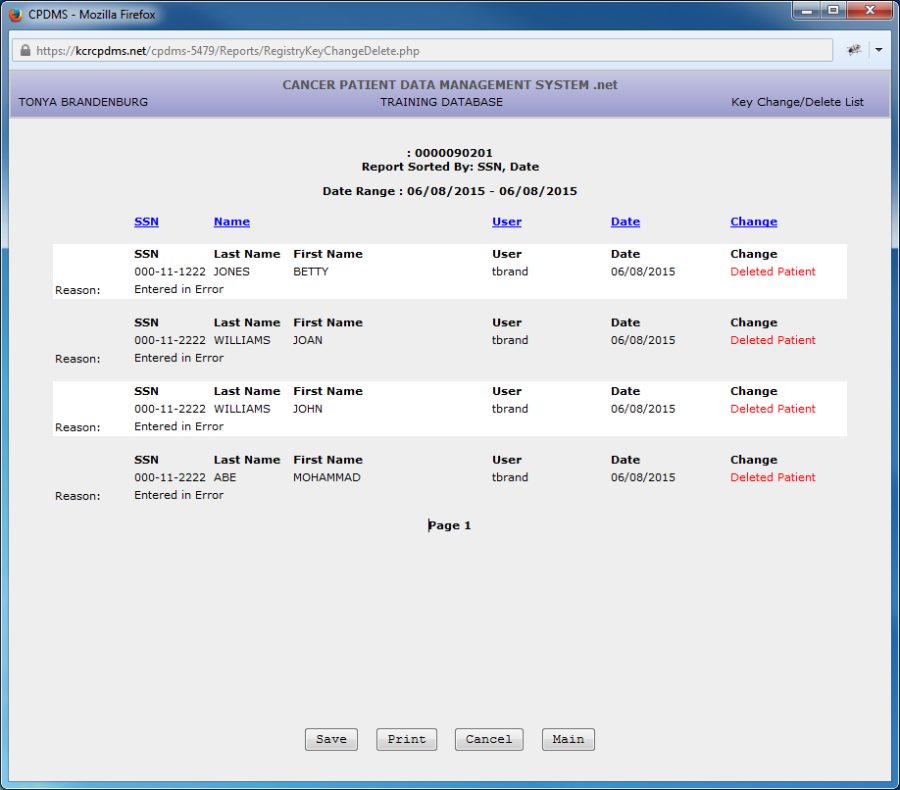
The list can be sorted by SSN (the default), Last Name, User, Date, or Choice (key change vs. delete) by clicking on the blue labels.
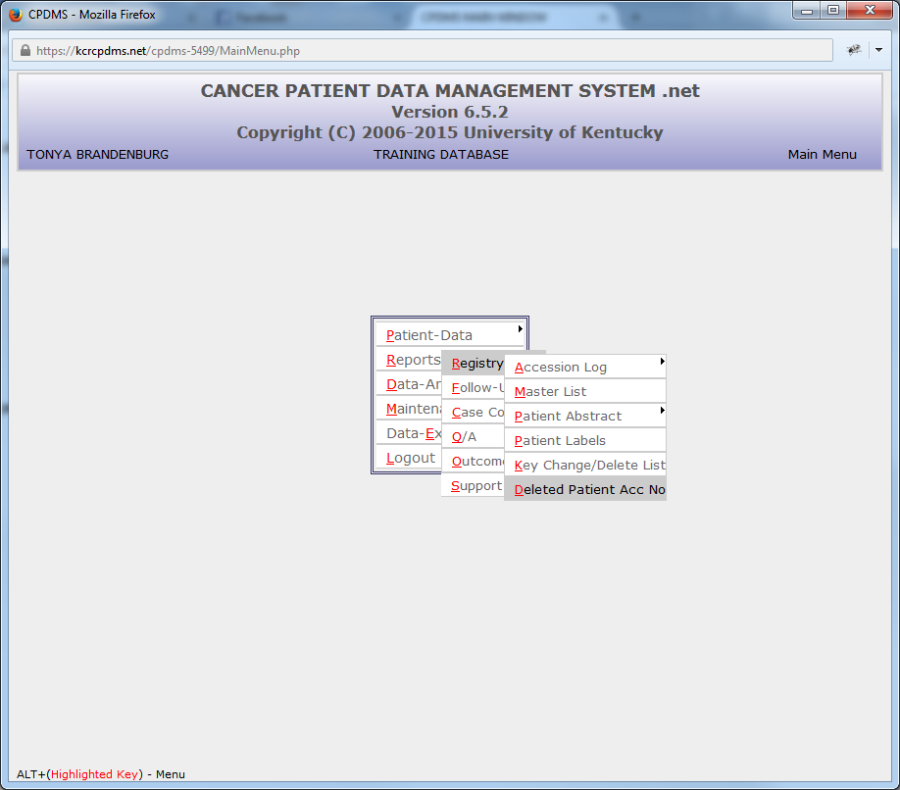
d. Deleted Patient Accession Numbers
This report is used for those facilities that report to NCDB and RQRS. If a patient is deleted and they come back wanting to know about a patient this report will show which patient accession number have been deleted.
Open the file with Excel or Save the file. 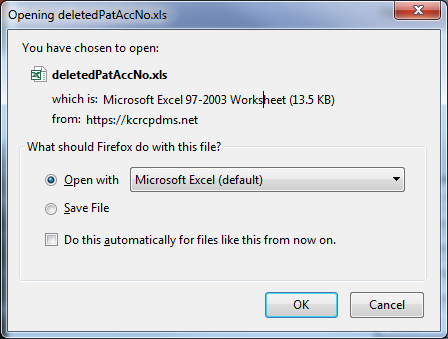
The output file will look like this:
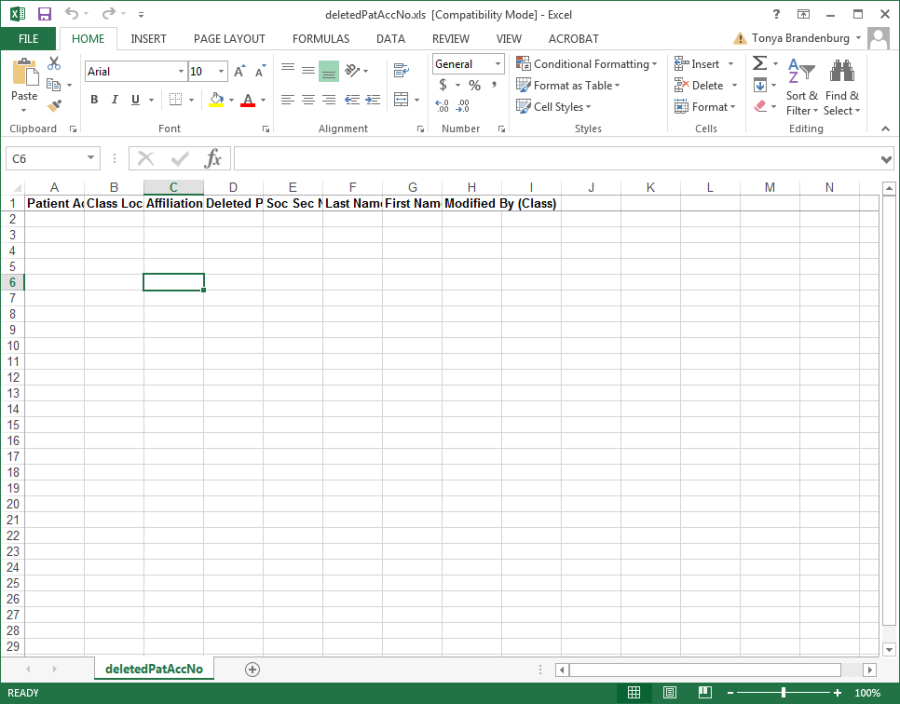
There aren't any deleted accession numbers in this database, but information would be plugged into the fields if there were.
2.Follow-up Reports
To create a follow-up report, select Follow-up from the Reports submenu and a list of available reports appears:
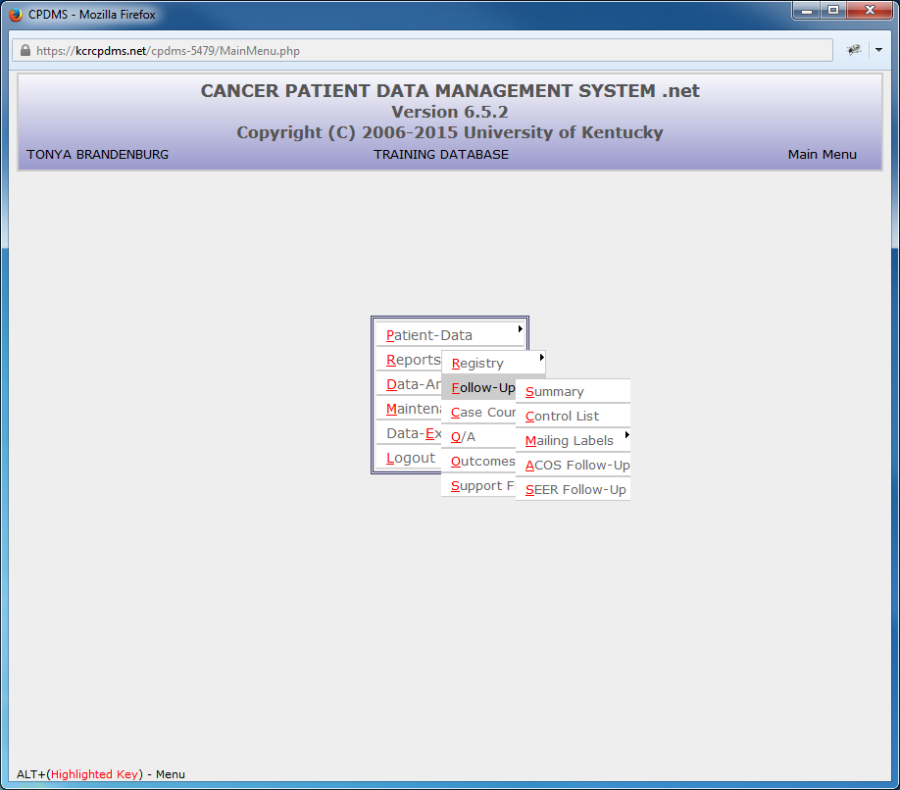
a. Summary Report
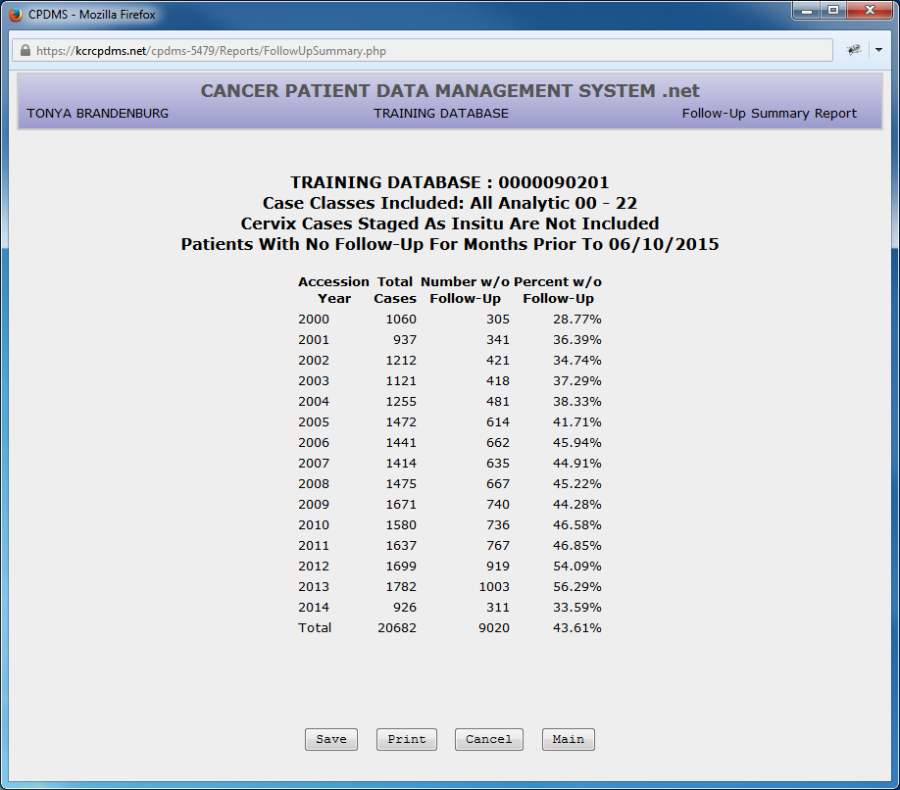
The Summary Report is a count of all cases by accession year which have not had a follow-up contact within a specified number of months from a specified reference date. To generate this report, select Summary and the following screen appears:
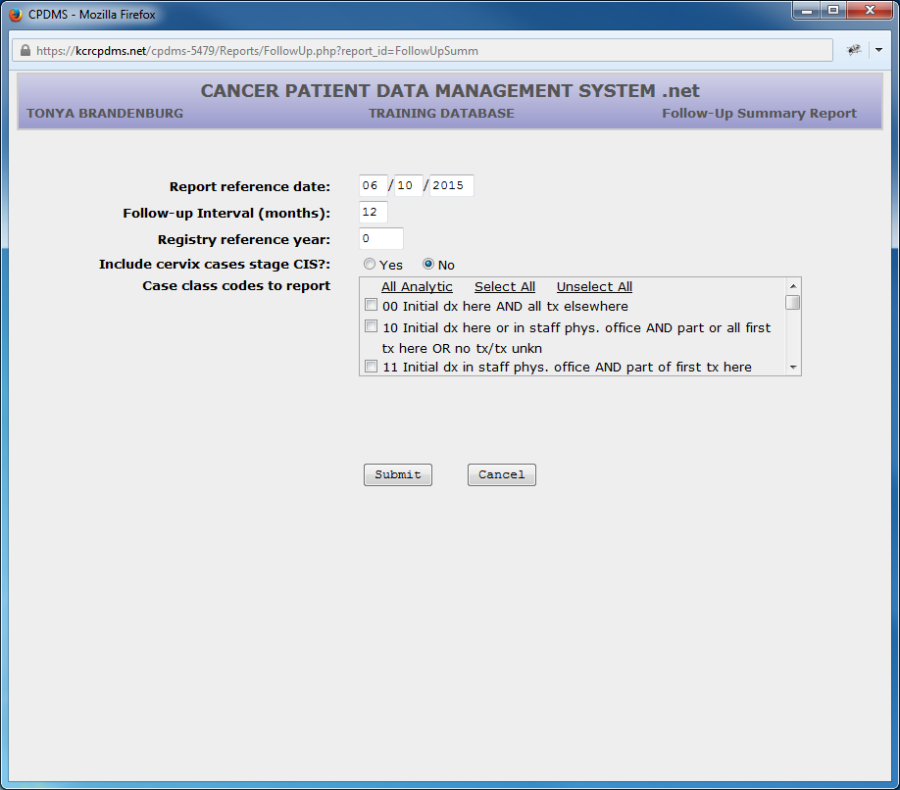
The Report Reference Date defaults to the current date. If this is the desired reference date, press ENTER to accept it and move to the next field. If not, type in a different date.
The Follow-up Interval defaults to a 12 month time frame. Press ENTER to accept that value, or type in a different interval.
The cursor next goes to Registry Reference Year. Enter the 4 digit year of the registry's reference date and ENTER. The cursor moves to Include Cervix Cases Stage CIS. The default is "No" because CIS of the cervix does not require follow-up. Choose "Yes" to include these cases.
Specify the Class of Case does for the patients for whom mailing labels will be generated. If all classes are to be included, leave these fields blank.
Users of multi-facility institutions will have the option to choose which facility's records to include in the report. See Appendix B for instructions.
Select the "Submit" button and the Follow-up Summary Report will be displayed:
b. Control List
The Control List contains the name, SSN, site group, follow-up methods, and other relevant information for all the patients whose last follow-up contact is not within a specified number of months from the specified reference date. It is used to identify which patients need a follow-up contact.
To create this report, select "Control List" from the Follow-up submenu and the following screen is displayed:
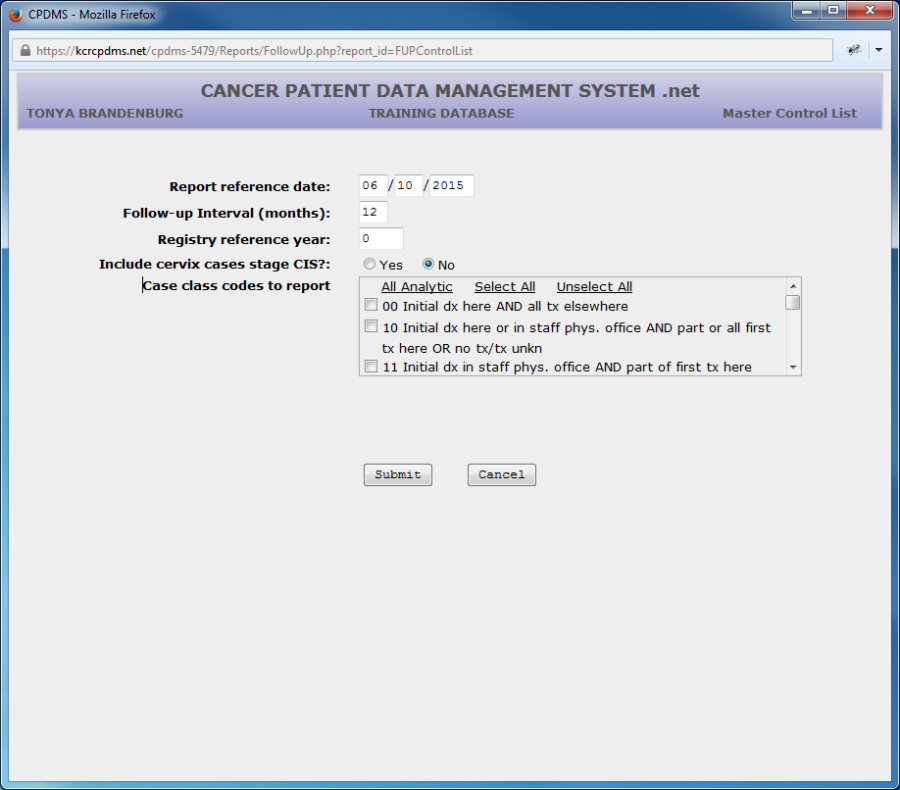
The Report Reference Date defaults to the current date. Press ENTER if this is the desired reference date, or enter another valid date. Follow-up Interval defaults to 12 months but may be written over with a different value. Proceed to Registry Reference year and type in the 4 digit year for the registry's reference date.
Once again, the default for Include Cervix Cases CIS is "No," but if desired, these cases may be included.
Specify the Class of Case codes for the patients for whom mailing labels will be generated. If all classes are to be included, these fields should be left blank.
Users of multi-facility institutions will have the option to choose which facility's records to include in the report. See Appendix B for instructions.
Choose "Submit" and the report will be displayed as seen in the example below:
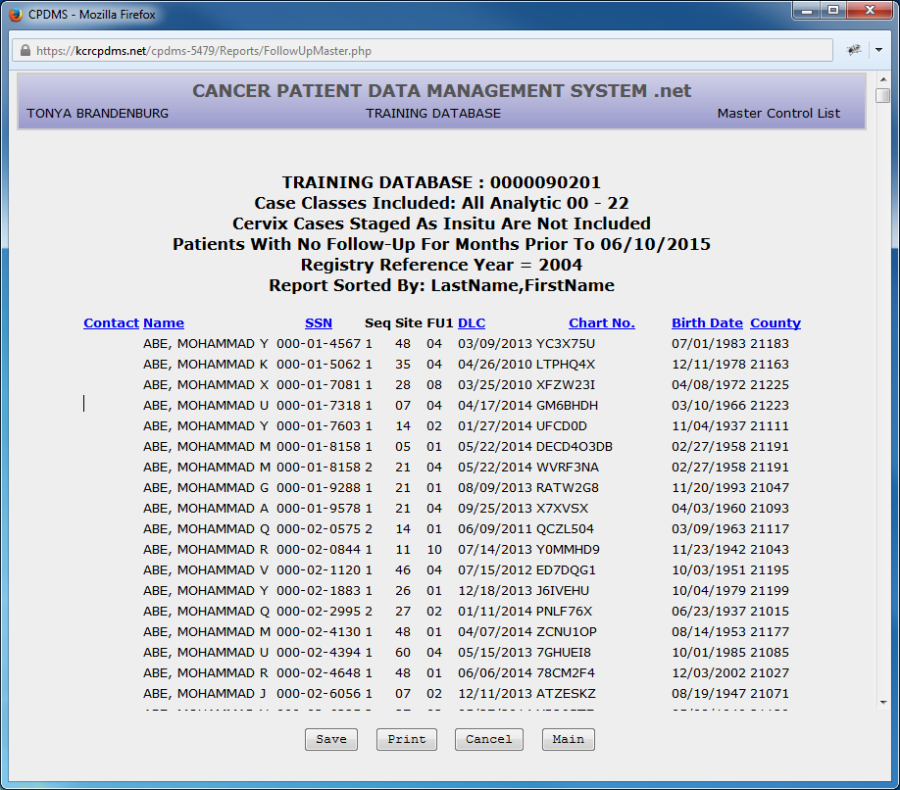
The report may be sorted by Name (the default sort order), SSN, Date of Last Contact, Chart Number, or Birth Date by clicking on the fields highlighted in blue.
c. Mailing Labels
Mailing labels may be produced for all patients not contacted within a specified time frame, or for any specified group of patients to be followed. The labels are directed to the follow-up contact person designated by either the Next Follow-up Method code or the Alternate Follow-up Method code.
To create the labels, highlight Mailing Labels from the Follow-up submenu. A further submenu appears with five options for the order in which labels are to be generated: Patient Name, Date of Last Contact, Chart Number, Accession Year/Number, or individually.
The first option produces labels alphabetically by the patient's last name. The second option orders the labels from the oldest date of last contact to the most recent. The third option creates labels ordered by medical record number, and the fourth option sorts by accession year and number.
Select a sort order and the next screen appears:
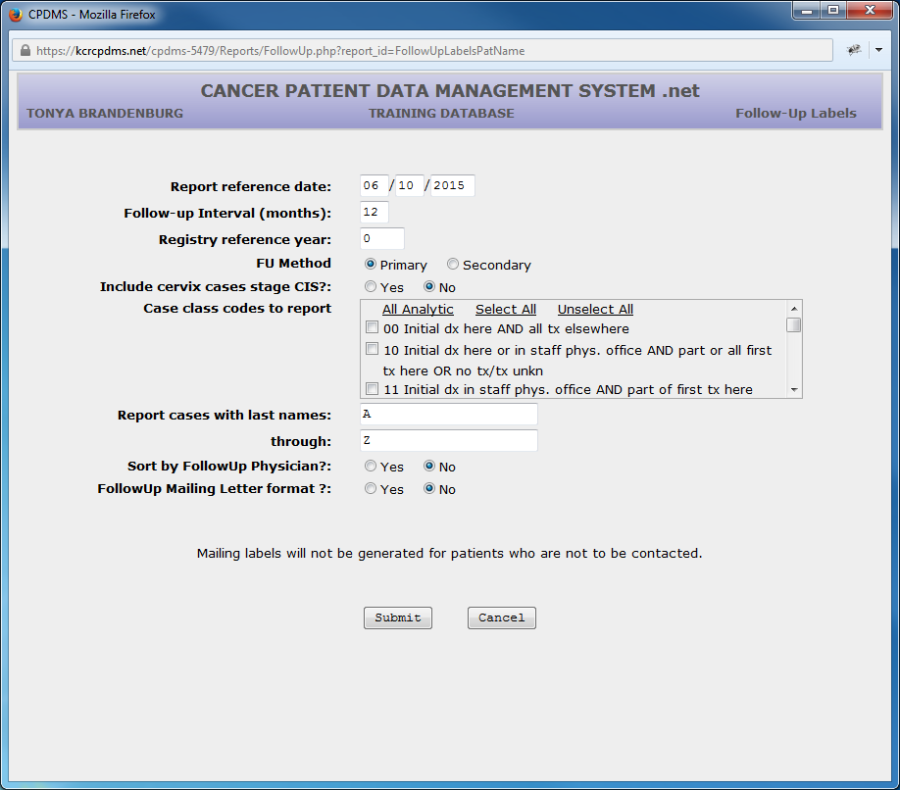
The Report Reference Date defaults to the current date. Press ENTER to use that date, or another date may be typed over the default. Follow-up Interval defaults to a 12 month time frame. This may be overwritten with a different time interval if desired. Next enter the 4 digit year of the registry's reference date.
At FU Method, indicate whether the primary (individual coded in Next Follow-Up Method) or secondary (individual coded in Alternate Follow-Up Method) contact is to be used when generating this batch of mailing labels.
Once again, the default for Include Cervix Cases CIS is "No," but these cases may be included if desired.
Specify the Class of Case does for the patients for whom mailing labels will be generated. If all classes are to be included, leave these fields blank.
Cases within a specified range of last names may be reported. The default range A through Z will report all patients.
For convenience in mailing, patients may be sorted by the primary following physician.
Selecting "FollowUp Mailing Letter format" generates form letters with each physician's name and address instead of labels. Refer to Appendix C for detailed instructions regarding printing follow-up letters.
Users of multi-facility institutions will have the option to choose which facility's records to include in the report. See Appendix B for instructions.
Click "Submit" and the mailing labels will be displayed:
Choose "Cancel" to return to the Patient Label criteria, "Main" to exit to the Main Menu, "Save" to save the report to a local computer or network drive, or "Print" for a hard copy.
Note: Due to the wide variety of printer and label types, many labels will not print with the proper alignment when using the "Print" function directly from CPDMS.net.
However, this issue may be resolved by saving the labels and printing them using Microsoft Word Mail Merge. See Appendix E for special instructions regarding label printing using this method.
To generate follow up labels for a specific group of patients, select "Individual" from the Mailing Labels submenu.
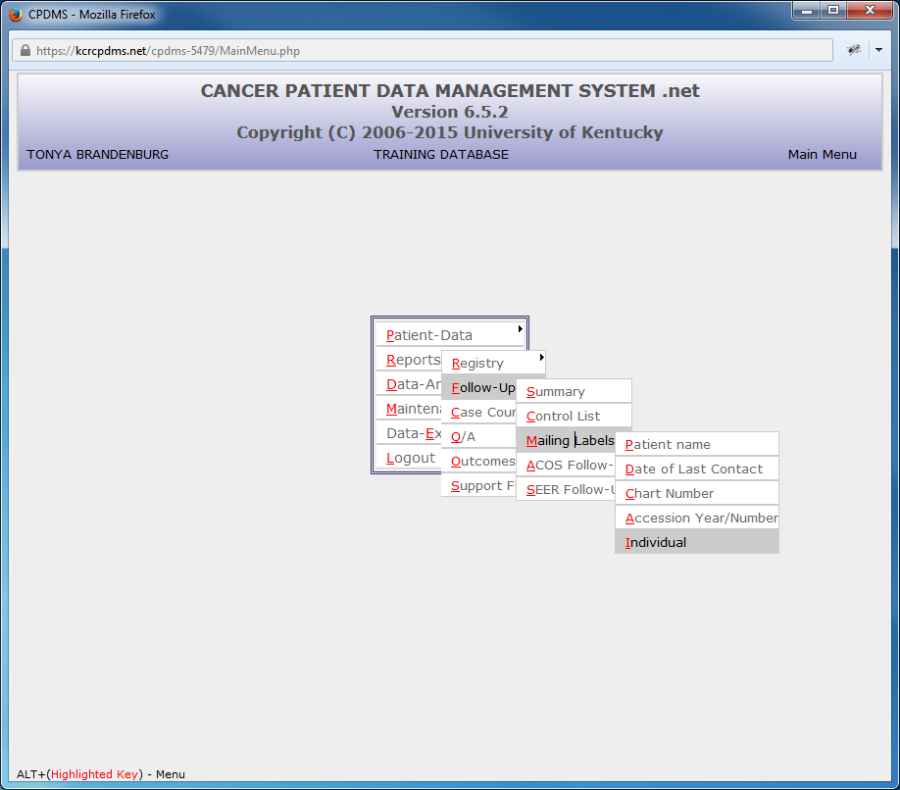
Up to ten social security numbers may be entered for specific patients' follow-up labels.
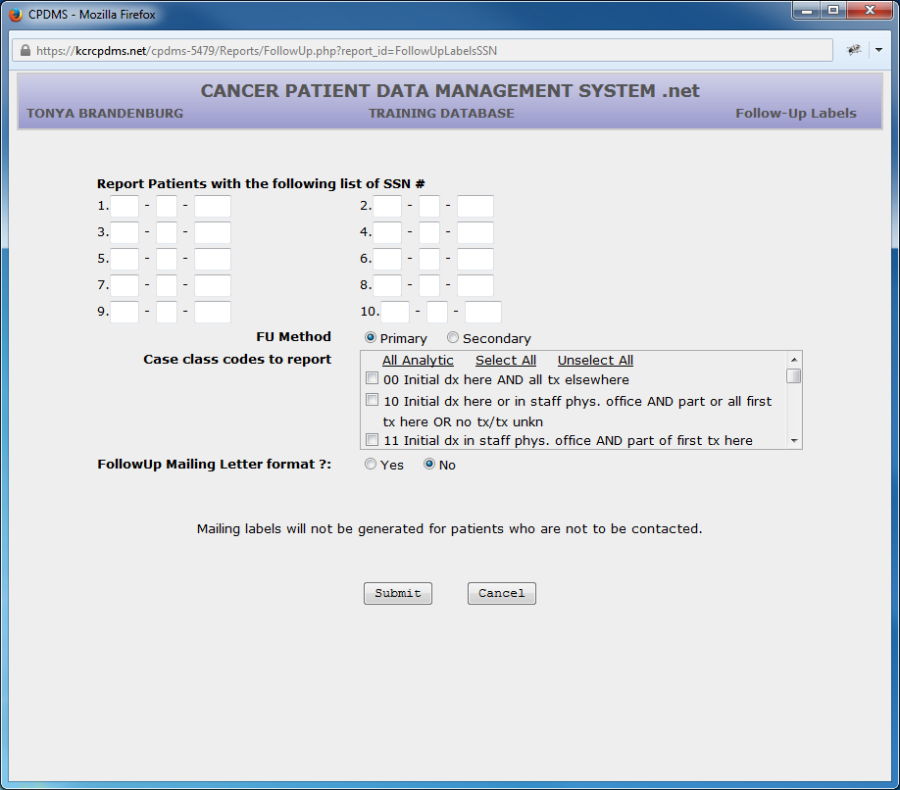
Enter the social security number of each patient for whom a follow-up label will be generated. Then press ENTER until the cursor moves to the next prompt.
Choose Primary to produce labels addressed to the person coded in the next follow-up method field, or Secondary for labels to the person coded in the alternate follow-up method.
Next specify the Class of Case. Leave these fields blank to include all classes.
Users of multi-facility institutions will have the option to choose which facility's records to include in the report. See Appendix B for instructions.
Selecting "FollowUp Mailing Letter format" generates form letters with each physician's name and address instead of labels. Refer to Appendix C for detailed instructions regarding printing follow-up letters.
Select "Submit" and the labels will be displayed as shown in the previous Follow-up Label example.
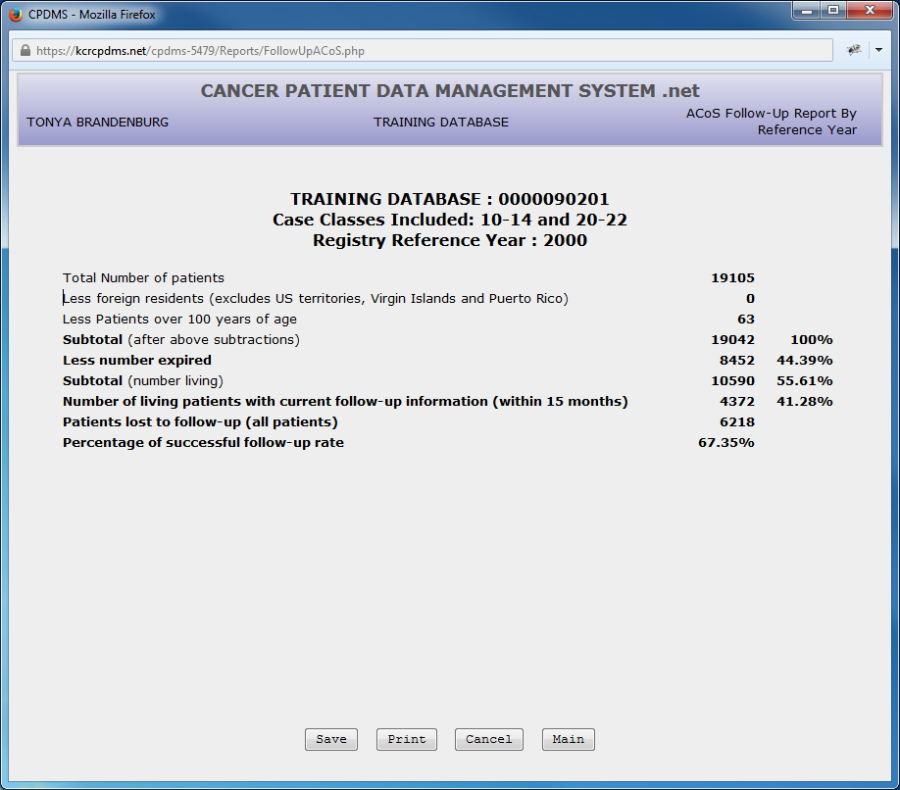
d. ACoS Follow-Up
This option will calculate the percentage of cases in the registry that are current according to ACoS standards for timely follow-up. ACoS requires that all reportable analytic cases (cases 0, 1, and 2), except cases of CIS of the cervix and residents of foreign countries, be followed annually. A case is considered delinquent (not current) when the last recorded contact is not within 15 months of the current date.
To create the ACoS Follow-up reports, select ACoS from the Follow-up submenu. The next screen appears:

Enter the four digit year of the registry's reference date, or leave the default '0' for a five year report. Users of multi-facility institutions will have the option to choose which facility's records to include in the report. See Appendix B for instructions.
Select "Submit" to generate the ACoS Follow-up report:
e. SEER Follow-Up
This follow-up report is chiefly for use by the central registry. It calculates the completeness of follow-up prior to a SEER data submission by using this calculation:
Assume that Y is the calendar year ending 22 months prior to the due date for a November 1st submission. The percentage of patients diagnosed during the years prior to Y who have current follow-up is defined as
P = 100(D + A)/T where is D is the number who died prior to January 1, Y + 1, A is the number with follow-up dates on or after January 1, Y + 1 (includes both dead and alive patients), and T is equal to A + D + the number of patients who were last known to be alive with follow-up dates prior to January 1, Y + 1.
In order to run this report, choose "Follow-up" from the Reports submenu, and then select "SEER Follow-up." The following screen will appear:
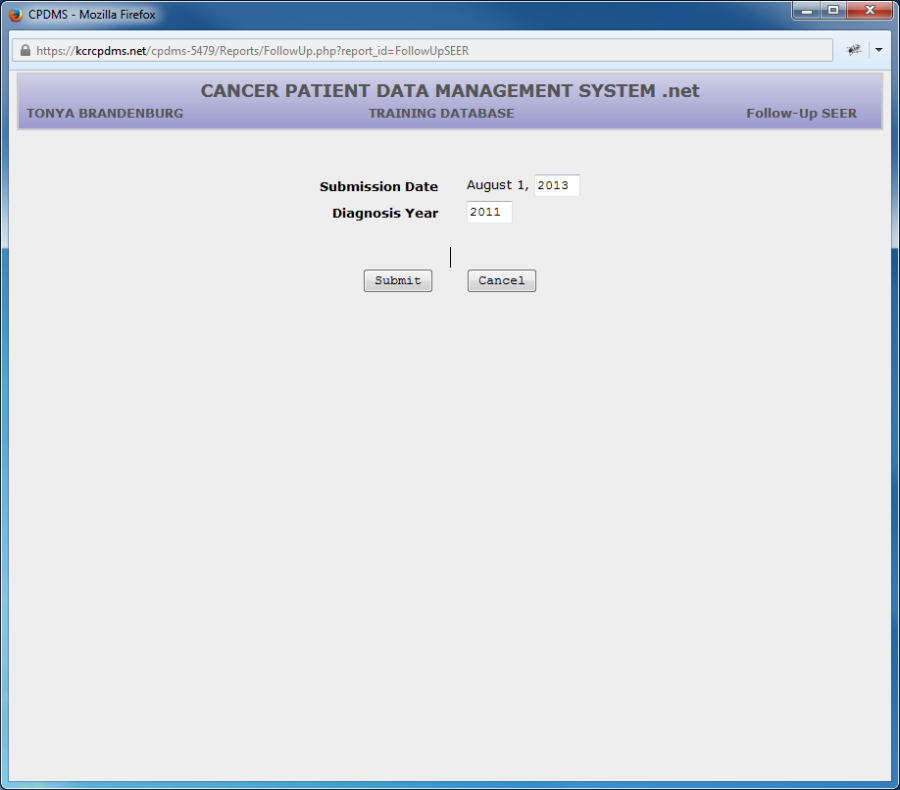
Enter the year of the submission date, and then enter the diagnosis year for which SEER Follow-up is to be calculated.
Select "Submit" and the results will be displayed.
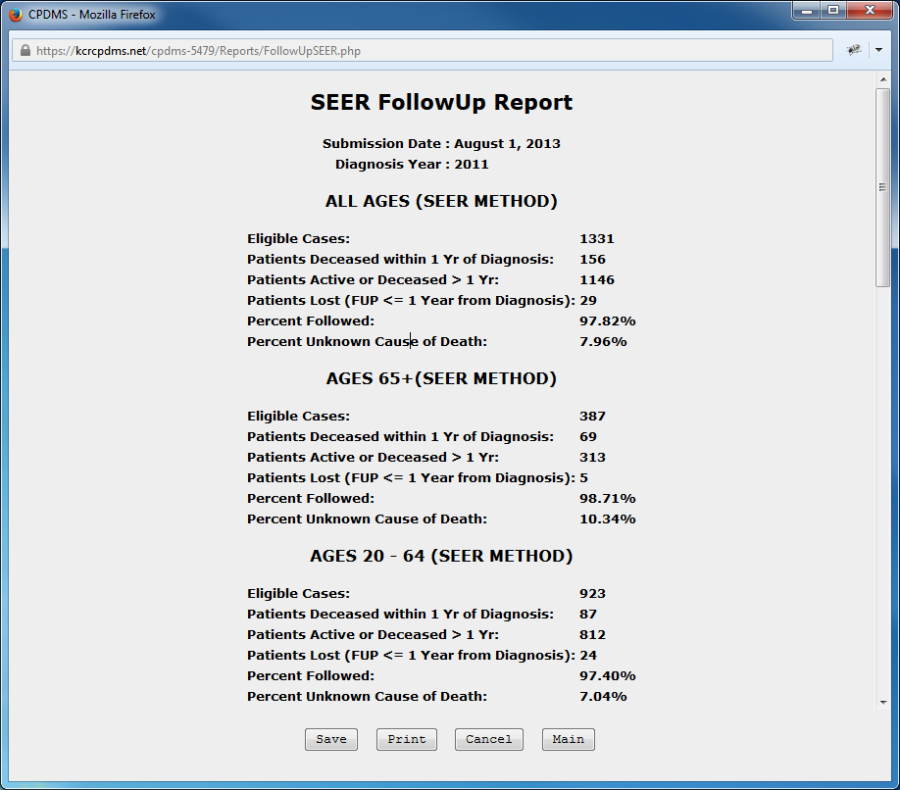
The report contains the SEER Follow-up percentages for all patients, as well as broken down within age ranges. In addition, the report lists all patients (with fields SSN, Last and First Name, Birth Date, Sequence Number, Site Group, Hospital, Class of Case, Follow-up Date, and County) whose follow-up does not meet SEER standards.
3. Case Counts
To obtain various counts of cases, by accession year and by site of cancer, select Case Counts from the Reports submenu and the following list appears: 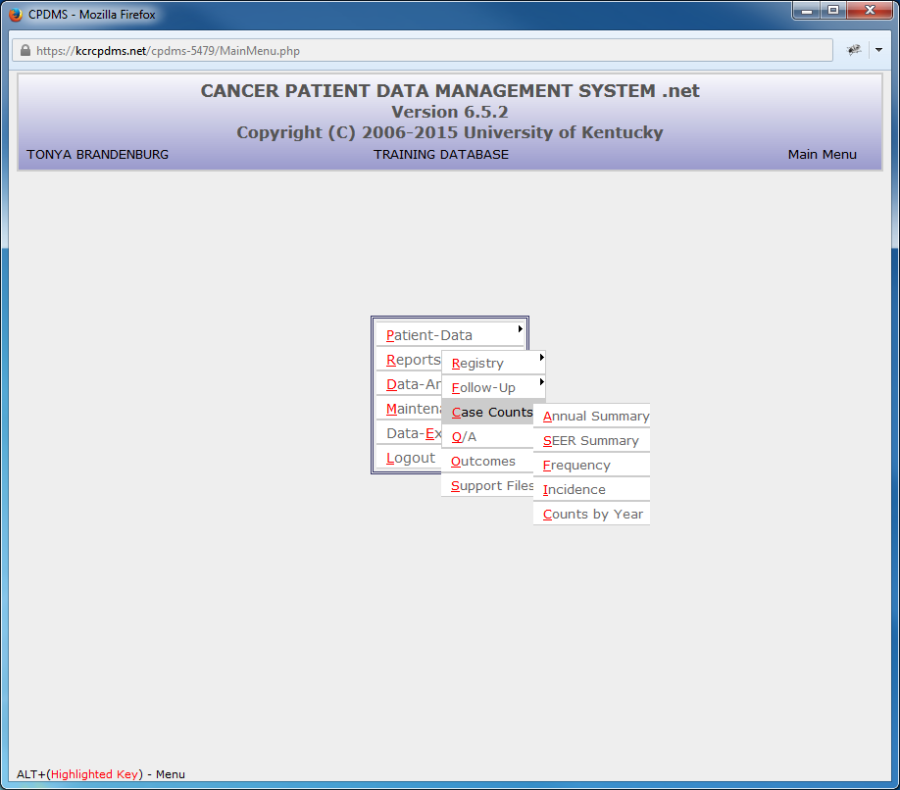
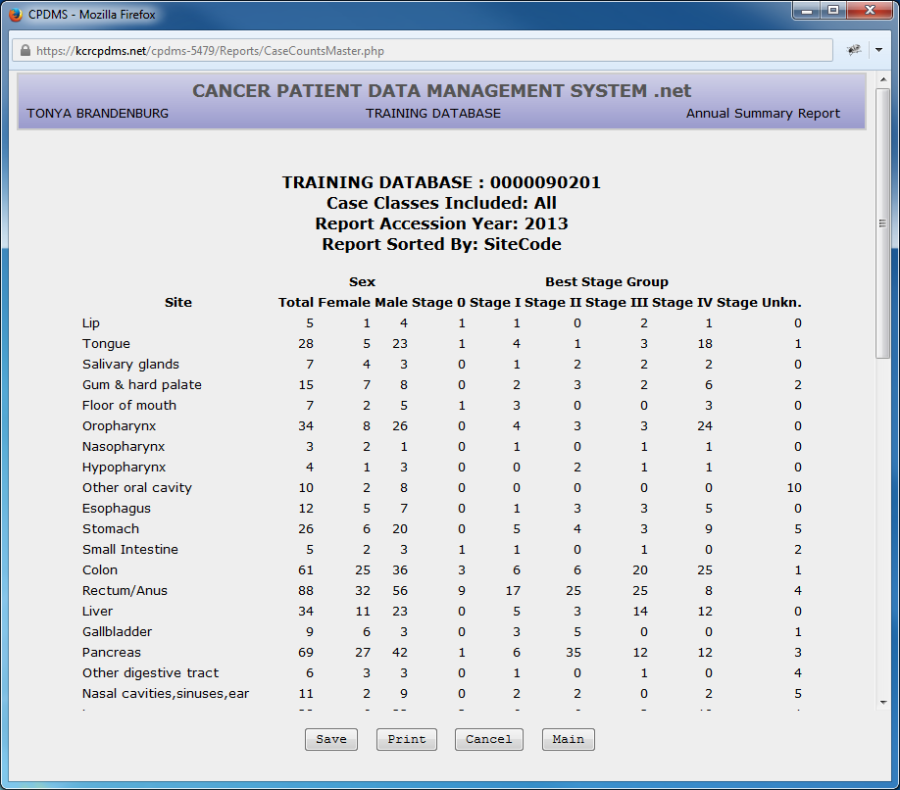
a. Annual Summary
The Annual Summary report lists the total number of cases diagnosed for each site group in a given accession year. It also shows the number of cases by sex and by stage of disease at diagnosis for each site group.
This report is frequently used in the annual report of the tumor registry for a hospital's cancer program.
To create this report, select Annual Summary and the following screen appears:
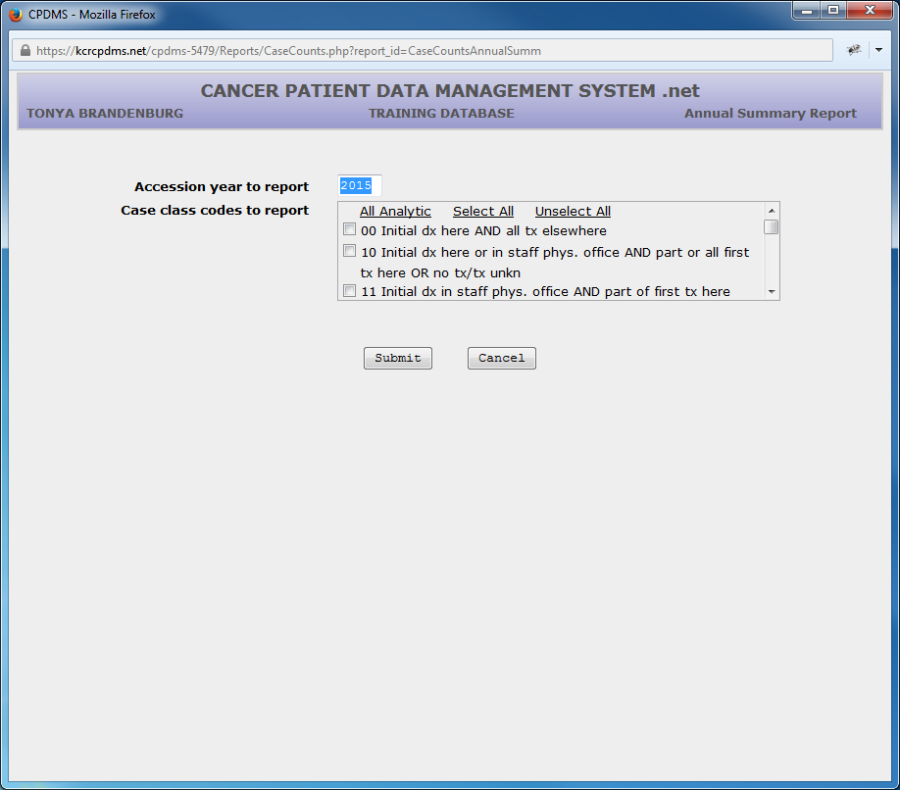
Accession Year to Report defaults to the current year. However, this field may be overwritten with any valid year.
Next choose the Class of Case codes to report, or leave all five fields blank to include all classes.
Users of multi-facility institutions will have the option to choose which facility's records to include in the report. See Appendix B for instructions.
Select "Submit" and the report will be displayed, as shown below:
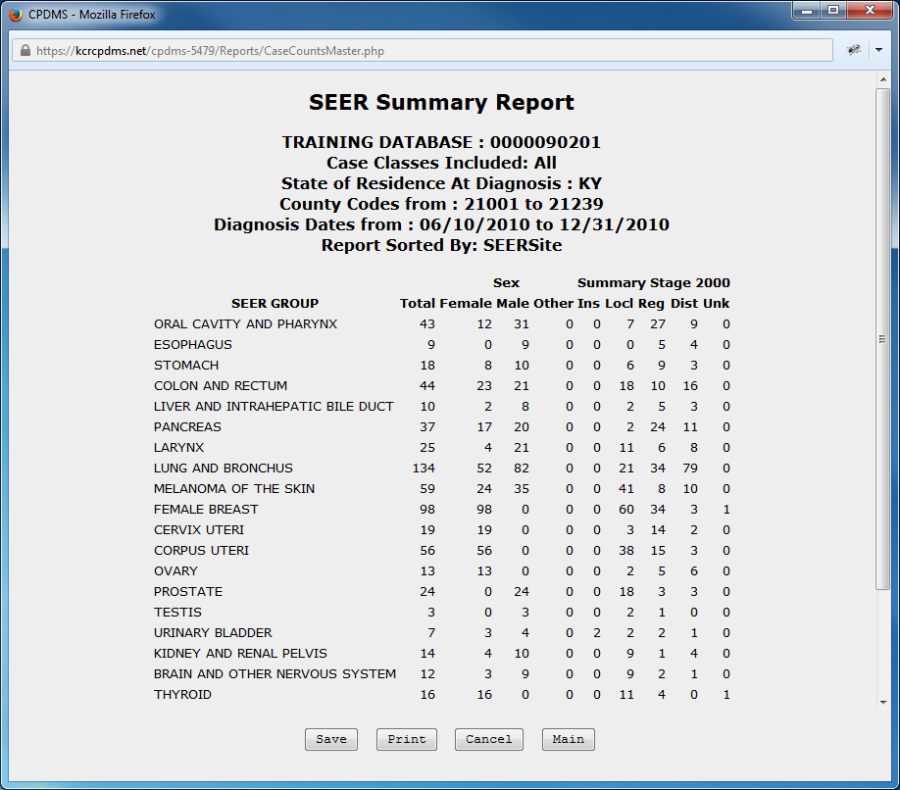
b. SEER Summary
This report presents case counts from a given range of diagnosis dates by SEER site group. The list is further subdivided by sex and summary stage.
To produce this report, select SEER Summary from the Case Counts submenu. The following screen will appear:
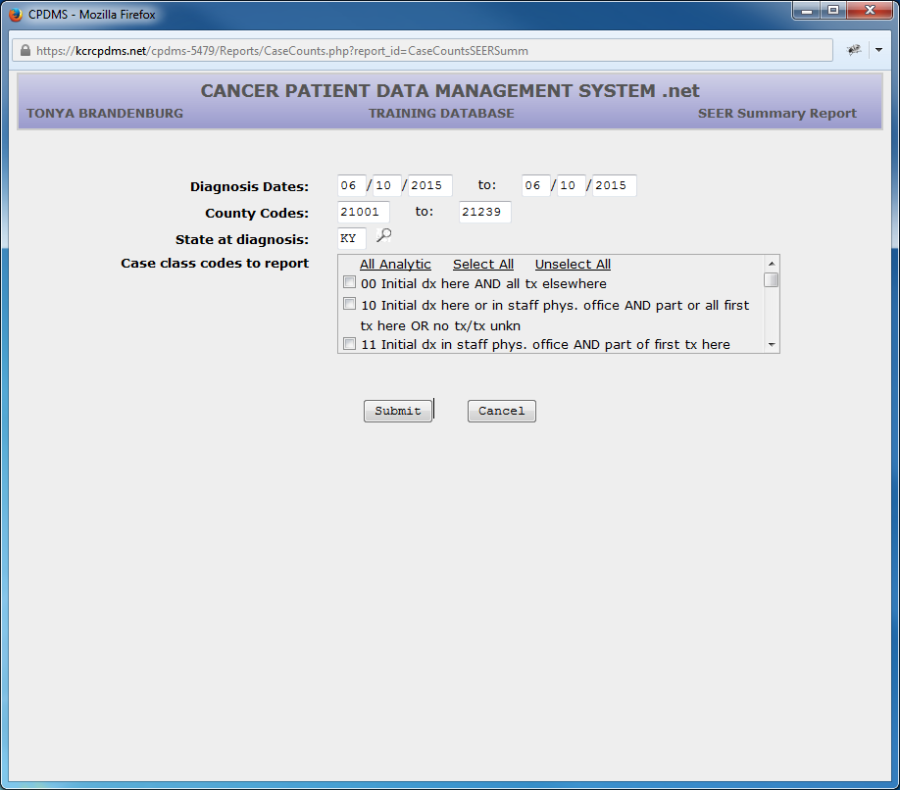
The range of Diagnosis Dates defaults to the current date, but these fields may be written over with any valid dates.
The County Codes range defaults to all Kentucky counties, but any valid county codes may be specified. Similarly, State at Diagnosis defaults to 'KY' but may be written over with another state. A Choice List is available.
Specify which Case Class codes to report, or leave these fields blank to include all cases.
Users of multi-facility institutions will have the option to choose which facility's records to include in the report. See Appendix B for instructions.
Select "Submit" and the report will be displayed, as shown below:
c. Frequency
A Frequency distribution may be produced using this option, which lists the count of cases by site group. This report shows the site groups in order from the most frequently seen group to the least frequently seen group in the registry.
To generate this report, select Frequency from the Case Counts submenu and the following screen is displayed:

Enter the four digit accession year of the cases to be reported. This field defaults to the current year, but this may be written over.
Choose the case class codes to include, or leave these fields blank to include them all.
Users of multi-facility institutions will have the option to choose which facility's records to include in the report. See Appendix B for instructions.
Select "Submit" and the report will be generated, as in the example below:
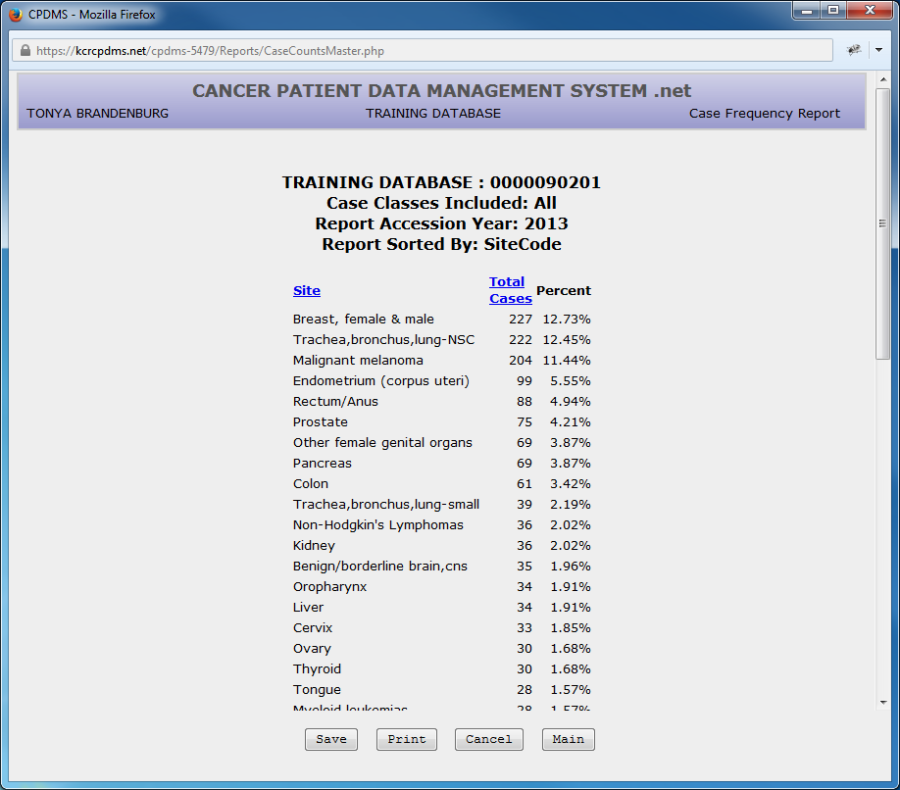
The report may be sorted by Site or by Total Cases (the default sort order).
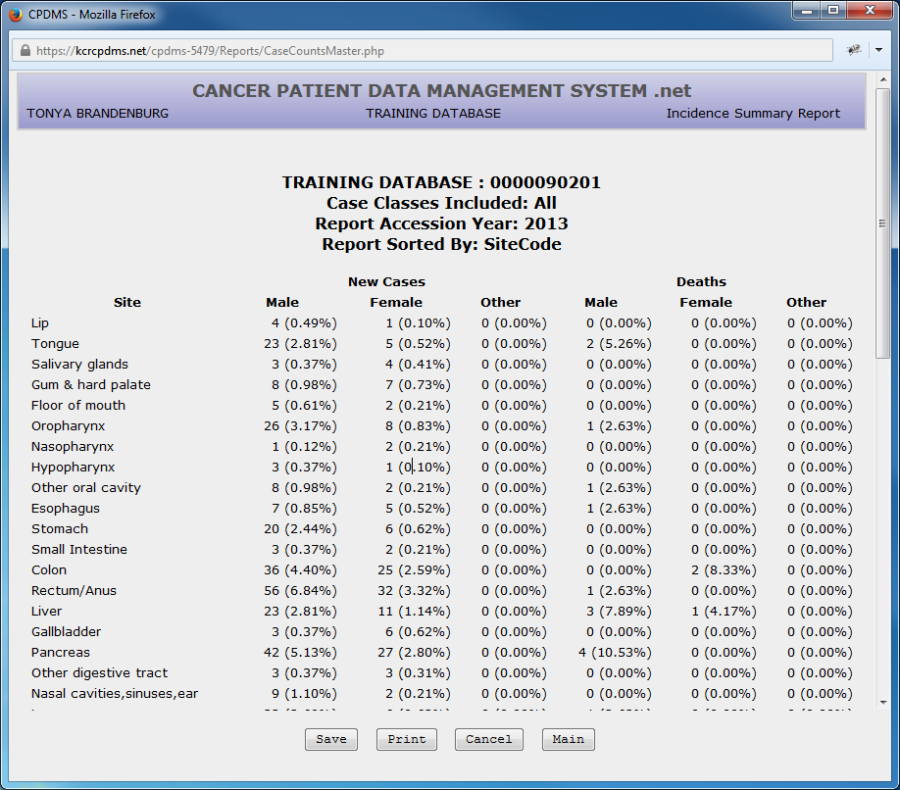
d. Incidence
An Incidence report shows, for each site group, both the numbers of new cases accessioned in a specified year, and the number of deaths due to cancer in that year. To produce this report, select Incidence from the Case Counts submenu and the following screen appears:

Enter the four digit accession year of the cases to be reported. This field defaults to the current year, but may be written over.
Choose the case class codes to include, or leave these fields blank to include them all.
Users of multi-facility institutions will have the option to choose which facility's records to include in the report. See Appendix B for instructions.
Select "Submit" and the report will be displayed:
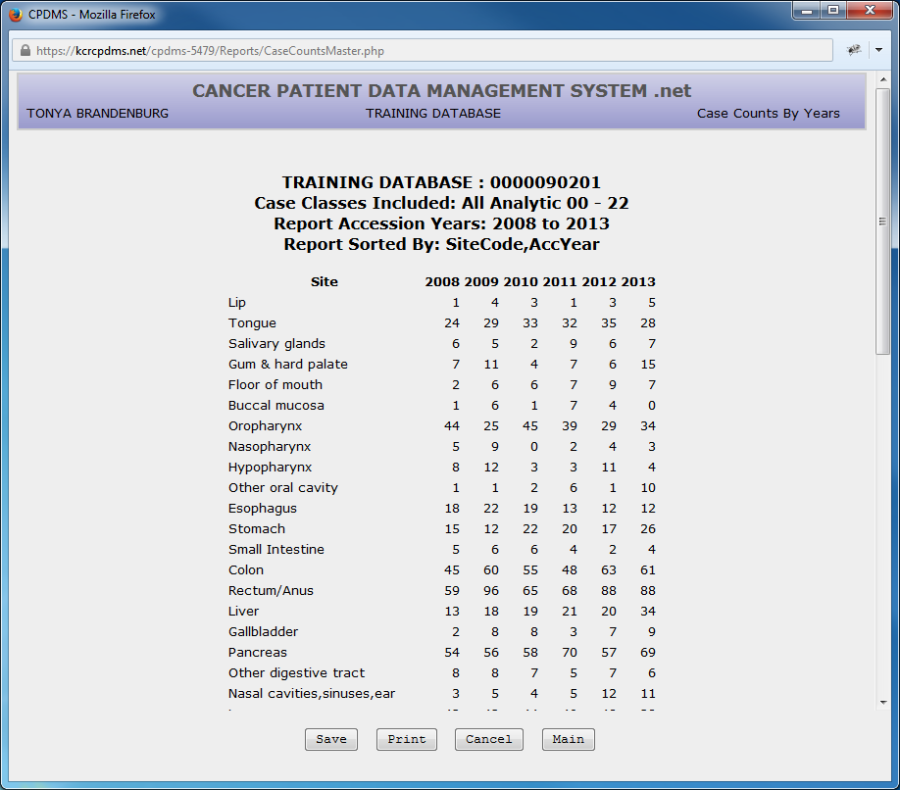
e. Counts By Year
This report gives a case count, by site group, for each year in a specified range. To create this report, select Counts by Year from the Case Counts submenu. See the screen below:
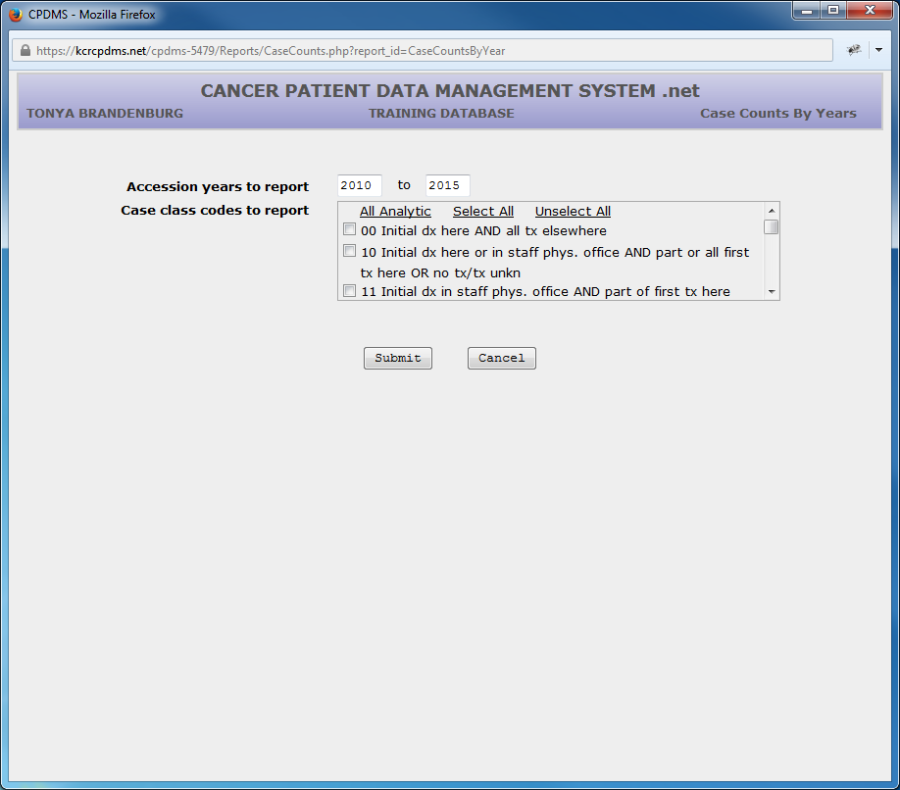
Enter the first and last accession years to be reported, or press ENTER to accept the default values.
Choose the case class codes to include, or leave these fields blank to include them all.
Users of multi-facility institutions will have the option to choose which facility's records to include in the report. See Appendix B for instructions.
Select "Submit" and the report will be displayed as shown here:
4.Quality Assurance (Q/A)
To produce a quality assurance report, select Q/A from the Reports submenu and the following list appears:
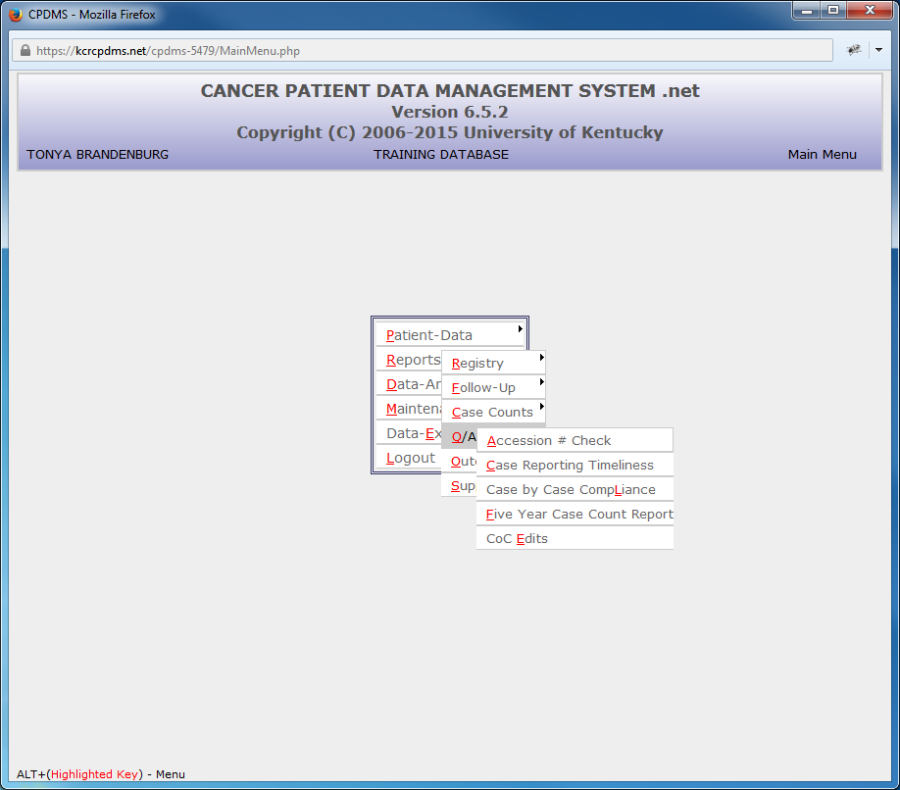
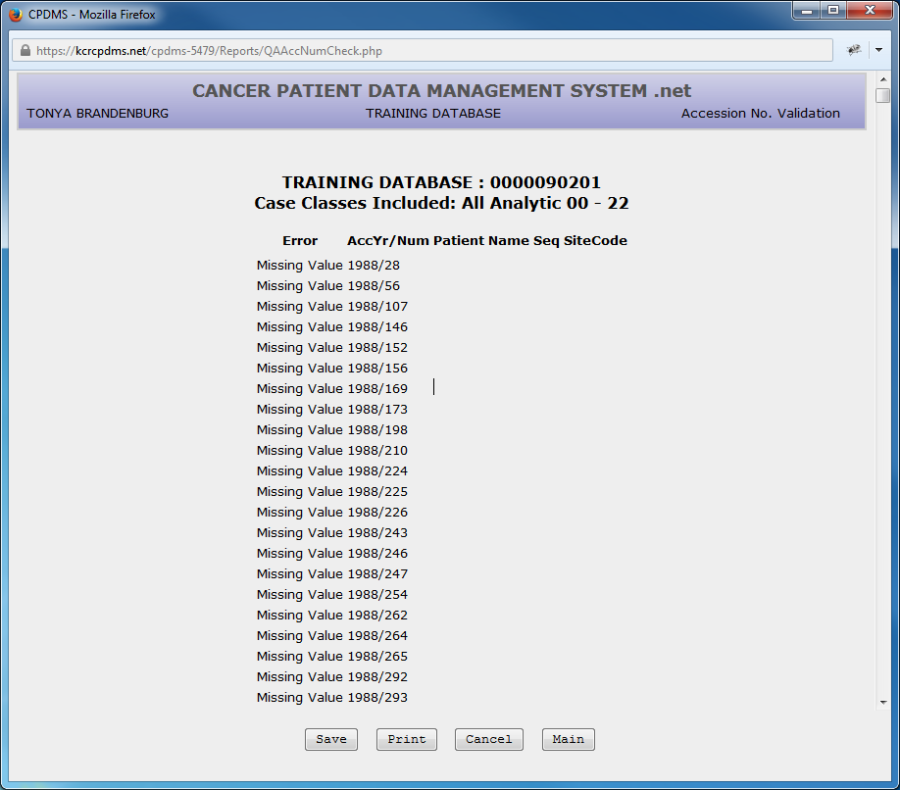
a. Accession Number Check
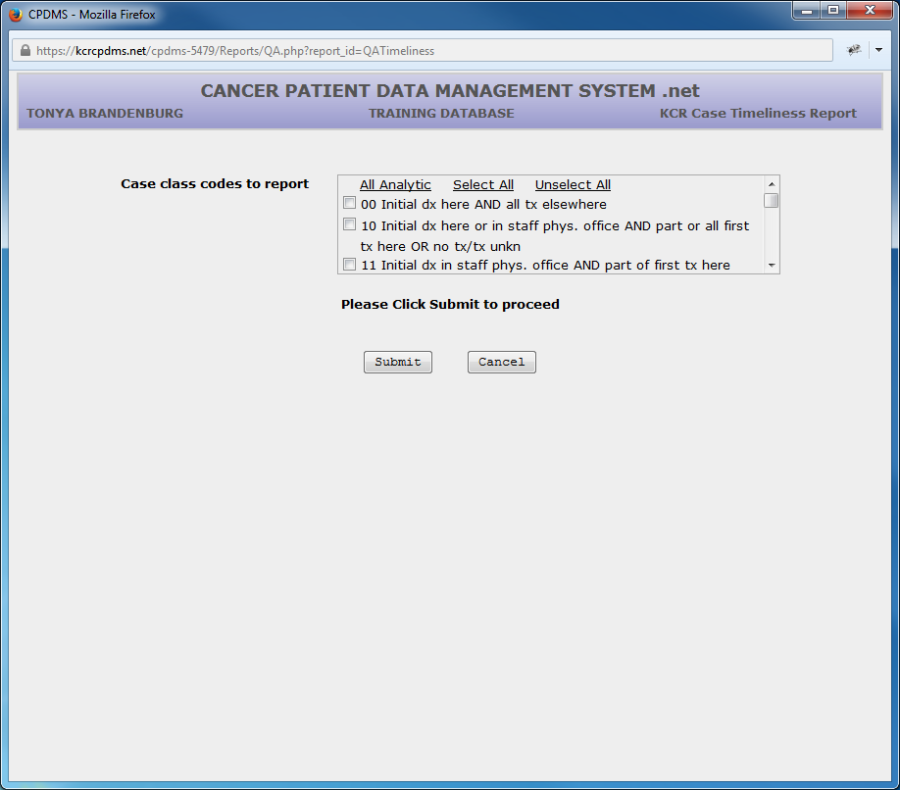
This Q/A report is used to ensure that all the accession numbers assigned for each accession year are sequential. To generate this report, select Accession Number Check from the Q/A reports submenu, and the following screen appears:
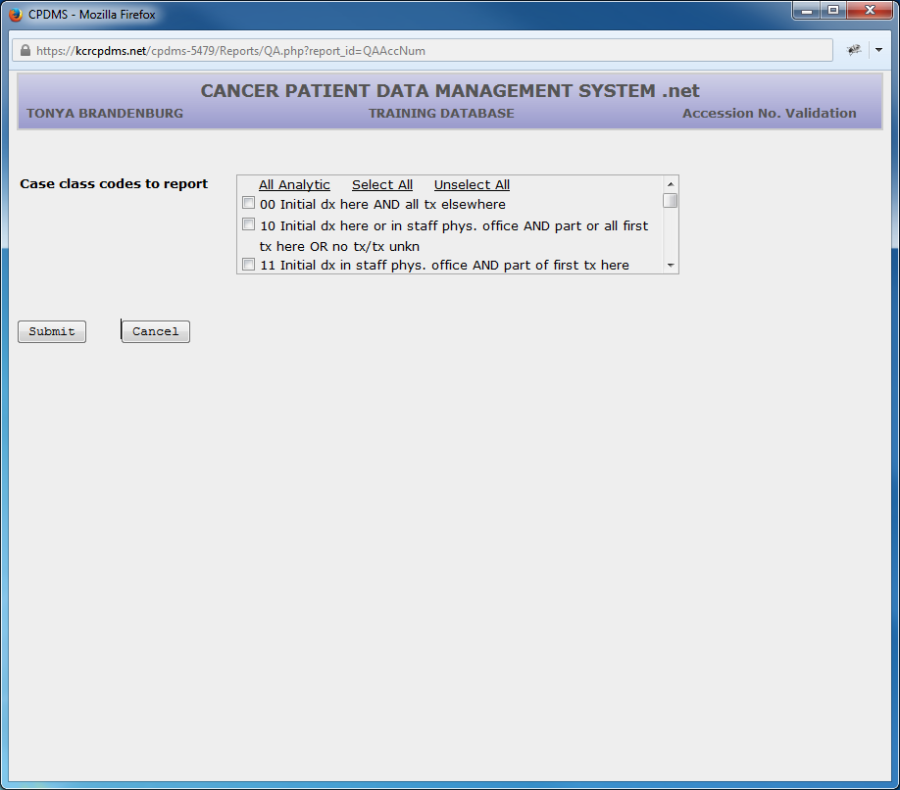
At Case Class Codes to Report, choose the classes of case codes to be reported (Choice Lists are provided), all analytic, or select all to report all of them.
Choose "Submit" to display the report.
An example of the Accession Number Check is shown below:
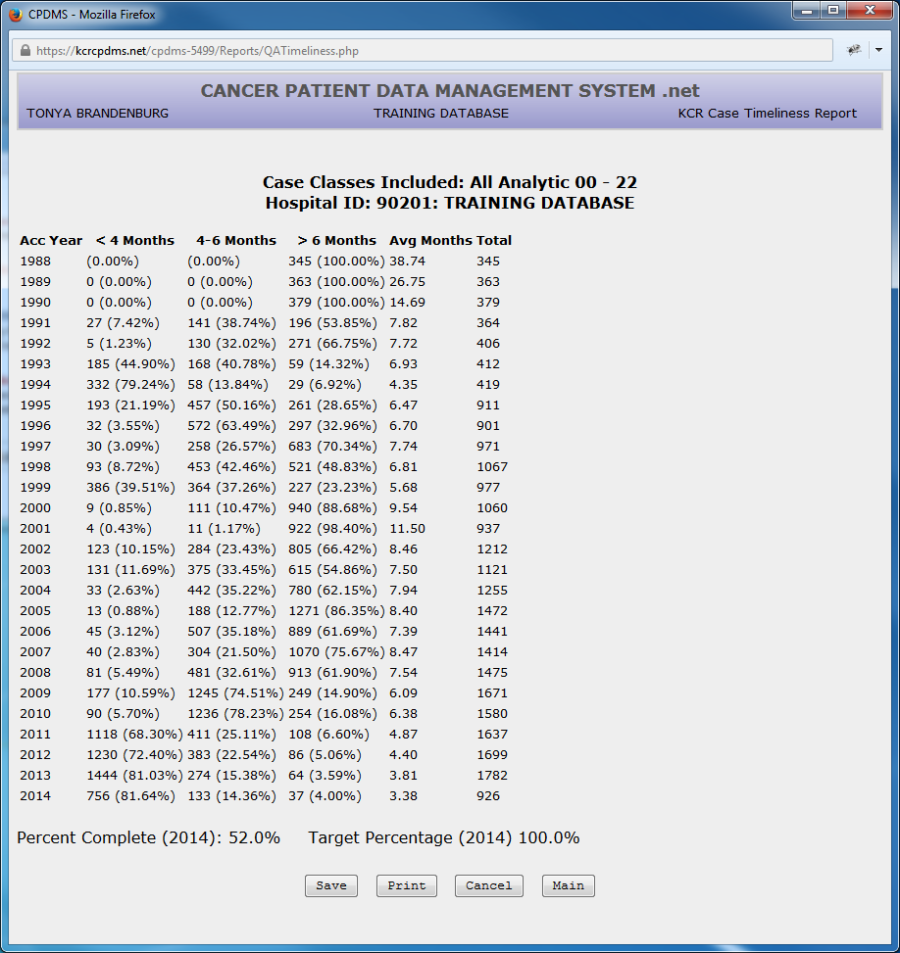
b. Case Reporting Timeliness
This report displays the number of new cases entered into the registry within four months of date of first contact, within 4 to 6 months of date of first contact, and after 6 months from the date of first contact, ordered by accession year. It also displays a target percent complete for the current reporting year as well as the hospital's actual percent complete.
To create this report, select Case Reporting Timeliness from the Q/A submenu. The screen below will be displayed:
Users of multi-facility hospitals will be given the opportunity to select which hospitals to include. To generate the report, simply select "Submit."
The following report will be displayed on screen:
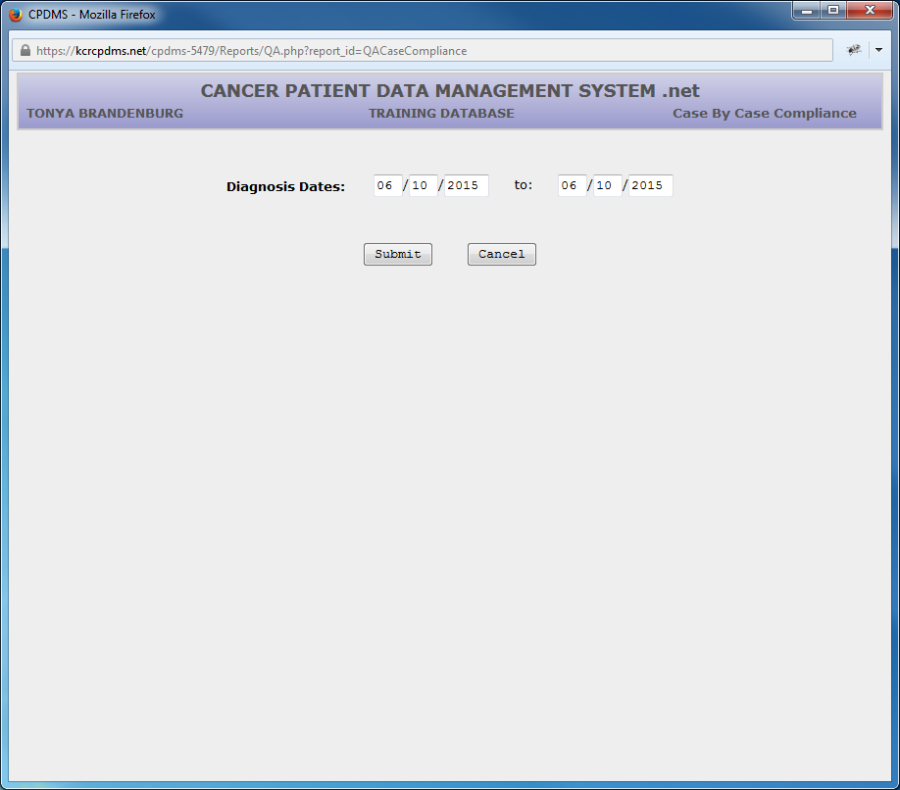
c. Case by Case Compliance
To run this report, choose Case by Case Compliance from the Q/A reports submenu. The following screen will be displayed:
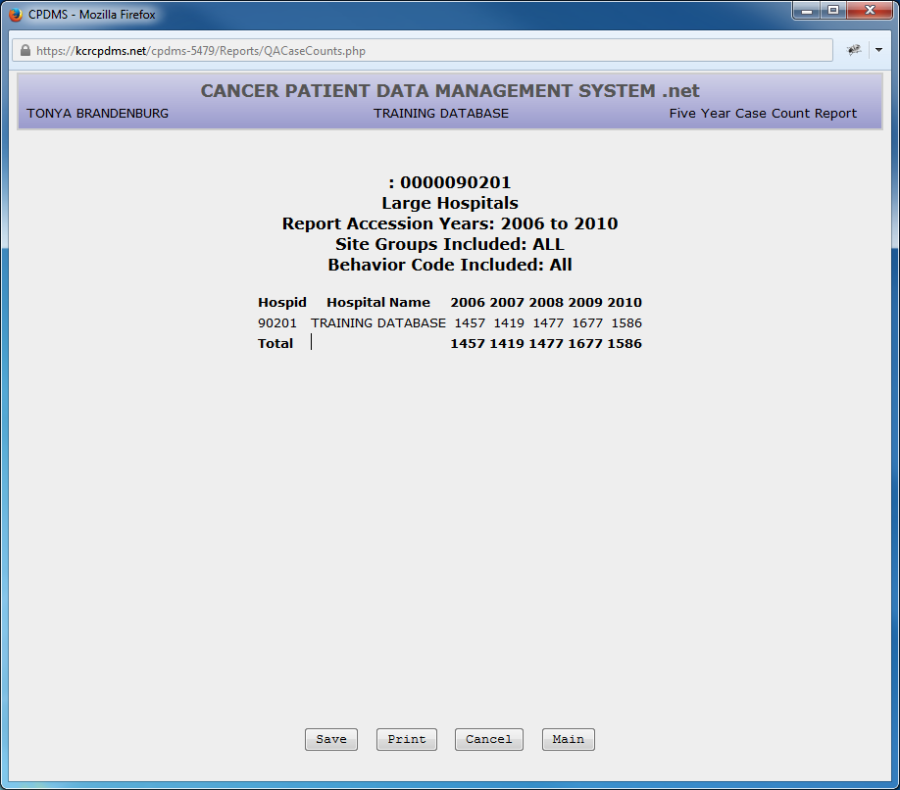
d. Five Year Case Count
This report lists the number of cases for each year over a five year period for a group of hospitals in a database, ordered by hospital ID. It is utilized mainly by the central registry, but is also helpful for multi-hospital user groups.
To run this report, choose Five Year Case Count Report from the Q/A reports submenu. The following screen will be displayed:

Counts may be reported for large hospitals only, small hospitals only, or non-hospital facilities (the third option is applicable only at the central registry).
The accession year to report defaults to the current year, but this may be overwritten with another date.
Up to five specific site groups may be reported (a Choice List is available), or leave these five fields blank to included all site groups.
The report may include only specified behavior codes (a Choice List is available), or leave this field blank to include all behavior codes.
Select "Submit" and the report will be displayed, as seen in the example below:
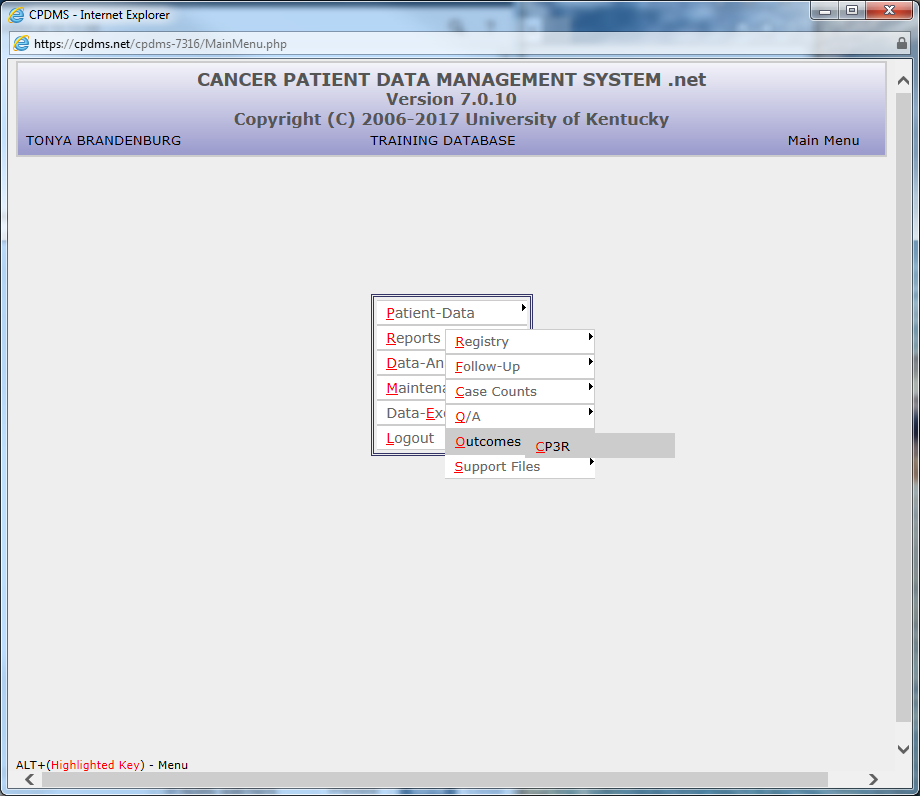
5.Outcomes
Six Cancer Program Practice Profile Reports (CP3R) allow facilities to identify the percentage of breast, colon, and rectal cancer patients who have received therapy according to recommended ACoS guidelines. Please consult ACoS documentation for specific information regarding patient eligibility requirements and treatment recommendations. To generate theses reports, from the Main Menu, select Reports, Outcomes, and CP3R.
After selecting the desired CP3R report, the following screen appears: 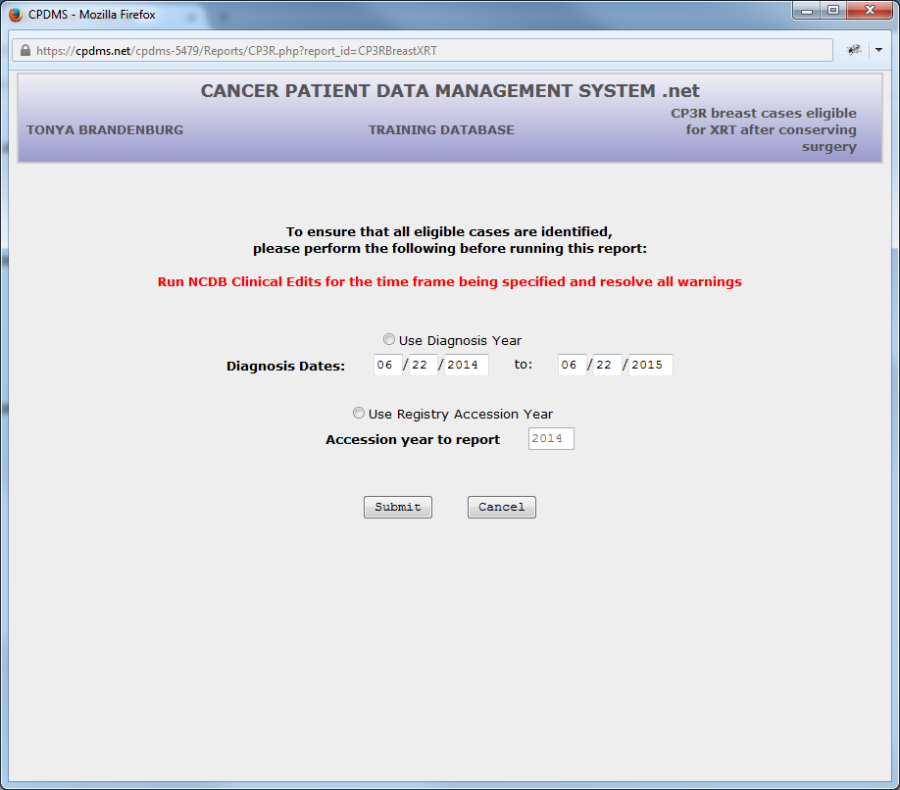
This screen is identical for each of the six reports. The user is advised to run NCDB clinical edits prior to generating the C3PR report (see the NCDB Call for Data section in Chapter Five for instructions on running clinical edits).
The user is prompted to choose a time frame for the cases which will appear in the report. Users may specify either a range of diagnosis dates (the default option), or a particular registry accession year. Once the time frame has been entered, click "Submit" to generate the report.
The CP3R report for colon cancer cases eligible for chemotherapy is shown below. The report lists all colon cancer patients in the database who meet the ACoS parameters for being recommended to receive chemotherapy following surgical treatment. The report lists the SSN, ACoS patient accession number, diagnosis date, chemotherapy start date, the number of days elapsed from diagnosis to start of treatment, the type of chemotherapy or reason no chemotherapy, the pTMN stage group, and the initials of the registrar who abstracted the case. The report may be sorted in ascending or descending order by any field except pTNM stage group.
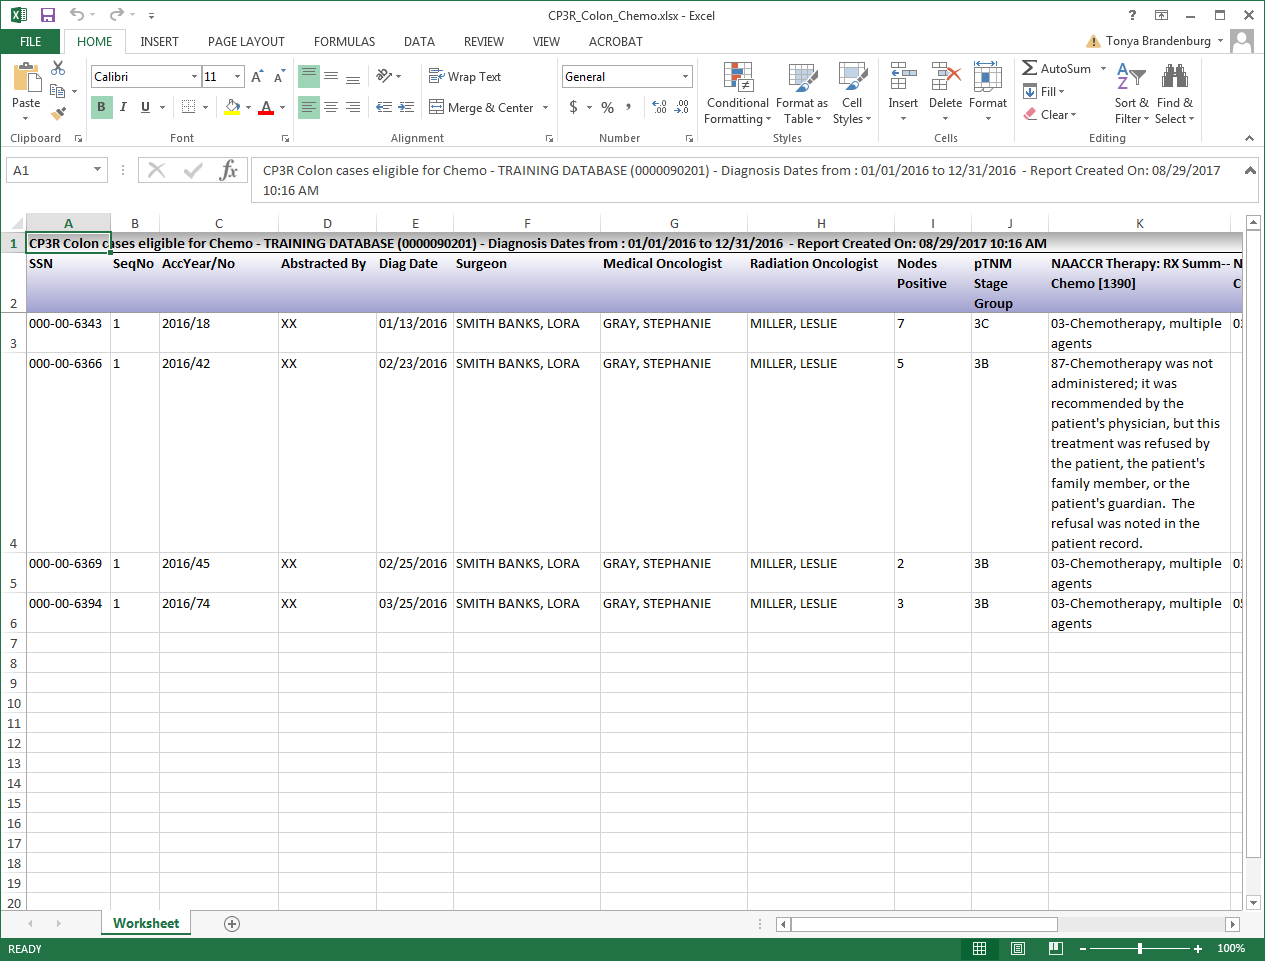
The CP3R reports for breast cancer and rectal cancer are similar, with the field for chemotherapy being replaced by hormone therapy, radiation therapy, or number of lymph nodes removed, as applicable. At this point, the user may save or print the report, or return to the report parameters or main menu.
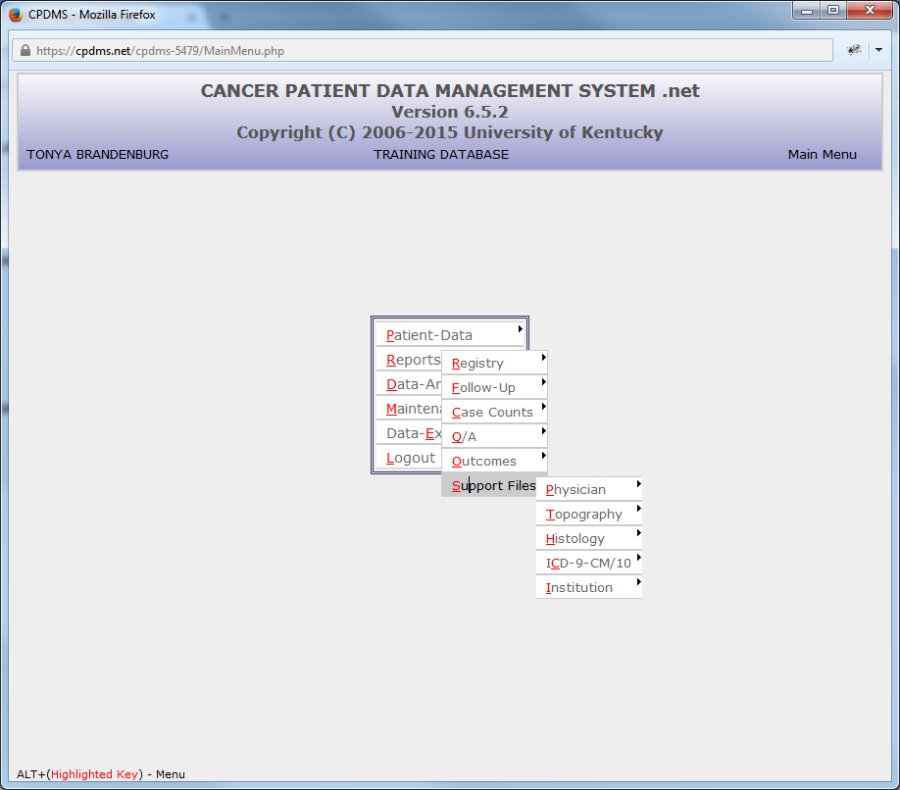
6. Support Files
Each of the support files acts as a Choice List to validate values entered for specific data items in the patient database. The support files and the items they validate are:
Physician Directory—Managing physician, primary surgeon, medical oncologist, radiation oncologist, primary follow-up physician, and follow-up physicians two through five.
ICD-O Topography—Topography ICD-O Histology—Histology
ICD-9-CM and ICD-10—Cause of death, ACoS Comorbidities
Institution—Institution referred to, institution referred from, following registry, and therapy facility
A screen listing or a printed copy of any of the support files may be generated using this option of the Reports submenu.
Within the Support Files submenu, select the desired file. (See below.)
Next a screen appears prompting the choice of the beginning and ending values for the entries to be included on the report (see example below, using the Topography List).
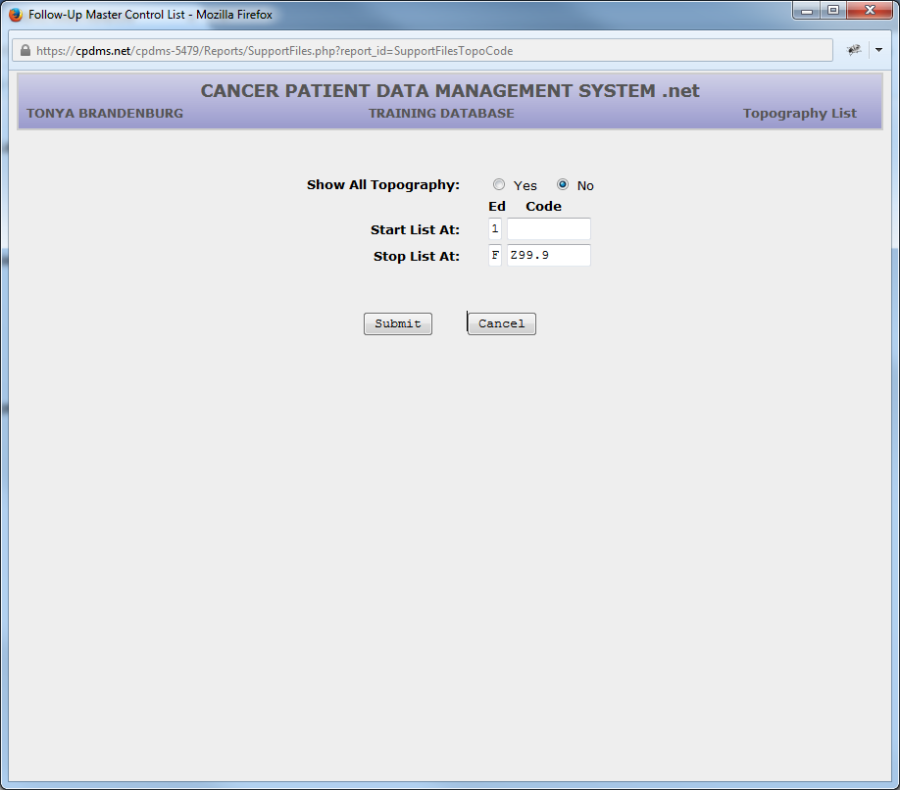
The entire list may be displayed by changing Show All Topography to "Yes." After the selection has been made, choose "Submit" to run the report.
Below is an example of the Topography List, sorted by Edition and Topography Code.
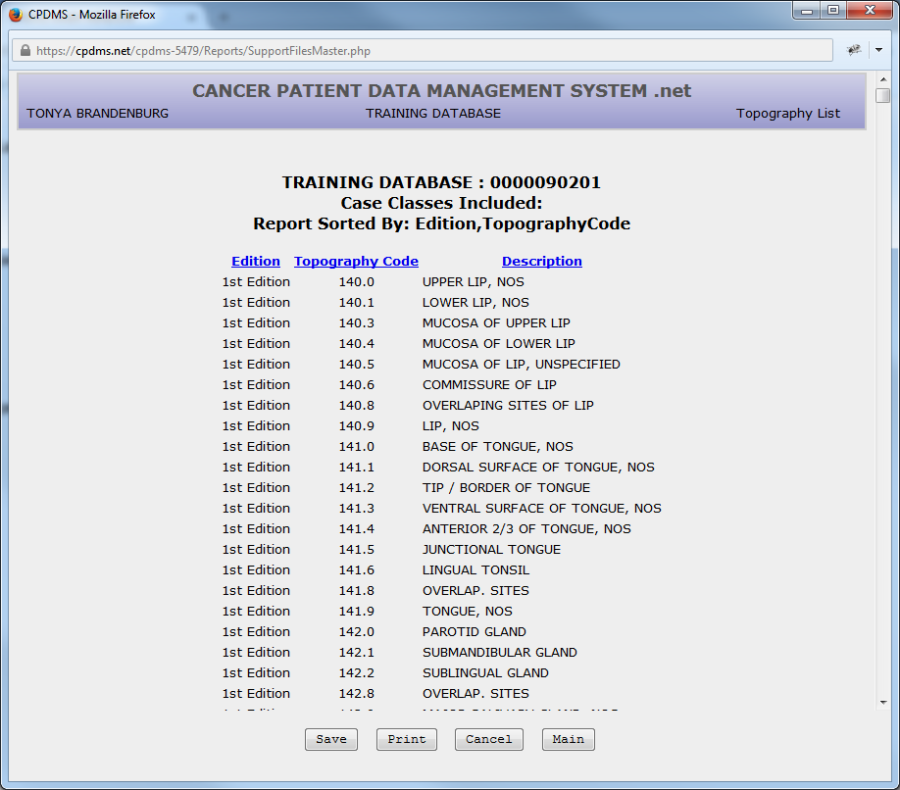
The order of a list may be changed by clicking on the fields in blue. In the above example, this list may be re-ordered by clicking on Edition, Topography Code, or Description. As with any report, users have the options of returning to the report criteria, going to the Main Menu, saving the report, or printing.