This menu option allows the user to create, view, or modify any record in the cancer patient database, as well as to view and edit records which are incomplete or have been saved with errors. The following general rules apply to data entry procedures:
1.There are only enough spaces in each field for the maximum number of characters allowed for that field. If the field is completely filled with a valid entry, the cursor will stop and no further characters can be entered.
2. The cursor will always start in the leftmost column of the field to be entered. Once a field has been completed, press ENTER or TAB to move to the next field.
3. All dates must be stored with a 2-digit month, a 2-digit day, and a 4-digit year- i.e., 01/08/2006. They must be valid dates and not beyond the current date.
4. Validity checks are performed on each data item as it is entered. Only valid codes are accepted. Many of the data items have a list of valid choices associated with that item. The Choice List may be accessed when the cursor is on a field with a drop down menu. To display the choice list, click on the arrow to the right of the field or press ALT and the down arrow key simultaneously. Move through the Choice List using the up and down arrow keys, and press ENTER to select the desired value. It is not mandatory to choose the value using the Choice List. The value may simply be entered in the same manner as a field with no Choice List.
5. Fields that have a very extensive choice list (such as State at Diagnosis) have a magnifying glass icon to the right of the field instead of a drop down menu. Click on the magnifying glass or press F2 to display the Choice List. The longer Choice Lists may be searched for the desired value using either the code for that value or the description. Type in the code or the written description and then select the "Search" button. A dialog box will appear which displays any matches. The list may be navigated using the up and down arrow keys. Lists that are more than one page can be navigated using the Page Up and Page Down keys, or the scroll bar to the right of the list. The cursor can be moved directly to the top of the list by pressing the Home key or directly to the bottom of the list by pressing the End key. To make a selection from the Choice List, highlight the desired entry and press TAB to exit the list and move the cursor to the "Select" button. Press ENTER and the chosen value will appear in the field.
6.The fields of a record segment may be navigated using the TAB key or the ENTER key.
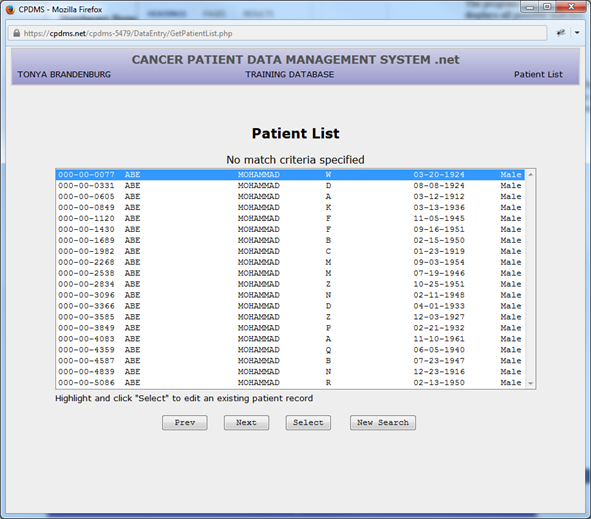
7. When a list is displayed onscreen (i.e. lists of patients, cases, therapies, physicians, etc.), use the up and down arrow keys to scroll through the list and highlight the desired record. Use the page up and page down keys to move through lists that are more than one page long. Use the TAB key to move from the list to the buttons on screen.
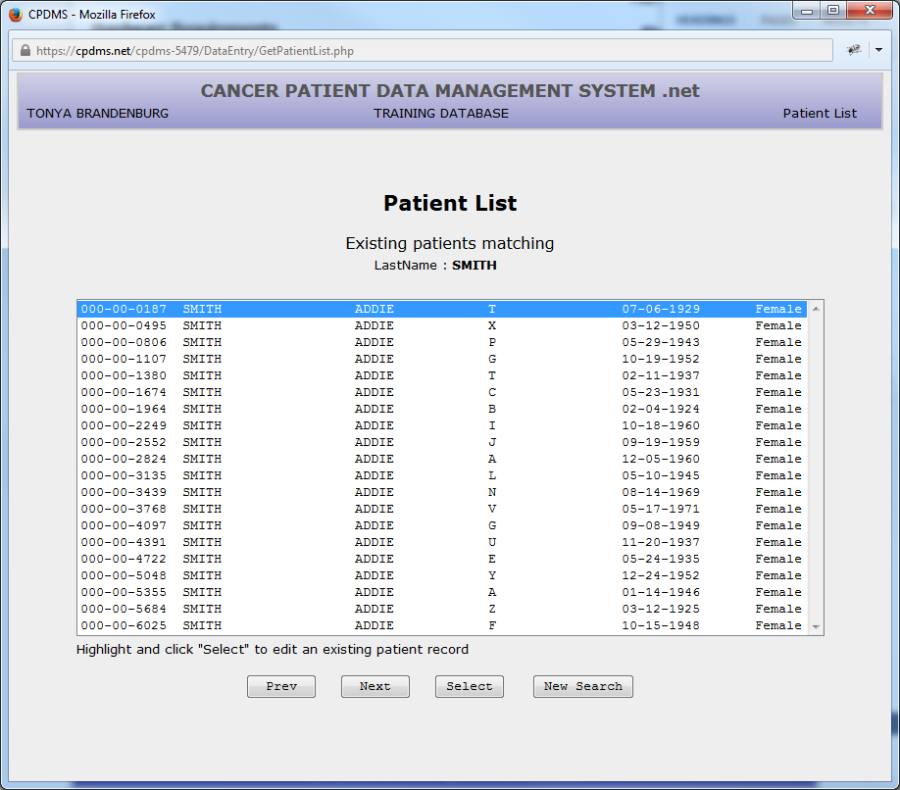
8. The various "buttons" on a screen may be selected by left clicking the mouse on the desired button. The TAB key may also be used to navigate among the buttons. Each time TAB is pressed, the focus moves to the next button, which is then "highlighted." In the example below, the focus is on the "Select" button.
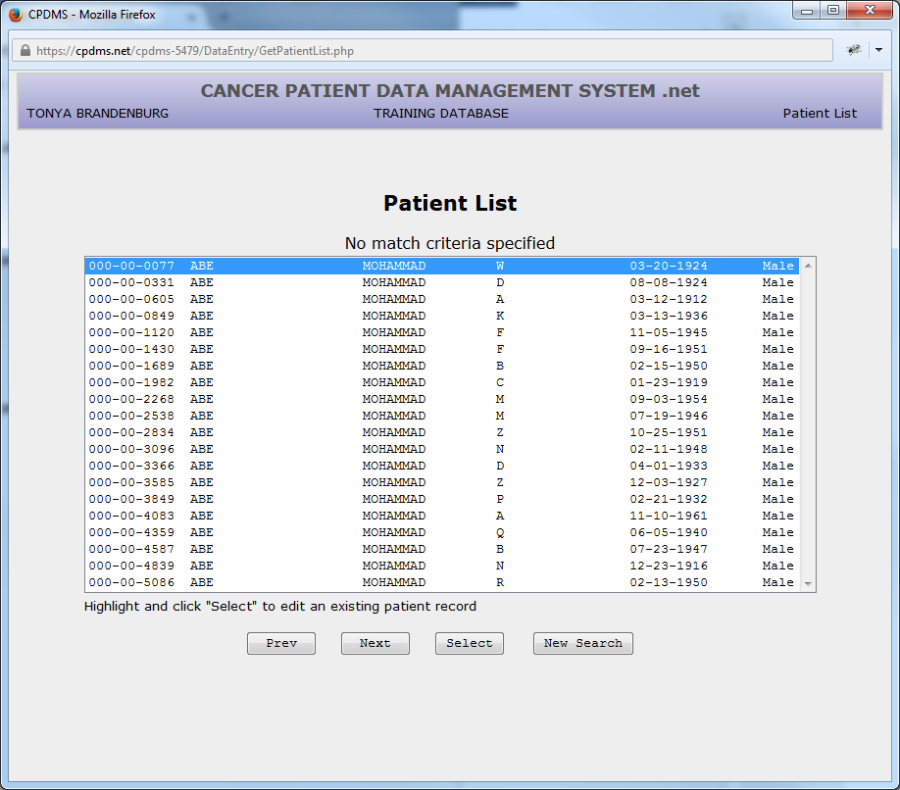
The focus navigates through the buttons and the list in a default order. This order may be reversed by pressing the shift key and TAB simultaneously. In the above example, pressing TAB would result in moving the focus from 'Select' to 'New Search'; pressing shift + TAB would move the focus from 'Select' to 'Next.
Many record edit forms are more than one page long. There are multiple options for navigating within these forms. The "Next" and "Previous" buttons at the bottom of the page may be used to move through the pages sequentially, while clicking on the tab at the top of a page jumps directly to that page
Some operations within a record can be performed using shortcuts. These are listed at the bottom of the screen (see below).
Press the ESC key to cancel editing. Press ALT and the highlighted letter on the tab at the top of each page \[referred to as the "hot key"\] to go directly to that page (for example, pressing ALT+C would go directly to the page containing all the Collaborative Stage fields). Press F2 to display a searchable Choice List, or ALT + down arrow key to open a drop-down menu (see rules d and e for further instructions regarding Choice Lists). Press F7 to go to the previous page and F8 to go to the next page. The F9 key displays a list of hospitals affiliated with the case, and F10 saves the current record.
Some fields contain default values when the data entry screen is first entered. These may be written over with a different valid value
A data entry screen may be exited at any time by pressing the ESC key or selecting the "Cancel" button. After confirming the intention to quit and abandon these changes, the system will return to the menu
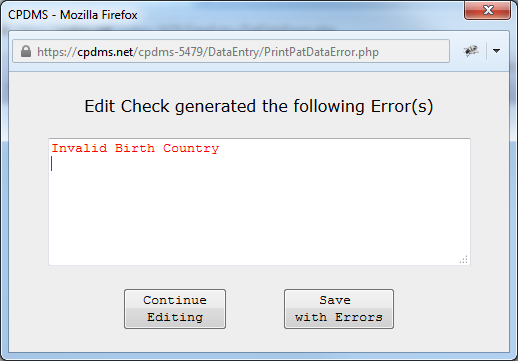
To exit a data entry screen and save changes to a record, select the "Save" button at the bottom of the screen, or press F10. If there are any required fields with invalid values (including blanks), an error message will appear. (See example below.)
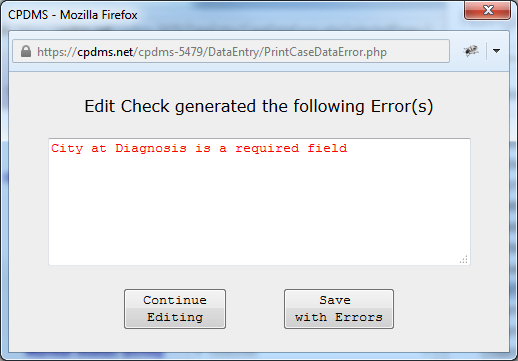
Choose "Continue Editing" to enter a valid value at this time, or select "Save with Errors" to save the record with errors and correct it later. Please note that there is a limit of only 10 incomplete case records at any given time. See the section entitled "Edit Checks and Error Messages" for more detailed information.
Enter a New Patient
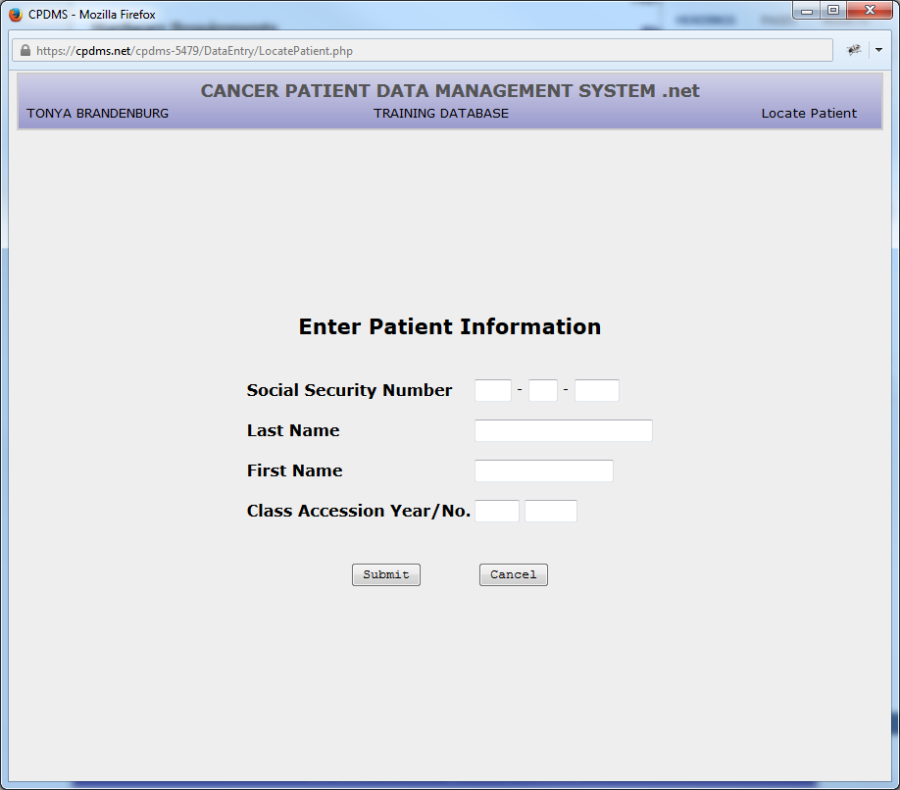
From the Main Menu, select Patient Data, and then Patient List. The following screen is displayed:
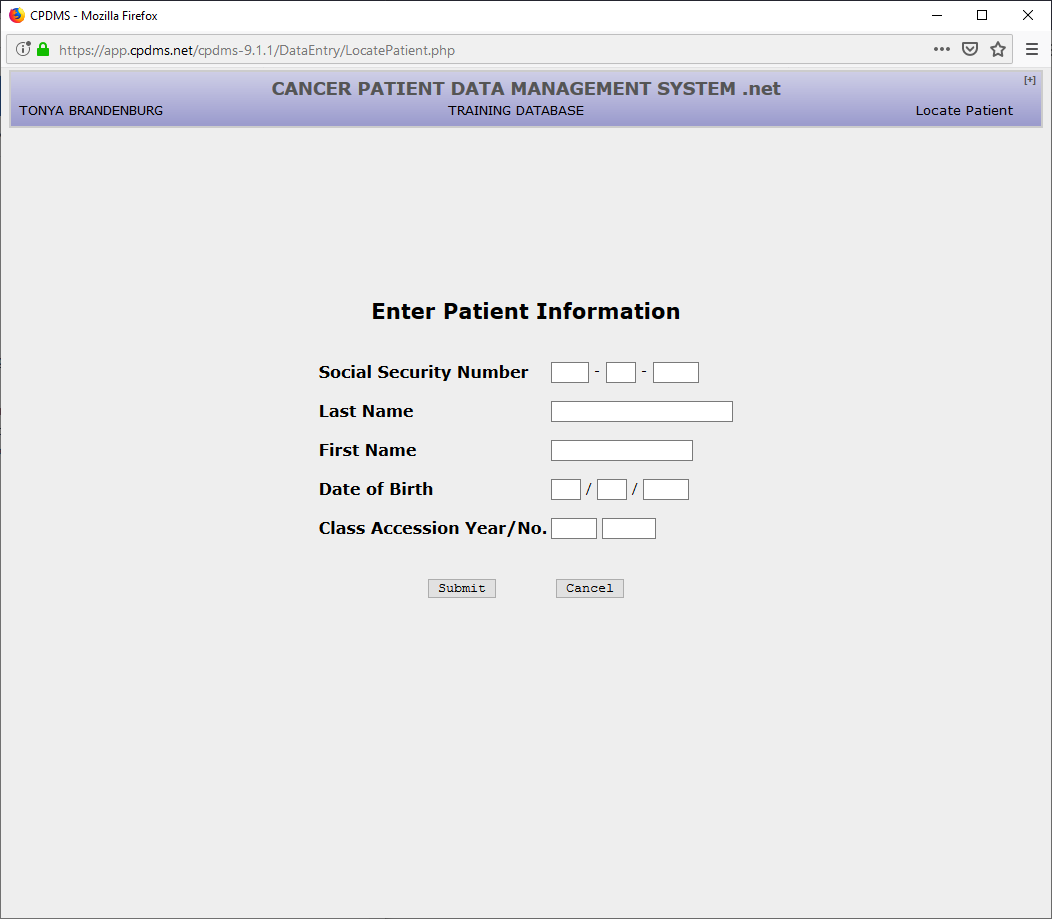
From this screen an existing patient record may be located or a new one created. Existing patients may be located using the patient’s social security number, name, or registry accession number.
Enter the social security number of the patient to be added to the database. When the field is completed, the system immediately searches the existing patient records for that social security number. If a match is found, the matching patient record is displayed in a patient list. To locate and modify the existing record, use the mouse to click on the button labeled “Select” or press TAB and then ENTER. In order to return to the patient entry screen, TAB once to move out of the patient list and then again to go to “New Search” and press ENTER, or mouse click on the “New Search” button.
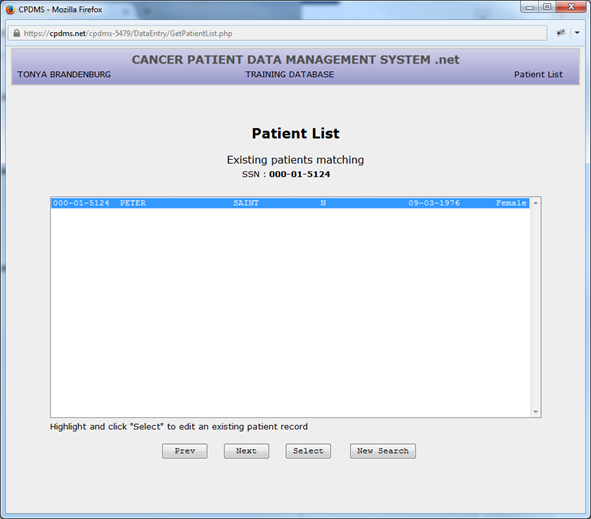
If a patient list appears, carefully compare the patient information displayed (name, DOB, sex) with these data values for the patient to be entered. If it is the same patient, the existing record need only be updated with the new information. For instructions, consult section two of this chapter, “Update an Existing Patient.”
If there is a different patient record to be entered, but both have the same social security number, verify the SSN for both patients from the best source documents available. The occurrence of duplicate identification numbers is most likely to happen with temporary numbers. Two different patient records cannot have the same identification number.
If two patients have the same SSN or temporary number, follow the instructions in the CPDMS Abstractor’s Manual for assigning a unique SSN. Use the “New Search” button to return to the entry screen for Patient Keys and re-enter a unique SSN. When the field is filled and no match is found in the existing database, the cursor automatically moves to the Last Name field.
Enter the patient’s full last name, with no special characters or punctuation marks. (Embedded blanks are allowed.) Press ENTER and the cursor moves to the First Name field. Enter the patient’s full first name-- again, with no special characters or punctuation marks, and press ENTER. Press ENTER once again to Submit.
The program then searches the database for that first and last name combination and displays all possible matches.
For example:
Once again, use the “Select” button to locate and update an existing patient record, or choose the “Create” button to override the matching names and create the new patient record anyway. Use “New Search” to return to the Enter Patient Information screen.
This may be entered as a new record because it has a unique SSN, even though the first and last name combination is already in the database. CPDMS displays the match only as a warning, to prevent the inadvertent re-entering of an existing patient record.
After a unique SSN and last and first name combination has been entered, a new patient record may be created. Choose “Submit” and you will either be taken to patient create from pathology report if your facility has a pathology report associated with this patient or the screen displays the SSN and name for the potential new record.
If patient does not have an associated pathology report:
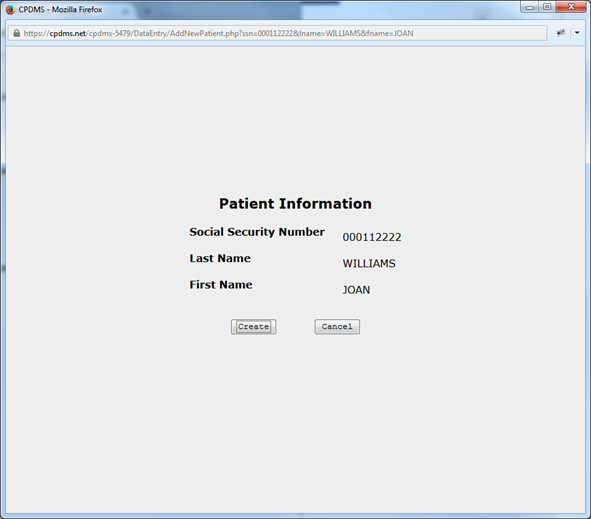
Select “Create” to create the record and go on to the Patient Data Edit Form. To return to the Patient Key entry screen without creating a new record, press TAB and ENTER to select “Cancel.”
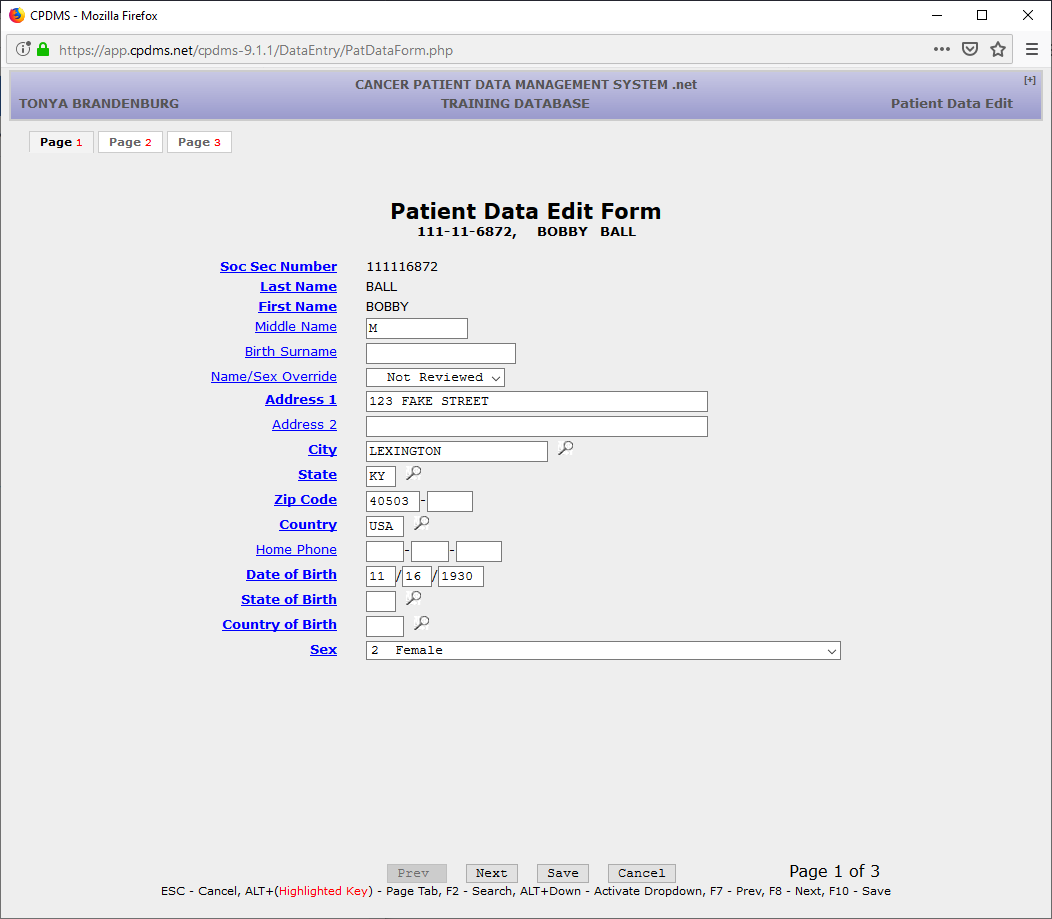
The Patient Data Edit Form is now displayed.
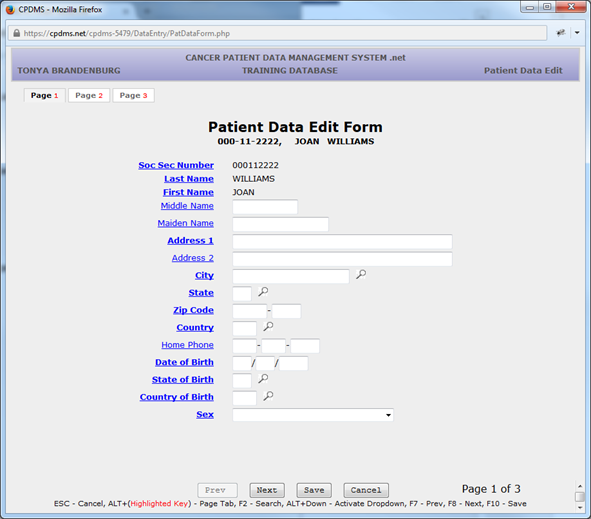
The following pages show examples of each data entry screen, a list of the items on each screen, and the validity checks performed on each item. Mandatory fields are indicated on the screen by bold text. Each field name is a hyperlink to the entry for that particular field in the Web help version of the CPDMS Abstractor’s Manual. Clicking on the field name opens a pop-up window which displays instructions for coding that data item.
SSN, Last name, and First name (the key fields for a patient record) appear as the first three fields on this screen. However, they are protected fields and may not be changed here. (See “Update an Existing Patient” for instructions on how to edit key fields.)
Middle name – This field is mandatory if the patient has a middle name. Only alpha characters and blanks are allowed. This field may be left entirely blank.
Maiden name – This field is mandatory if the patient’s maiden name is available. Only alpha characters and blanks are allowed. This field may be left entirely blank.
Address – Address 1 is a Mandatory field; alphanumeric and special characters are allowed. This field is actually two lines long to allow enough room for apartment numbers, etc. Address 2 is optional.
City – Mandatory field; this field may not be left entirely blank. A help screen of the largest cities and their counties is available by pressing F2 or clicking on the magnifying glass icon.
State – Mandatory field; a Choice List is available using F2 or the magnifying glass. (See below.)
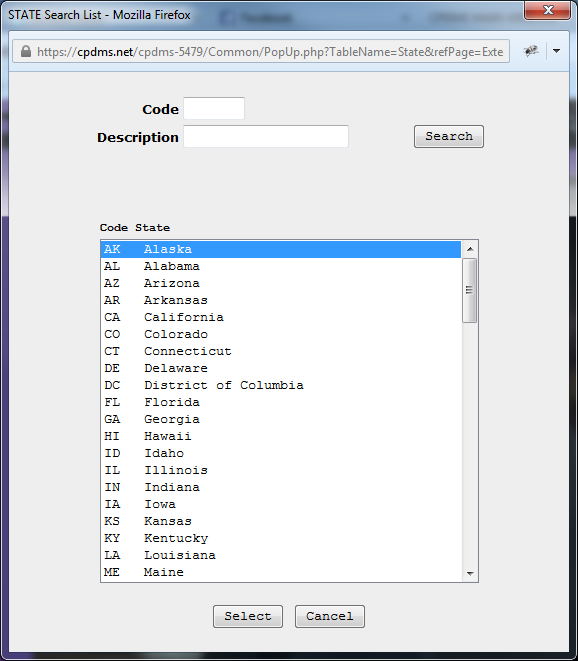
All of the valid state and country abbreviations are listed here (as well as in Appendix B of the CPDMS Abstractor’s Manual). Refer to the discussion of Choice Lists at the beginning of this chapter for detailed instructions on locating and making a selection from a Choice List.
Zip code – Mandatory field; only numbers are allowed. The last four spaces may be left blank but the entire field may not be left blank.
Home phone – Optional field; only numbers are allowed.
Date of birth – Mandatory field; must be entered as MMDDYYYY. The value entered must be a valid date on or before the current date.
State of birth – Mandatory field; a Choice List is available.
Country of birth - Mandatory field; a Choice List is available.
Sex – Mandatory field; a Choice List is available. It is also linked to the Number of Live Births field. When a ’1’ for male is entered, Number of Live Births is automatically set to ‘99’ [the appropriate code for males]. This field is also linked to site group and topography codes, and to the menopausal status field at the case level. Inconsistencies will result in error messages and corrective edits will be required before the case record is stored.
When all the fields on page one of the Patient Data Edit Form have been completed, proceed to page two by using the ‘Next’ button, hitting the F8 key, or pressing ALT and ‘2’.
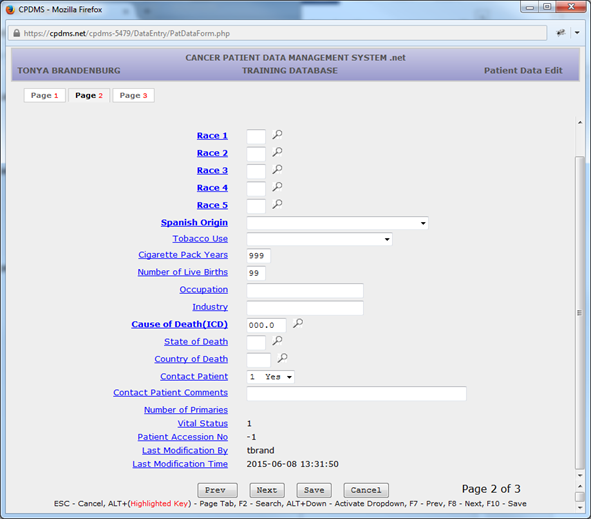
Race 1 – Mandatory field; a Choice List is available.
Race 2 through Race 5 – Mandatory fields; these should be filled in with 88’s unless patient has more than one recorded race. Entering ‘88’ in Race 2 will cause Race 3 through 5 to auto-fill with 88’s. These can be written over with a different value.
Spanish Origin – Mandatory field; a Choice List is available. Tobacco Use – Optional item; a Choice List is available.
Cigarette Pack Years – Optional item; must be numeric. This field defaults to ‘999’ for unknown when the data entry screen is initially displayed. A different value may be typed over the 999, or hit ENTER to preserve this value and proceed to the next field.
Number of Live Births – Optional item; must be numeric. This field defaults to ‘99’ when the code for ‘male’ is entered in the sex field.
Occupation – This field is mandatory to the extent that the information is available in the source documents. It allows alphanumeric characters or may be left blank.
Industry – This field is mandatory to the extent that the information is available in the source documents. It allows alphanumeric characters or may be left blank.
Cause of Death (ICD-9 or ICD-10) – Mandatory field initially calculated and coded automatically by the data entry program. A Support File acts as a Choice List here. Refer to the discussion of Support Files at the beginning of this chapter for detailed instructions on locating and making a selection from a Support File. This field may be completed by entering a code from the ICD-9 or ICD-10 Support File only when the correct code is available from the death certificate.
Place of Death – Optional item; a Choice List is available or leave blank.
Number of Primaries – Calculated field; cannot be entered by the user. This field is initialized at zero, then re-calculated whenever associated case records are entered or deleted.
Vital Status – Calculated field; cannot be entered by the user. The computer initializes this field with a blank, then updates it based on the value for survival status entered in the Follow Up data entry screen. The calculated codes are ‘1’ for alive and ‘0’ for dead. If a patient has more than one case and the survival codes are inconsistent among case records, a correction is required before this patient record may be exited.
ACoS Patient Accession Number – Calculated field; cannot be entered by the user. This field is initialized with a blank, and then updated with the value of the case accession number assigned to the case with the lowest sequence number for this patient.
Last Modification By – Calculated field; cannot be entered by the user. The username of the last user to modify patient data is recorded by the computer and is updated each time the record is edited.
Last Modification Time – Calculated field; cannot be entered by the user. The computer automatically records the date and time that patient data was last modified.
NOTE: The data edit form may be abandoned at any time without saving by pressing ESC. To exit and save changes, press F10 or select the “Save” button at the bottom of the screen. The patient record will be displayed with the option to save, return to editing, or cancel (see example).

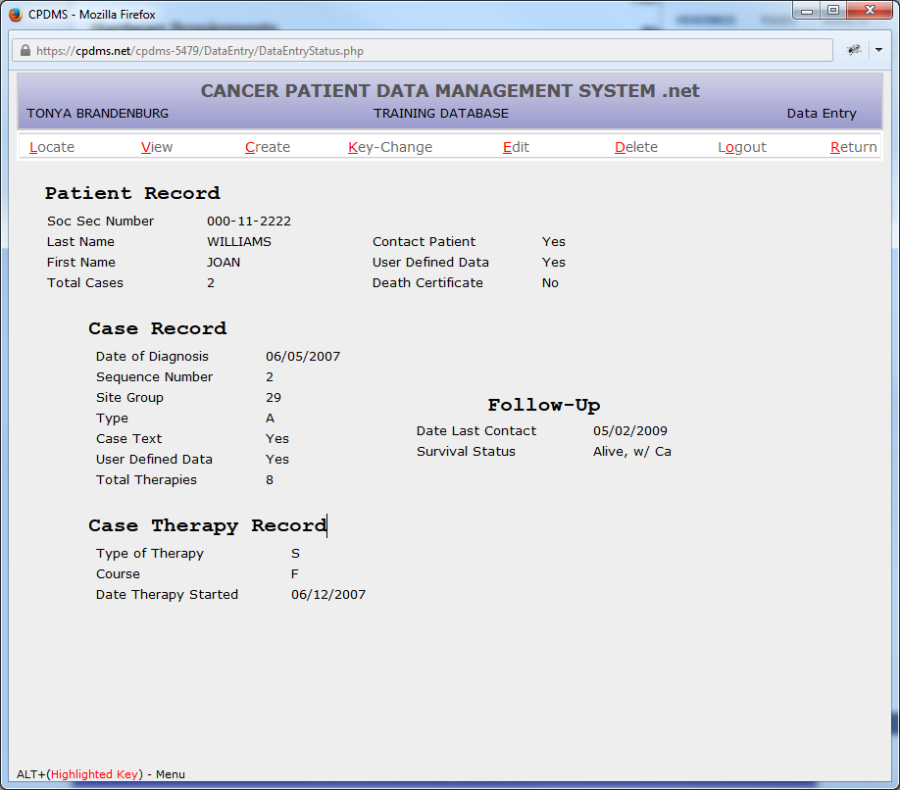
Once the patient record has been saved, the following screen appears:
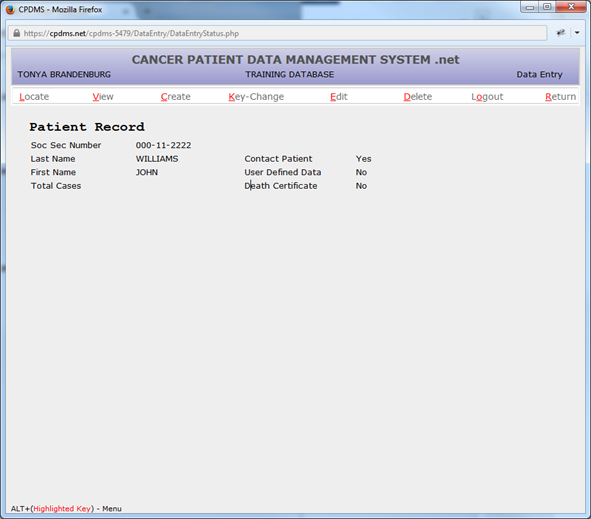
Now several functions are available to display, modify, or delete this record. These functions are listed across the top of the screen and described briefly below.
LOCATE allows users to find a specific case or therapy attached to the current patient record. When a case or therapy is located, its key fields are displayed in a Data Entry Status screen.
VIEW displays the data values stored in any particular segment of the current patient record, without allowing editing of the record.
CREATE allows the addition of a new segment of any type (i.e., case, therapy, follow-up, etc.) to the current patient record.
KEY CHANGE allows the editing of the key fields of the current patient, case, or therapy record.
EDIT allows users to access and make changes to any existing segment of the current patient record.
DELETE enables users to delete an entire patient record, or any particular segment of the current patient record. When deleting a case, however, all records related to that case (except patient data) will be deleted as well. For example, if a case record is deleted, all related therapies and follow-up information will be deleted also.
LOGOUT allows the user to log out of CPDMS.net. Users in a multi-hospital institution may also login as a different facility here.
RETURN takes the user back to the “Enter Patient Information” screen to allow the addition or location of another patient record
At this point in entering a new patient record, only certain functions are logical (and therefore available) to perform next. The patient data that has been entered may be viewed or edited, patient level user defined fields may be created, a case record related to this patient may be created, or the patient record may be deleted.
The discussion on the subsequent pages will continue with the steps to CREATE new segments for the current patient record. In section two, “Update an Existing Patient,” the other functions are described in detail.
NOTE: These other functions may be used during the initial record entry as long as the appropriate segment has been created.
Additional data may be collected in the user defined fields. To store values for these data items for the current patient record, highlight the word CREATE using the mouse and the submenu is displayed:
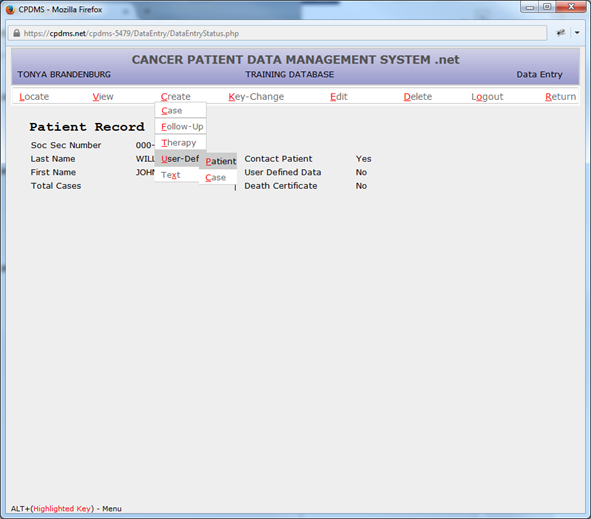
Within the “User Defined” category, two options are available-- “Patient” or “Case.” Select “Patient” and the following screen will appear:
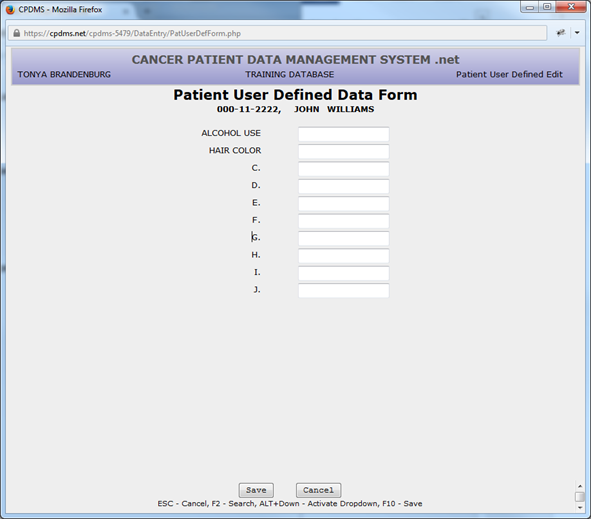
Alphanumeric or special characters may be entered in any or all of the ten patient level user defined fields. No validity checks are performed on these items. After all relevant data items have been entered, use the “Save” button or F10 to save the record and exit this screen. (If the screen is left entirely blank, the record is not stored.) See the “Maintenance” chapter for instructions regarding assigning meaning to user defined fields.
The screen then returns to the Data Entry Status screen:
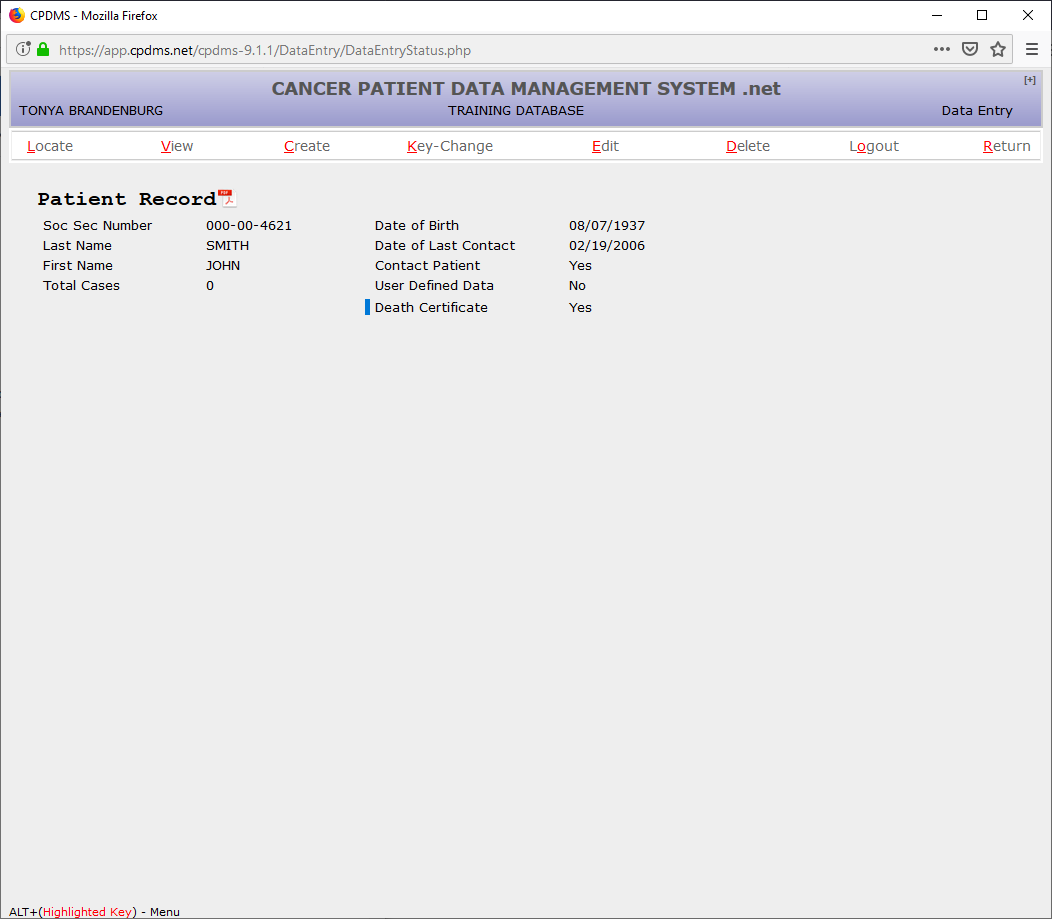
Note that in the Data Entry Status screen, the word “Yes” now appears to the right of “User Defined Data.” This indicates that some or all of the patient level user defined fields have been coded and stored for this patient.
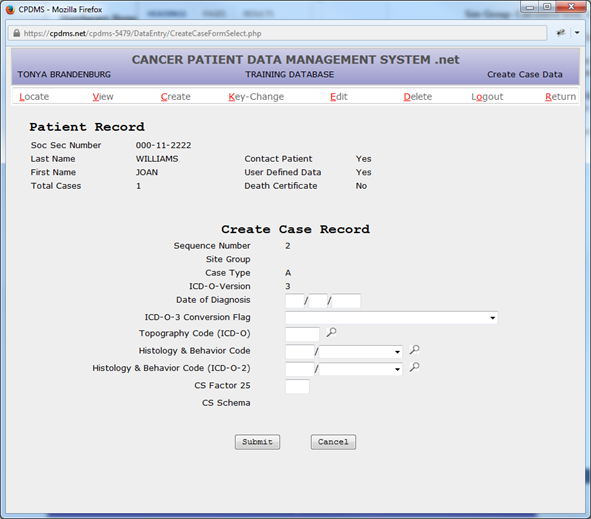
To continue entering data for the current patient, choose CREATE from the Main Menu and then select Case from the CREATE submenu. The following screen is displayed in which the key fields for the case record must be entered:
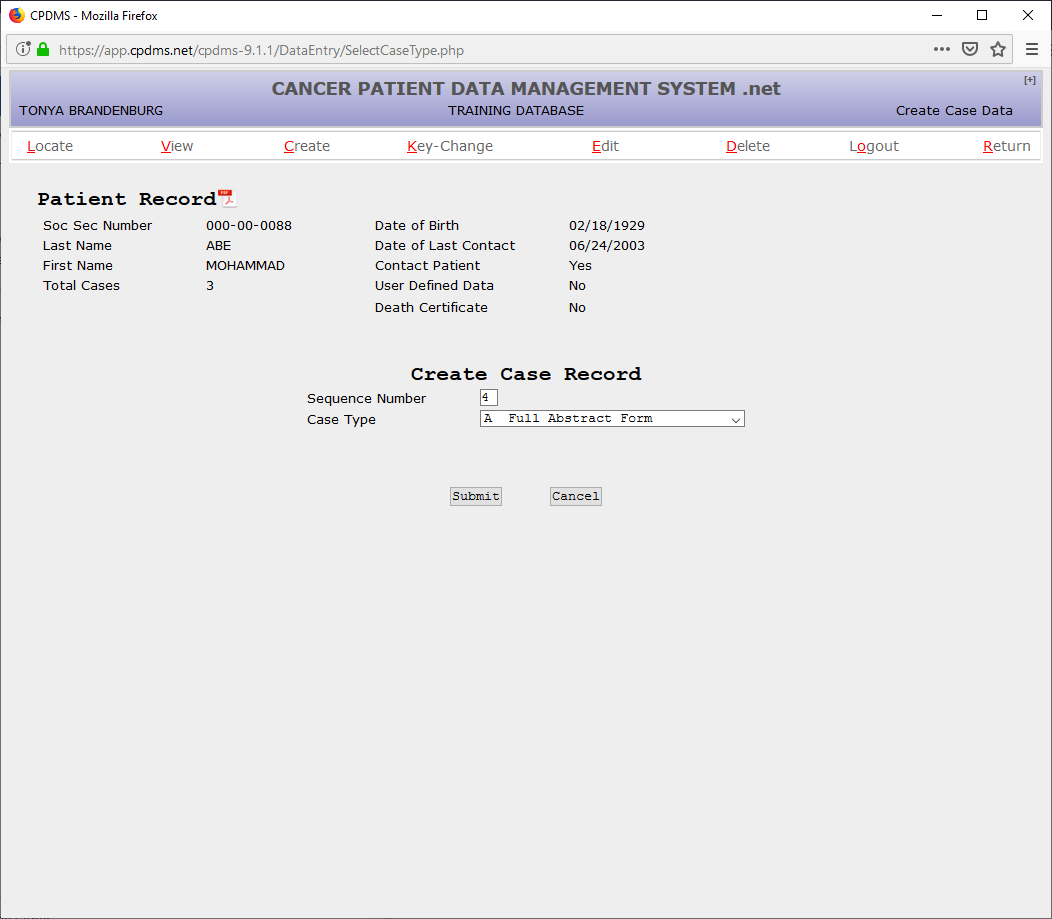
The sequence number field defaults to the next available sequence number for the current patient. This value may be written over with another number. However, the current patient record may not be saved without errors until all sequence numbers stored for this patient are sequential, starting with number one.
Enter the sequence number or press ENTER to accept the default value. Choose the appropriate case type for the record that is to be created.
If ‘Other Primary’ is selected, the year of diagnosis and site group must be entered. If the year of diagnosis is unknown, use ‘9999.’ A site group Choice List is available by using F2 or clicking on the magnifying glass (see below).
A brief remark regarding the diagnosis and/or treatment of this malignancy, or any other pertinent information (i.e., patient was a resident of another state at diagnosis), may be entered in the “Comment” field. After these fields have been completed, choose “Submit” to save as a Case Type Other.
Now the case is displayed.
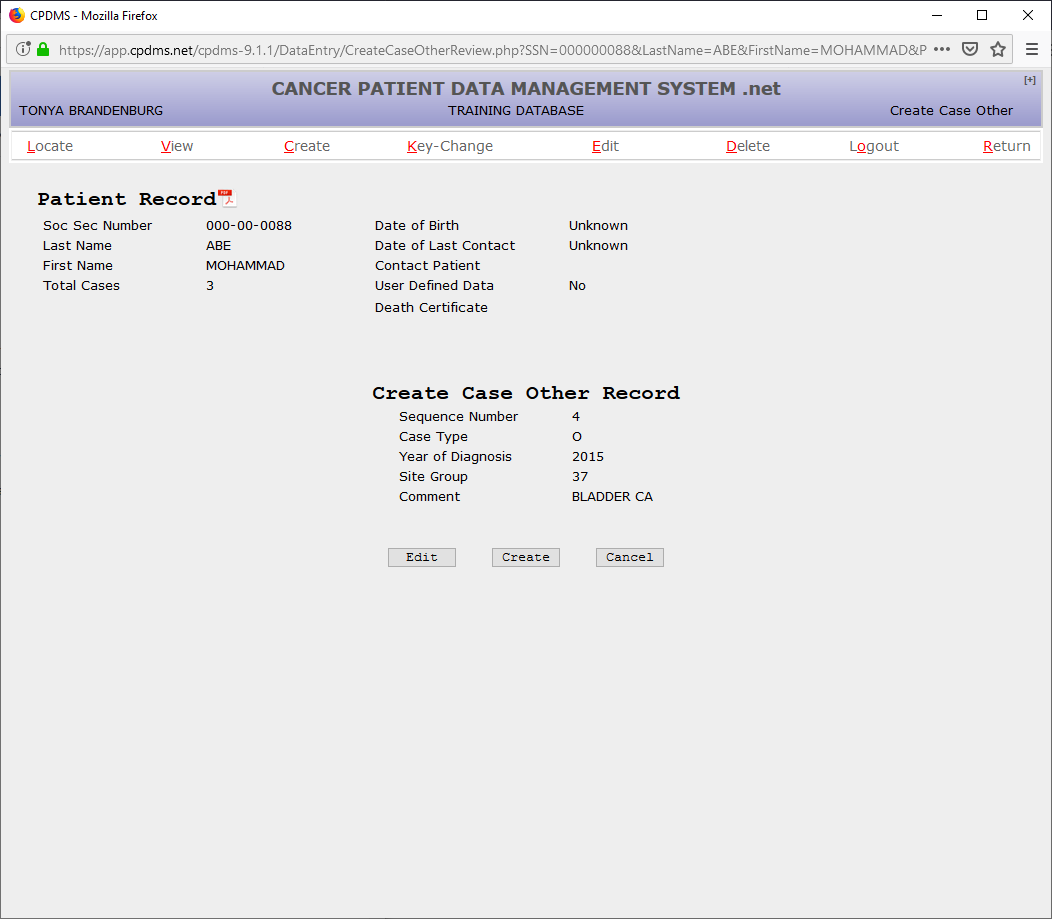
Select “Edit” to modify the data that has been entered, or “Cancel” to escape without saving the data. Choose “Create” to create a case record.
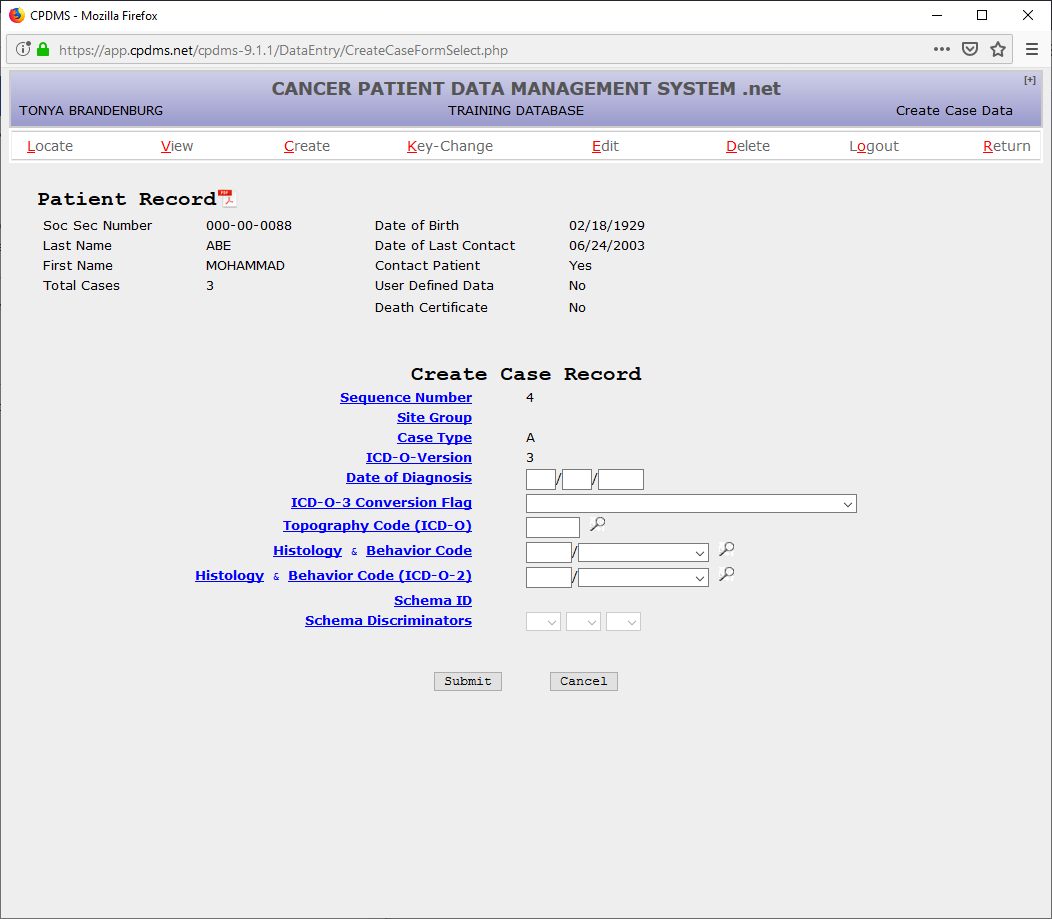
If ‘Full Abstract Form’ is selected, an edit form is displayed with the date of diagnosis, ICD-O-3 conversion flag, topography, histology, and behavior code. Choice Lists are available for ICD-O-3 conversion, topography, histology, and behavior.
Site Group- Calculated field; based upon the topography and histology. ICD-O Version – Calculated field; this field defaults to ‘3’ for 3rd edition.
Date of Diagnosis – Mandatory field; must be entered as MMDDYYYY. The value entered must be a valid date on or before the current date.
ICD-O-3 Conversion Flag – Mandatory field; a Choice List is available. This field defaults to zero when the date of diagnosis is 1/1/2001 or later.
Topography Code – Mandatory field; a Choice List is available which includes codes from all editions of ICD-O.
Histology and Behavior Code – Mandatory field; this is actually stored as two separate fields. A Choice List is available.
Histology and Behavior Code (ICD-O-2) – Mandatory field for cases diagnosed prior to 1/1/2001; this is actually stored as two separate fields. A Choice List is available.
If Site Specific Factor 25 is required you will need to fill it in, otherwise it will be defaulted.
After the previous fields have been completed, select “Submit” to save the data entered, or “Cancel” to escape without saving. If “Submit” was chosen, the following screen will appear:

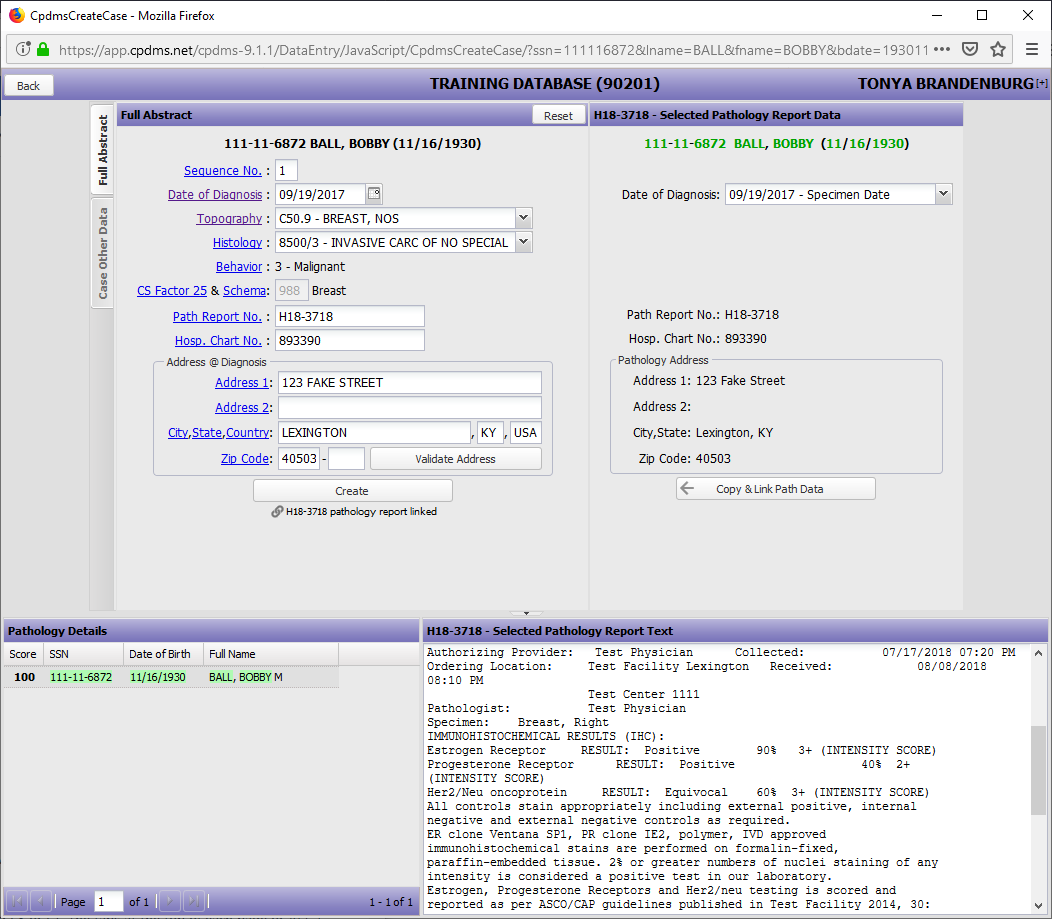
If the patient has an associated path report:
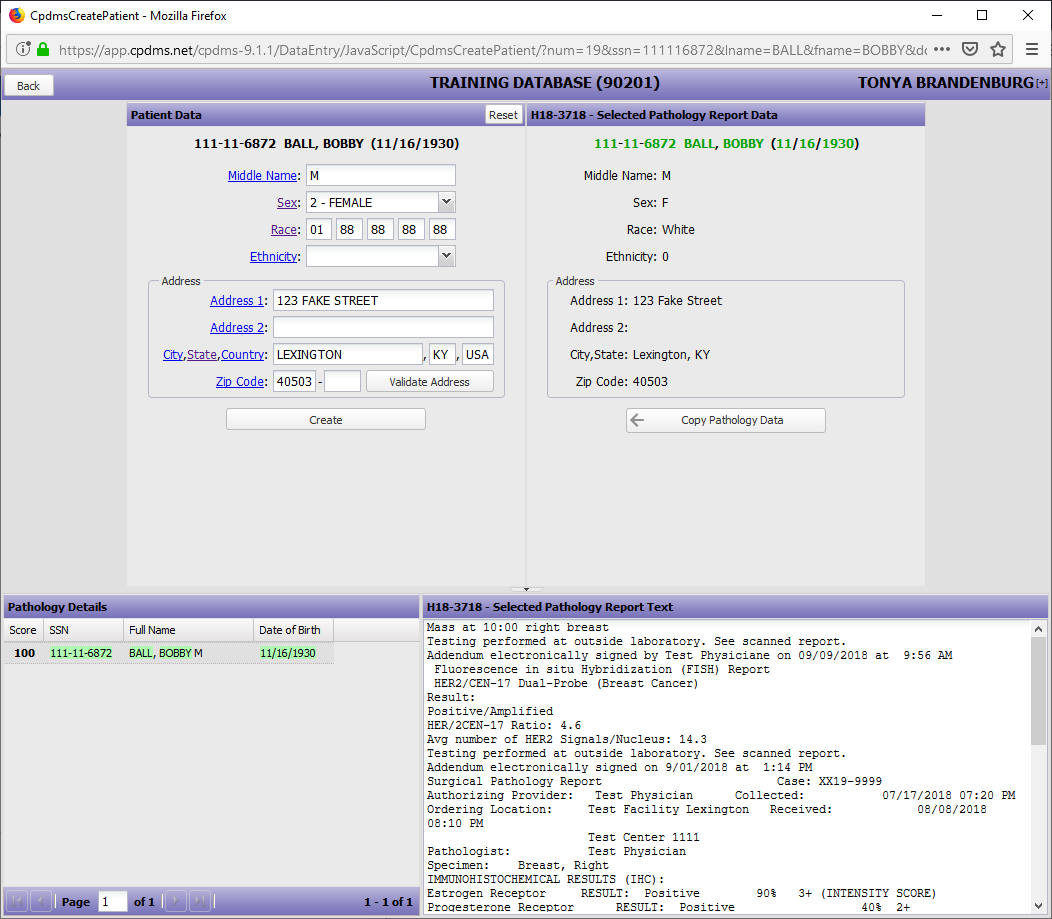
Once you put in the SSN, name, and date of birth and click "submit" you will be taken to the screen below:
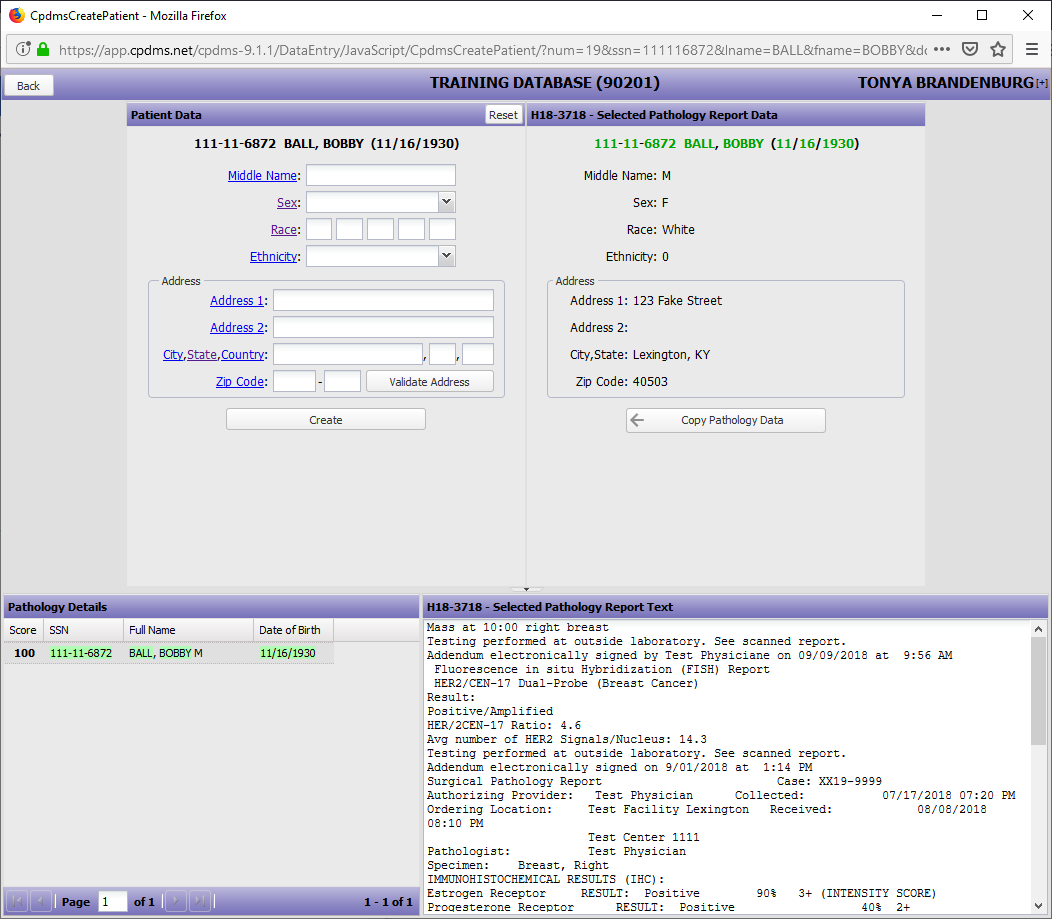
Click copy pathology data to use the address listed if it is correct and fill in any missing information, as seen below:
Once you have input the information click create and you will be taken to the Patient Data Edit Form, as seen below:
Select “Edit” to modify the data that has been entered, or “Cancel” to escape without saving the data. Choose “Create” to create a case record.
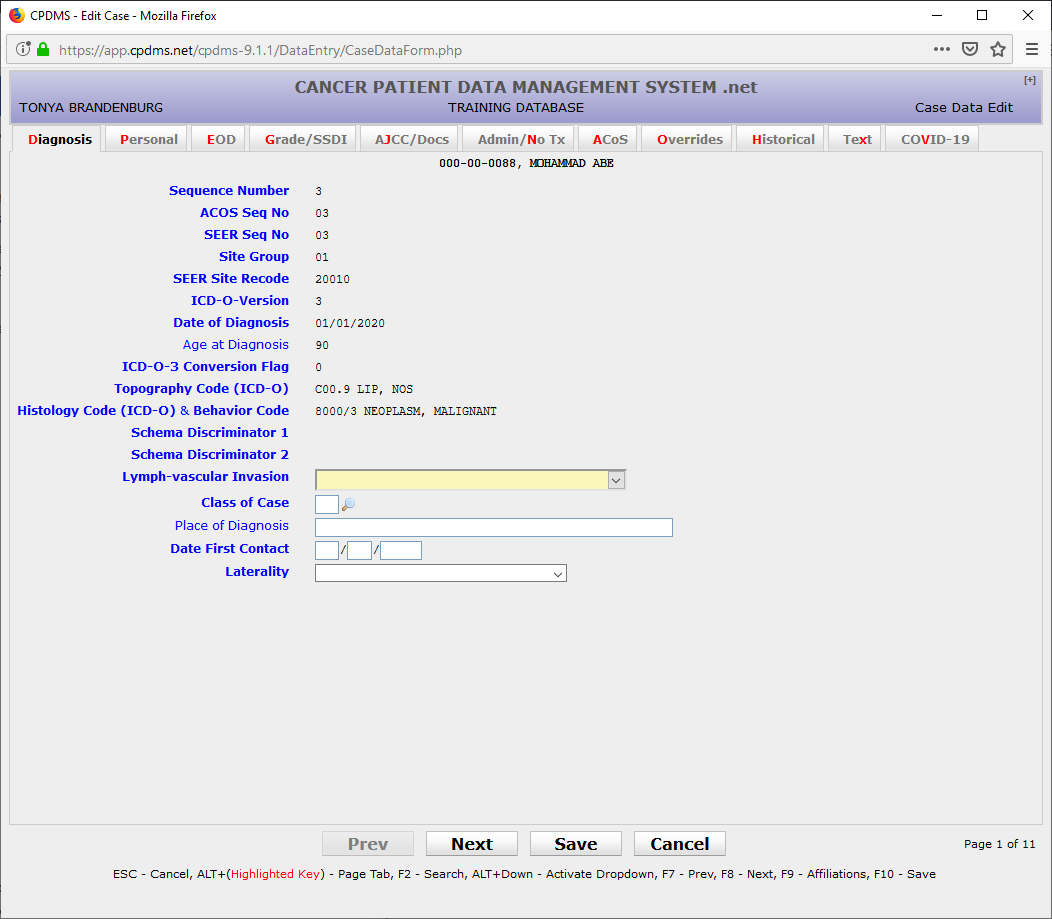
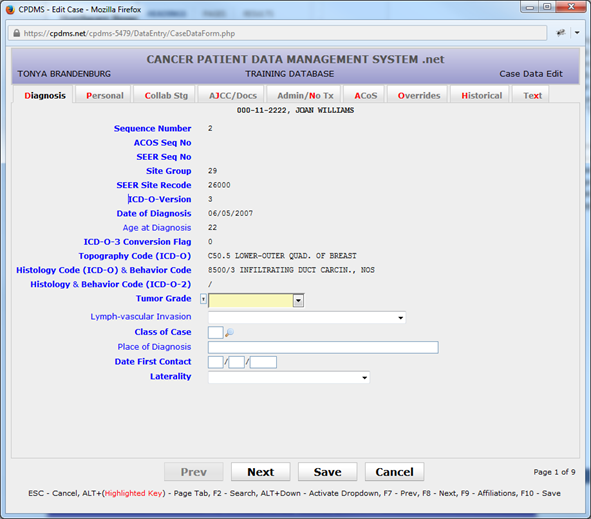
The Case Data Edit Form is now displayed, as seen below:
Once the patient is created you can now create the case using the pathology report, as seen below:
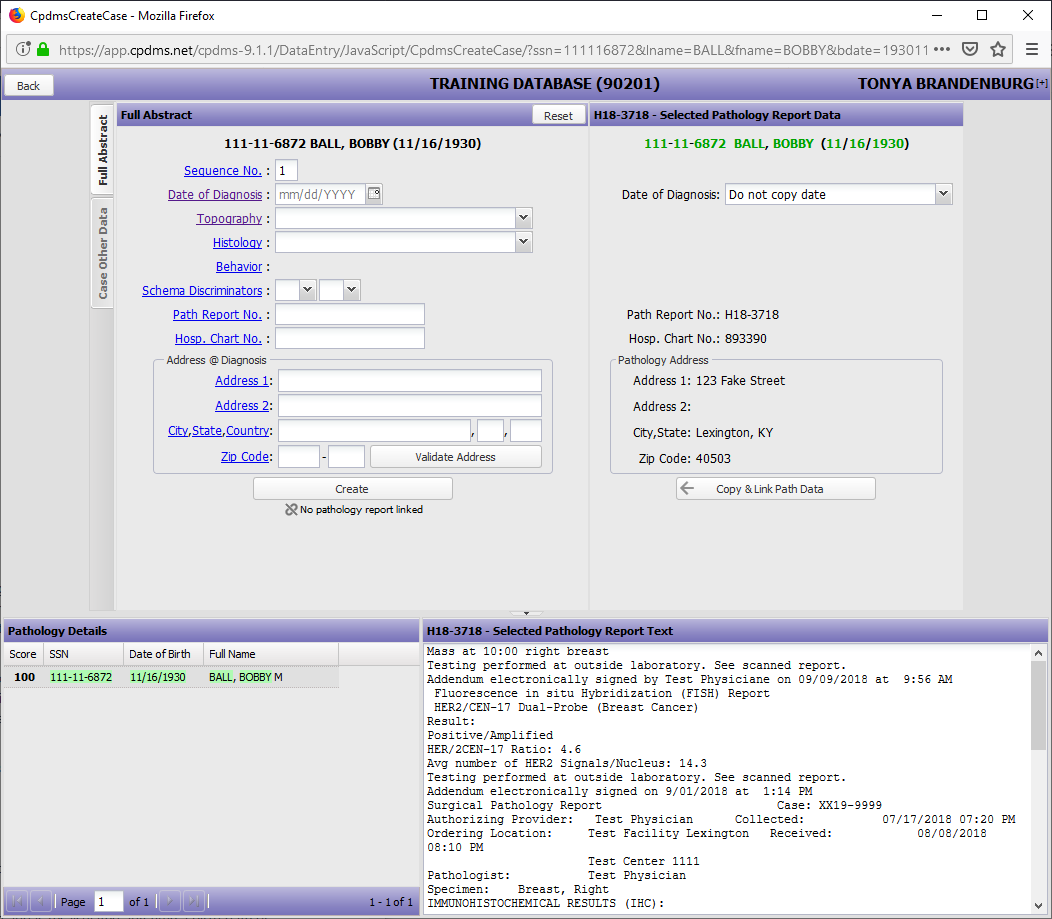
Once you have linked the pathology report you want and copied any information necessary click "create", as seen below:
The Case Data Edit Form is eight pages long, and may be navigated using the “Next” and “Prev” buttons, or by pressing F8 or F7. The tabs at the top of each page or ALT + hot key may be used to move directly to a particular page. There is a ninth tab on the top of the page labeled “Text” which opens the text data entry screen. Text may be entered and saved at any point during case data entry. After text has been saved, the cursor is automatically returned to the previous field in the Case Data Edit Form. (See the section on creating text at the end of “Enter a New Patient” for instructions regarding entering text.)
Note that the key fields Sequence Number, Site Group, ICD-O Version, Date of Diagnosis, ICD-O-3 Conversion Flag, Topography, Histology & Behavior, and Histology & Behavior (ICD-O-2) automatically appear on the first page of the Case Data Edit Form with the values which were specified when creating the case record. These fields may not be edited from the case data edit screen. In order to make changes to these fields, see the instructions for Key Changes. In addition, several calculated fields are present. These are described below.
ACoS Sequence Number – Calculated field; cannot be entered by the user. This field value is calculated when the case is created and is recalculated any time the sequence number is key changed.
SEER Sequence Number – Calculated field; cannot be entered by the user. This field value is calculated when the case is created and is recalculated any time the sequence number is key changed.
SEER Site Recode – Calculated field; cannot be entered by the user. This field value is calculated when the case is created and is recalculated any time the topography or histology is key changed.
Age at Diagnosis – Calculated field; cannot be entered by the user. This field value is calculated when the case is created and is recalculated any time a birth date or diagnosis date is edited. A warning message occurs if the age is calculated at less than 10 years old and the cancer site group is unlikely for children.
Tumor Grade – Mandatory field; a Choice List is available. There is a small T next to the drop down box. If you click on the T you can enter text about that field. For further details please see page 81.
Lymph-vascular Invasion – Optional field; a Choice List is available.
Class of Case – Mandatory field; a Choice List is available.
Place of Diagnosis – Optional field; any alphanumeric or special characters are allowed.
Date of First Contact – Mandatory field; must be entered as MDDYYYY. The value entered must be a valid date on or before the current date and on or before the date of initial discharge.
Laterality – Mandatory field; a Choice List is available. This field is linked by to the topography code to a list of paired organs. It should be coded ‘0’ if the anatomic site is not a paired organ, or 1-9 if it is a paired organ.
Use the “Next” button, the F8 key, or the “Personal” tab to go to the next page.
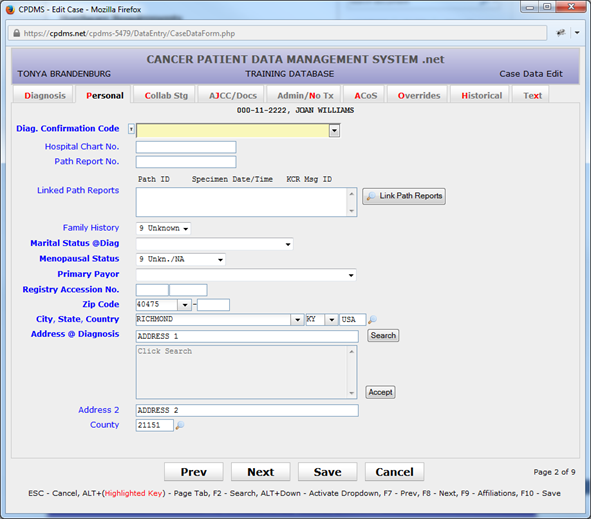
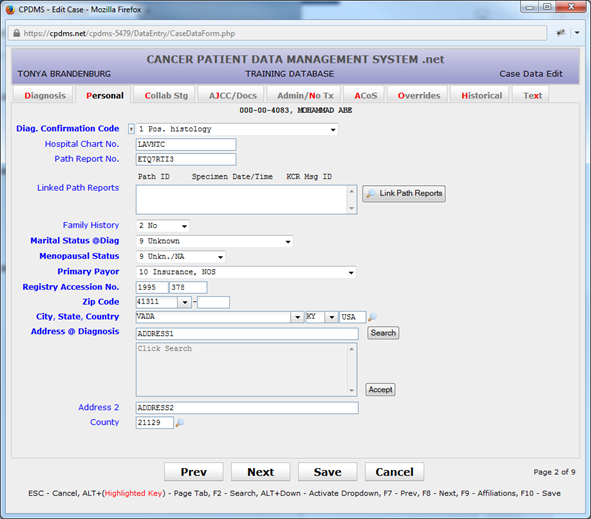
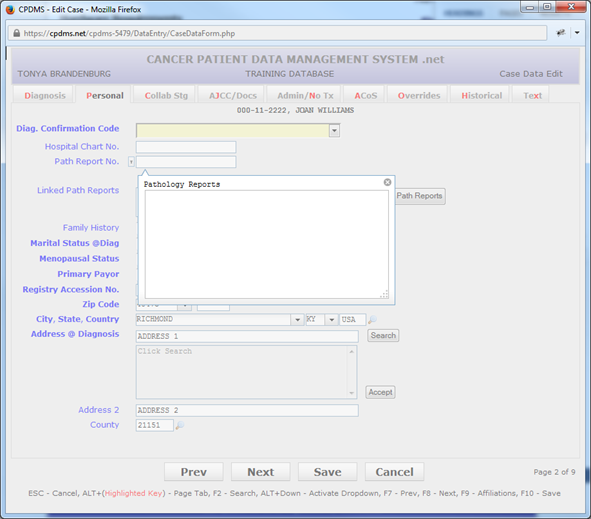
Diagnostic Confirmation Code – Mandatory field; a Choice List is available.
Hospital Chart Number – Optional field; alphanumeric and special characters allowed. The field may be left blank.
Pathology Report Number – Optional field; any alphanumeric or special characters are allowed.
Linked Path Reports – Optional field; Look-up tool to link path reports from facilities to path report.
Family History – Optional field; a Choice List is available.
Marital Status at Diagnosis – Mandatory field; a Choice List is available. If age at diagnosis is <15, a warning will appear if this field is not coded to ‘1’.
Menopausal Status – Optional field; a Choice List is available. Field defaults to ‘9’ for Unknown or not applicable. This field is linked to the variable sex in the patient record. If the patient is coded ‘1’ for male, then menopausal status must remain ‘9.’ Otherwise, it may be written over with any valid choice.
Primary Payer – Mandatory field; a Choice List is available.
Address at Diagnosis – This field is automatically filled in with the patient’s current address but it may be written over with another address.
City at Diagnosis – This field is automatically filled in with the patient’s current city but it may be written over with another city.
State at Diagnosis – This field is automatically filled in with the patient’s current state but it may be written over with another state. A Choice List is available.
Zip Code at Diagnosis – This field is automatically filled in with the patient’s current ZIP code but it may be written over with another ZIP code.
County at Diagnosis – Mandatory field; a Choice List is available. This field is linked to ZIP code and is automatically filled in for ZIP codes that are in just one county. However, for ZIP codes that cross county lines, this field remains blank and must be entered by the user. Both the US Census and US Postal Service web sites have search utilities in which an address may be entered and its county determined.
Registry Accession Number – Mandatory field; this item is actually stored as two fields – the accession year and the order number within that accession year. When concatenated, these must form a unique registry accession number within the database. The order number is automatically calculated with the next available number; however, this may be overridden.
Use the “Next” button, the F8 key, or the “EOD” tab to go to the next page.
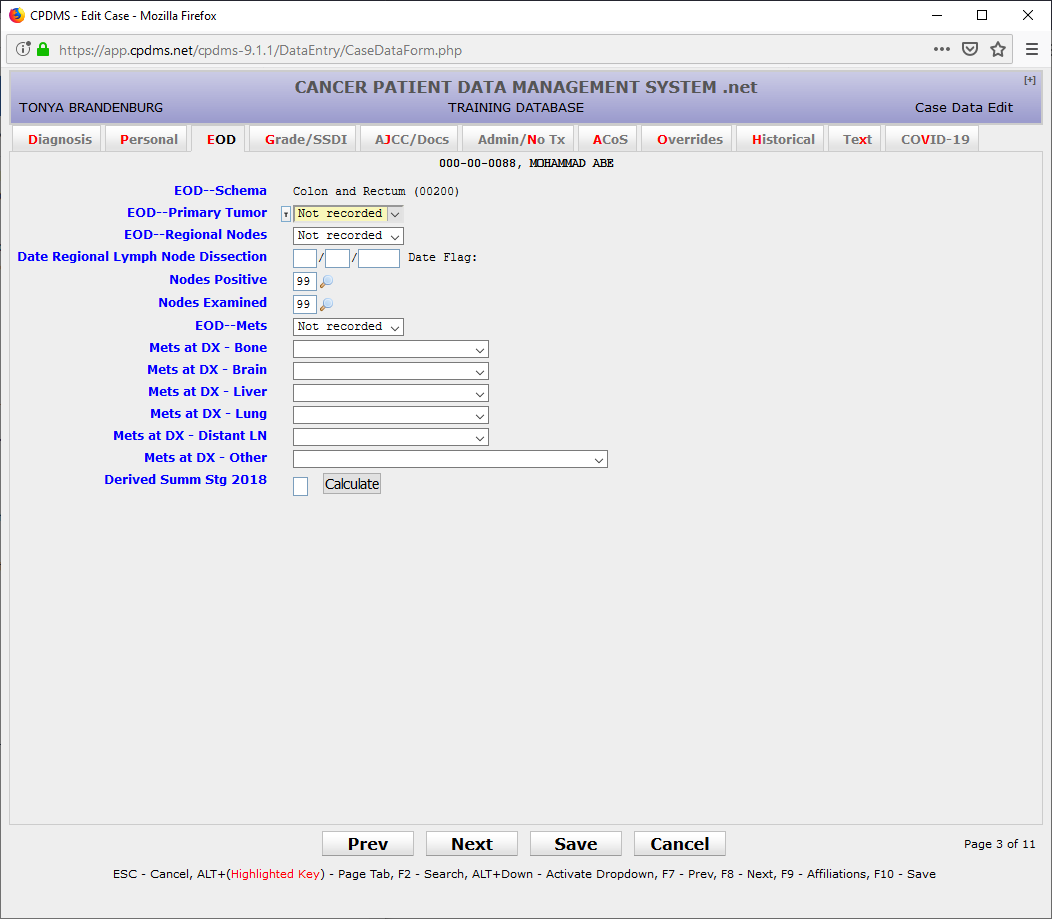
EOD Primary Tumor – Mandatory field; must be numeric.
EOD Regional Nodes – Mandatory field; must be numeric.
Date Regional Lymph Node Dissection - Mandatory field; must be numeric in MM/DD/YYYY format
Nodes Positive – Mandatory field; must be numeric. Field defaults to ‘99’ for ‘Unknown’ but may be written over with any number less than or equal to the value entered in Nodes Examined. However, if Nodes Examined is zero, Nodes Positive must be 98.
Nodes Examined – Mandatory field; must be numeric.
EOD Mets – Mandatory field; must be numeric.
Mets at DX – Bone; Mandatory field; a Choice List is available.
Mets at DX – Brain; Mandatory field; a Choice List is available.
Mets at DX – Liver; Mandatory field; a Choice List is available.
Mets at DX – Lung; Mandatory field; a Choice List is available.
Use the "Next" button, the F8 or the "Grade/SSDI" tab to go to the next page.
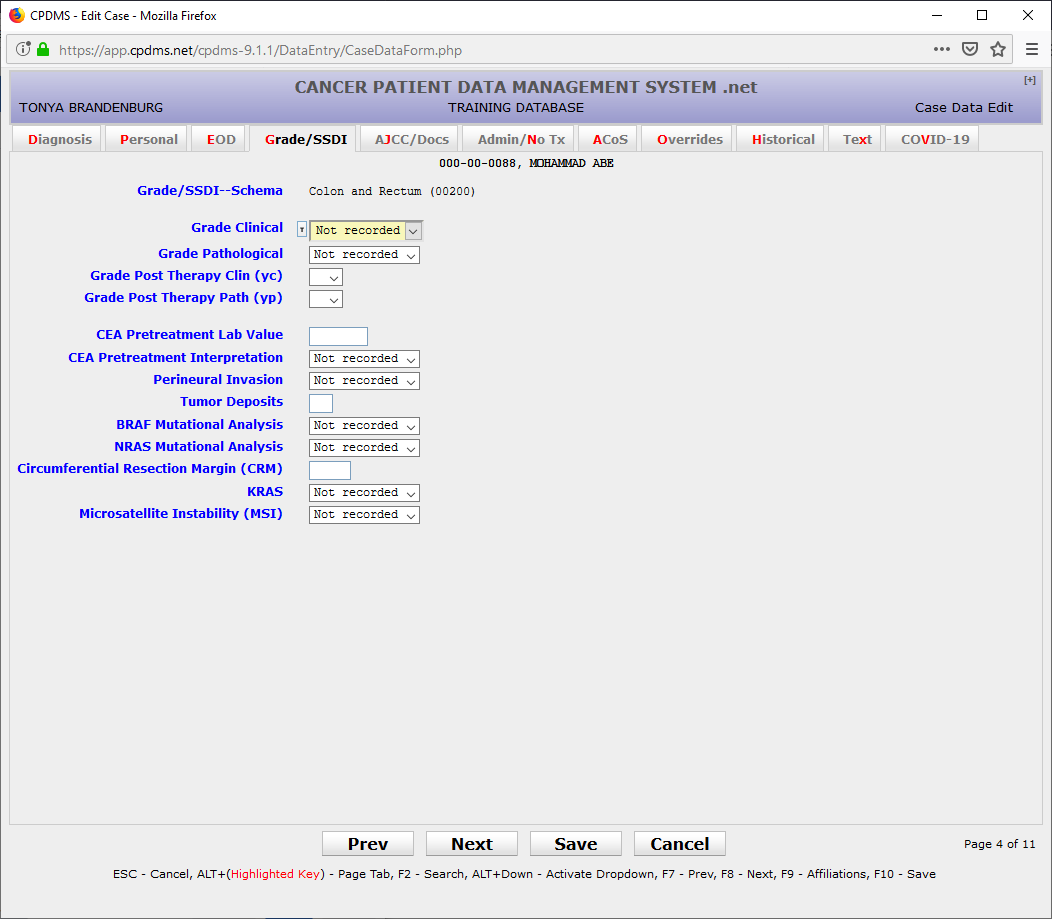
Grade Clinical - Mandatory field; refer to Grade Manual or SEER RSA
Grade Pathological - Mandatory field; refer to Grade Manual or SEER RSA
Grade Post Therapy Clin (yc) - Mandatory field; can be left blank; refer to Grade Manual or SEER RSA
Grade Post Therapy Path (yp) - Mandatory field; can be left blank; refer to Grade Manual or SEER RSA
SSDIs - Based on schema; Mandatory field(s); refer to SSDI Manual or SEER RSA
Use the “Next” button, the F8 key, or the “AJCC/Docs” tab to go to the next page.
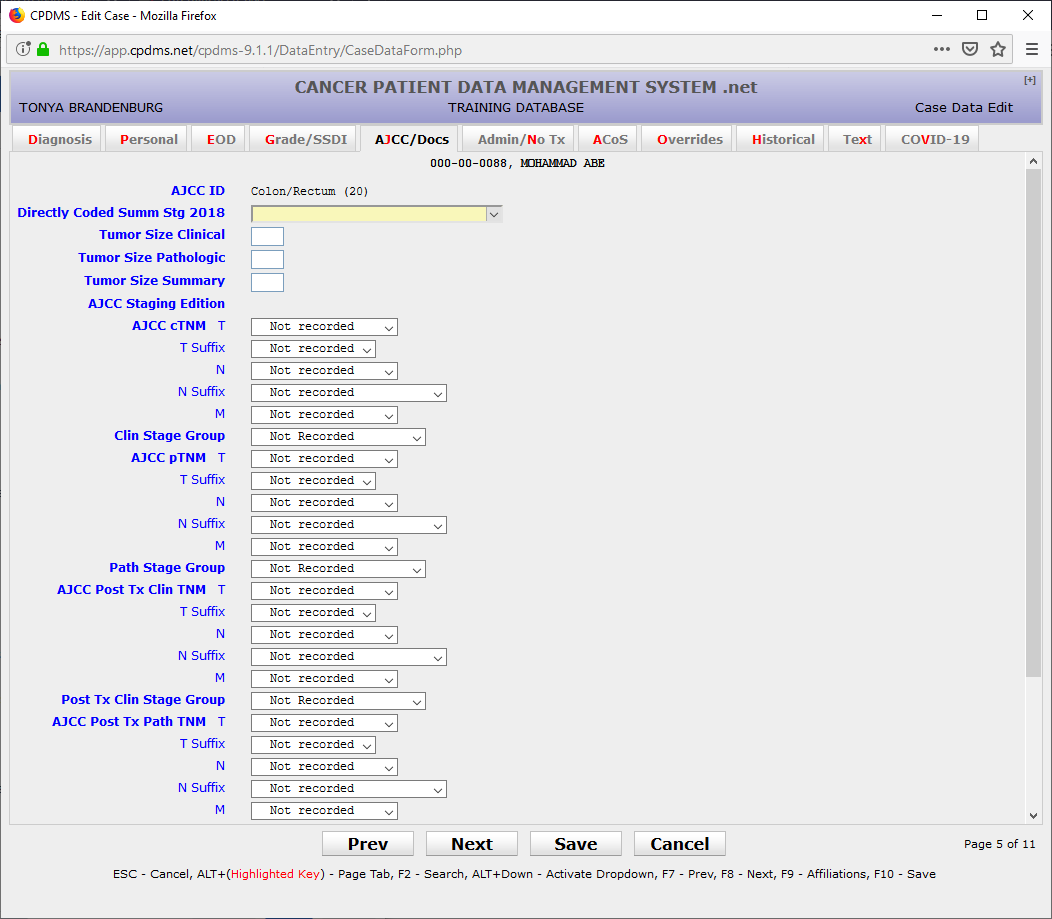
Directly Coded Summary Stage 2018 – Mandatory field; a Choice List is available.
Refer to AJCC 8th/9th edition staging manual for current AJCC staging.
AJCC Staging Edition – Mandatory field; a Choice List is available. Field should be '8' when there is no AJCC staging for the site and histology combination in the current case. Entering '8' will auto-fill all of the AJCC fields with 8's.
AJCC cTNM Classification – Mandatory field. This is actually stored as separate fields: the T value, T suffix, the N value, N suffix, and the M value. A Choice List is available for each.
AJCC cTNM Stage Group - Mandatory field; a Choice List is available.
AJCC pTNM Classification – Mandatory field. This is actually stored as separate fields: the T value, T suffix, the N value, N suffix, and the M value. A Choice List is available for each.
AJCC pTNM Stage Group – Mandatory field; a Choice List is available.
AJCC Post Tx Clin TNM Classification – Mandatory field. This is actually stored as separate fields: the T value, T suffix, the N value, N suffix, and the M value. A Choice List is available for each.
AJCC Post Tx Clin TNM Stage Group - Mandatory field; a Choice List is available.
AJCC Post Tx Path TNM Classification – Mandatory field. This is actually stored as separate fields: the T value, T suffix, the N value, N suffix, and the M value. A Choice List is available for each.
AJCC Post Tx Path TNM Stage Group - Mandatory field; a Choice List is available.
Alternate (Ped.) Stage System – Optional field; a Choice List is available.
Alternate (Ped.) Stage – Optional field; alphanumeric and special characters are allowed.
Managing Physician – Mandatory field for cases diagnosed after 1/1/2007; a Support File acts as a Choice List here. (Codes may be inserted into this file from this screen. See "Support Files" in Chapter Four for instructions.)
Primary Surgeon – Mandatory field; a Support File acts as a Choice List here. (Codes may be inserted into this file from this screen. See "Support Files" in Chapter Four for instructions).
Radiation Oncologist – Optional field; a Support File acts as a Choice List here. (Codes may be inserted into this file from this screen. See "Support Files" in Chapter Four for instructions).
Medical Oncologist -- Optional field; a Support File acts as a Choice List here. (Codes may be inserted into this file from this screen. See "Support Files" in Chapter Four for instructions).
Use the "Next" button, the F8 key, or the "Admin/No Tx" tab to proceed to the next page.
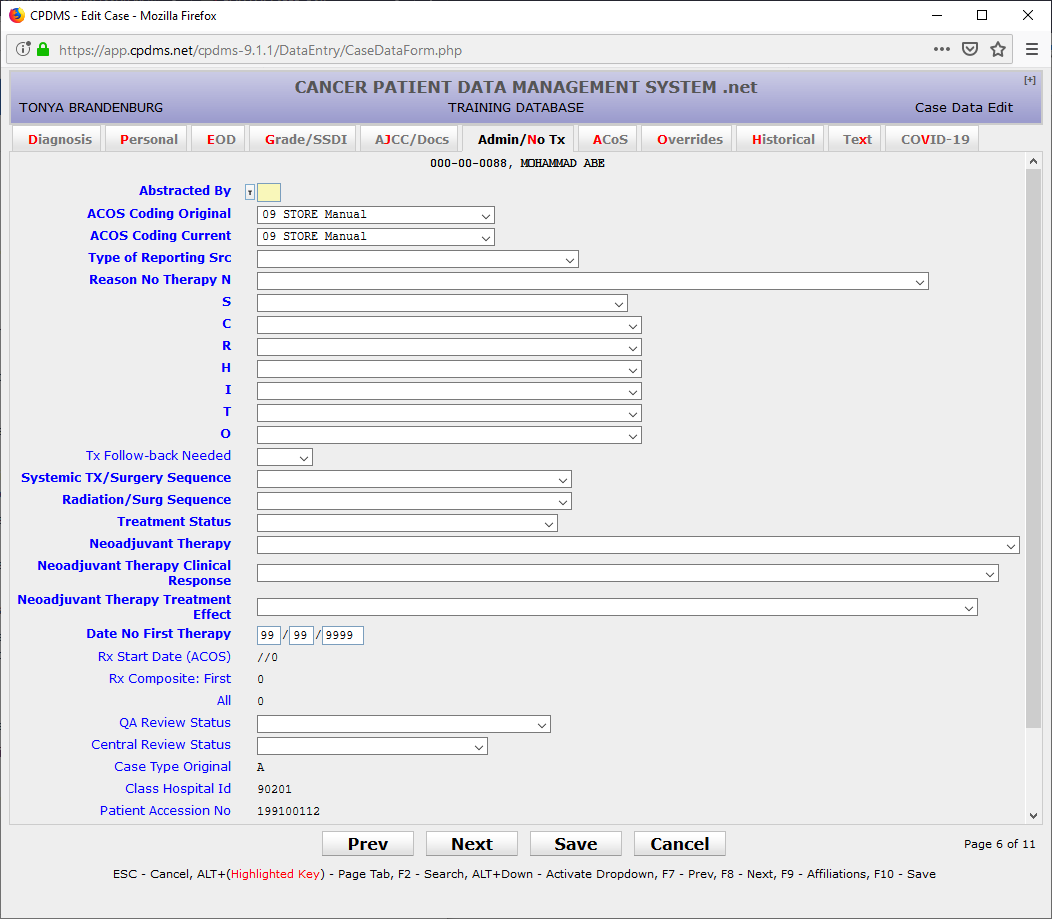
Abstracted By – Mandatory field; alphanumeric characters allowed.
ACoS Coding System – Original – Mandatory field; a Choice List is available. This field defaults to ‘8’ when the date of diagnosis is greater than 1/1/03.
ACoS Coding System- Current – Mandatory field; a Choice List is available. This field defaults to ‘8’ when the date of diagnosis is greater than 1/1/03.
Type of Reporting Source – Mandatory field; a Choice List is available.
Reason No Therapy – Mandatory field; this is actually seven fields, one for each type of therapy (surgery, chemotherapy, radiation, hormone, immunotherapy, transplant/endocrine, and other). A Choice List is available for each.
Tx Follow-back Needed – Optional field; a Choice List is available. You can mark patients that you may need to follow back on later.
Systemic Tx/Surgery Sequence – Mandatory field; a Choice List is available.
Radiation/Surg Sequence - Mandatory field; a Choice List is available.
Treatment Status - Mandatory field; a Choice List is available.
Neoadjuvant Therapy - Mandatory field; a Choice List is available.
Neoadjuvant Therapy Clinical Response - Mandatory field; a Choice List is available.
Neoadjuvant Therapy Treatment Effect - Mandatory field; a Choice List is available.
Date No First Therapy – Mandatory field if no definitive first course therapy was administered; leave blank if a first course therapy was given. Enter a valid date or all 9’s if date is unknown.
Rx Start Date (ACoS) - Calculated field; this field is calculated by the computer every time the entire patient record is saved. The cursor will not go to this field; however, it is displayed for informational purposes and it is available for data analysis. It will be calculated to blank if no first course therapy exists.
Rx Composite: First – Calculated field; this field is calculated by the computer every time the entire patient record is saved. The cursor will not go to this field; however, it is displayed for informational purposes and it is available for data analysis. The therapy composite calculation recognizes only definite surgeries to the primary site as a surgical treatment.
Rx Composite: All – Calculated field; this field is calculated by the computer every time the entire patient record is saved. The cursor will not go to this field; however, it is displayed for informational purposes and it is available for data analysis. The therapy composite calculation recognizes only definite surgeries to the primary site as a surgical treatment.
QA Review Status – Optional field; a Choice List is available. Central Review Status – Optional field; a Choice List is available.
Case Type Original – Calculated field; this field indicates cases which were originally case type “S” (short forms). Cases which were initially abstracted as short forms have certain restrictions when editing or adding therapy records. Please contact CPDMS.net technical support staff for assistance in editing these records.
Class Hospital ID – Calculated field; this field shows the facility ID number of the hospital that owns the case. For a multi-facility database, this is the hospital with the highest class of case.
Date Case Completed – This is a calculated field; it cannot be filled in by the user. It indicates the date on which was the case was initially saved without errors.
Last Modification By – Calculated field; cannot be entered by the user. The username of the last individual to modify case data is recorded by the computer and is updated each time the record is edited.
Last Modification Time – Calculated field; cannot be entered by the user. The computer automatically records the date and time that case data was last modified.
Use the “Next” button, the F8 key, or the “ACoS” tab to go to the next page.
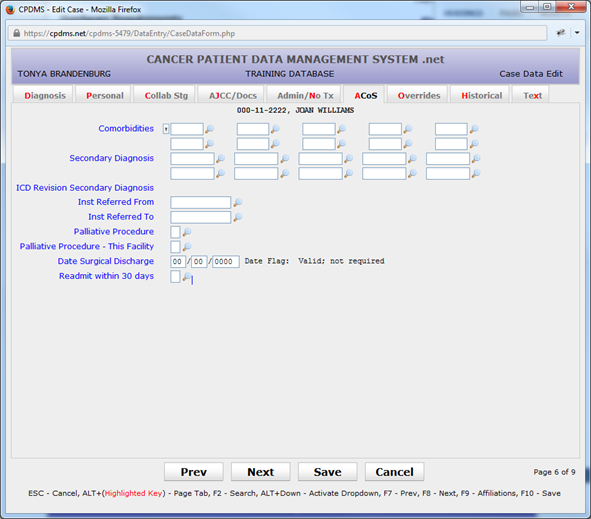
This page is required only for ACoS approved facilities. Non- approved facilities may leave all these fields blank, or may choose to fill them in. If data items are entered, they must be valid values and pass edits.
Comorbidities – Mandatory field for approved facilities; alphanumeric characters allowed. Up to ten comorbid conditions may be entered.
Comorbid ICD Revision – Calculated field; this field is for future use when ICD-10 codes are implemented for comorbidities.
Institution Referred From – Mandatory field for approved facilities; the Institution Support File acts as a Choice List here. (Codes may be inserted into this file from this screen. See “Support Files” in Chapter Four for instructions.) This field is defined as numeric. It may be left blank but a blank field will default to a zero when the case is saved.
Institution Referred To - Mandatory field for approved facilities; the Institution Support File acts as a Choice List here. (Codes may be inserted into this file from this screen.
See “Support Files” in Chapter Four for instructions.) This field is defined as numeric. It may be left blank but a blank field will default to a zero when the case is saved.
Palliative Procedure – Mandatory field for approved facilities; a Choice List is available.
Palliative Procedure- This Facility - Mandatory field for approved facilities; a Choice List is available.
Date Surgical Discharge – Mandatory field for approved facilities; must be entered as MMDDYYYY. It must be a valid date on or after the date of surgical treatment.
Re-admit Within 30 Days – Mandatory field for approved facilities; a Choice List is available.
Use the “Next” button, the F8 key, or the “Overrides” tab to proceed to the next page.
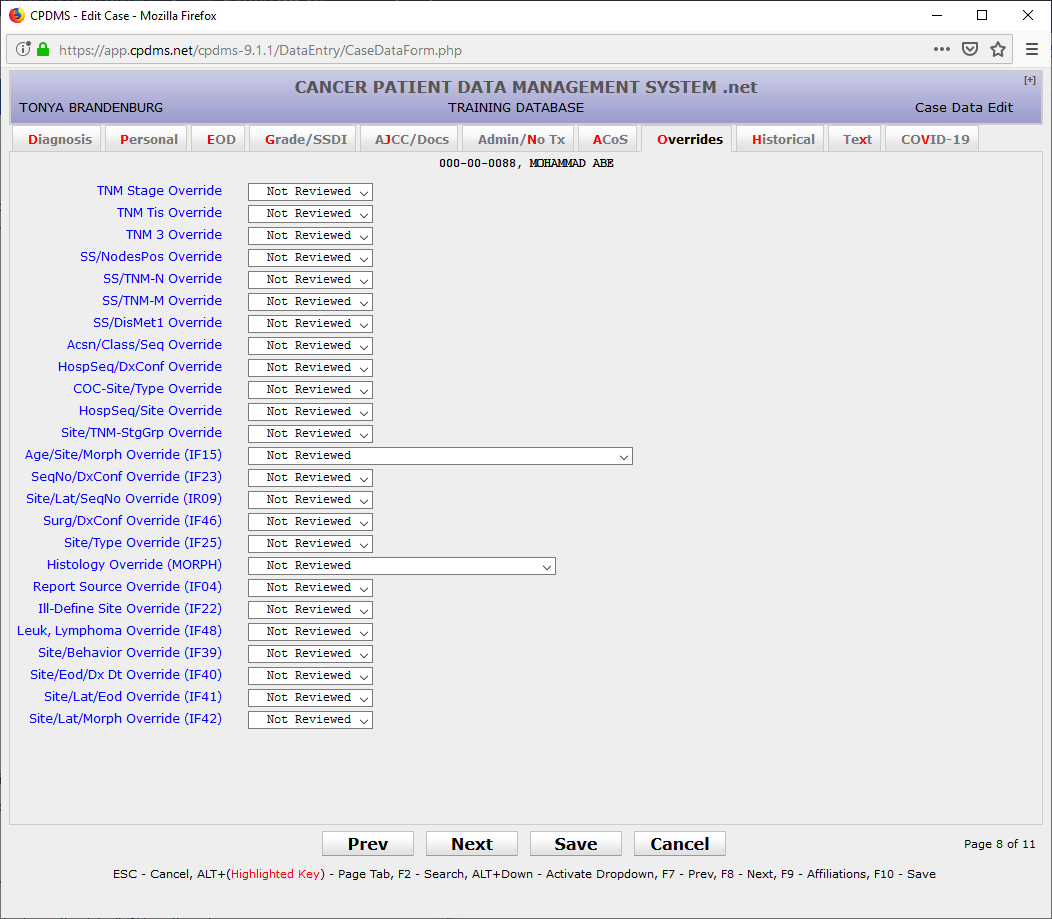
Overrides – Optional fields; used only by hospitals that submit data to NCDB and by the central registry. Override flags are used to indicate that a record with apparently inconsistent or unlikely data has been reviewed and is in fact correct as coded. There are 22 override flags available which correspond to various inter-field and inter-record edit checks. A Choice List is available for each one. These fields default to zero. Consult the CPDMS Abstractor’s Manual for further information regarding overrides.
Use the “Next” button, the F8 key, or the “Historical” tab to proceed to the next page.
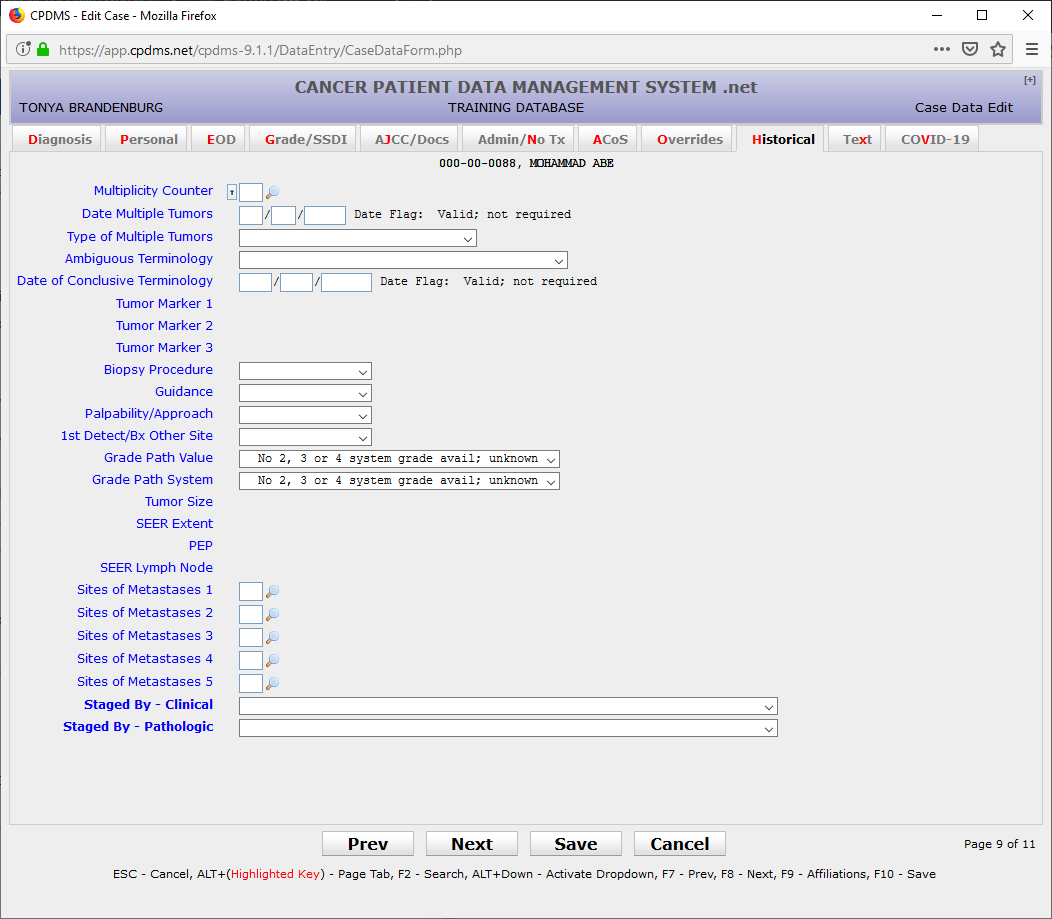
Multiplicity Counter – Mandatory field for cases diagnosed after 1/1/2007 and before 1/1/2013; this field is numeric and must be two digits.
Date Multiple Tumors – Mandatory field for cases diagnosed after 1/1/2007 and before 1/1/2013; must be entered as MMDDYYYY and must be a valid date on or before the current date.
Type of Multiple Tumors – Mandatory field for cases diagnosed after 1/1/2007 and before 1/1/2013; a Choice List is available.
Tumor Marker 1 – Mandatory field for cases diagnosed prior to 2004; applicable to breast, ovary, colorectal, liver, prostate, testis, and neuroblastomas only. Leave the default ‘9’ for other sites.
Tumor Marker 2 – Mandatory field for cases diagnosed prior to 2004; applicable to breast, prostate, and testis only. Leave the default ‘9’ for other sites.
Tumor Marker 3 – Mandatory field for cases diagnosed prior to 2004; applicable for testicular cancer only. Leave the default ‘9’ for other sites.
Biopsy Procedure – Mandatory field for cases diagnosed prior to 2004; applicable to breast and prostate only. All other sites should be coded to ‘0’. A Choice List is available.
Guidance – Mandatory field for cases diagnosed prior to 2004; applicable to breast and prostate only. All other sites should be coded to ‘0’. A Choice List is available.
Palpability/Approach – Mandatory field for cases diagnosed prior to 2004; applicable to breast and prostate only. All other sites should be coded to ‘0’. A Choice List is available.
1st Detected/Bx Other Site - Mandatory field for cases diagnosed prior to 2004; applicable to breast and prostate only. All other sites should be coded to ‘0’. A Choice List is available.
Tumor Size – Mandatory field for cases diagnosed prior to 2004; must be numeric. Field defaults to ‘999’ for unknown but may be written over.
SEER Extent – Mandatory field for cases diagnosed prior to 2004; only numeric characters allowed.
PEP (Pathologic Extent for Prostate) – Mandatory field for prostate cancer diagnosed prior to 2004; must be numeric.
SEER Lymph Node – Mandatory field for cases diagnosed prior to 2004; only numeric characters allowed.
Sites of Metastasis 1-5 – Optional fields; must be numeric. A Choice List is available.
Staged By - Clinical - Mandatory field for cases diagnosed prior to 2018. A choice list is available.
Staged By - Pathological - Mandatory field for cases diagnosed prior to 2018. A choice list is available.
NOTE: The Case Data Edit Form may be abandoned at any time without saving by pressing ESC or selecting the ‘Cancel’ button. The form can be exited and any changes saved by using the ‘Save’ button or the F10 key.
After the case has been created and saved, the system returns to the Data Entry Status screen, which will now indicate that this patient has two cases.
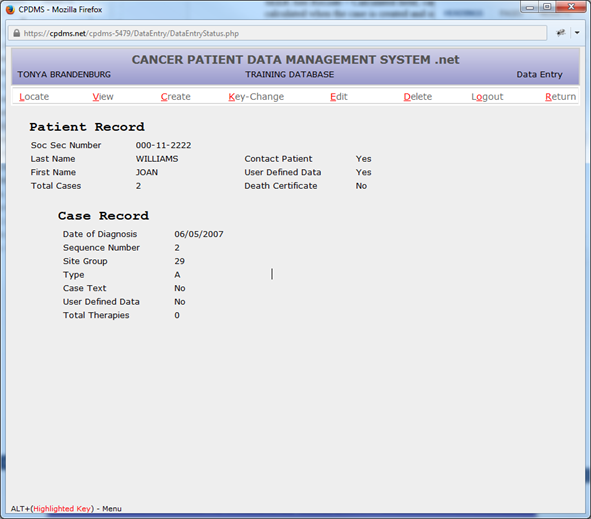
The remaining segments of the patient’s record may be created in any order.
To create a therapy record, move the cursor to CREATE at the top of page and click on ‘Therapy.’ The screen shown below will appear.
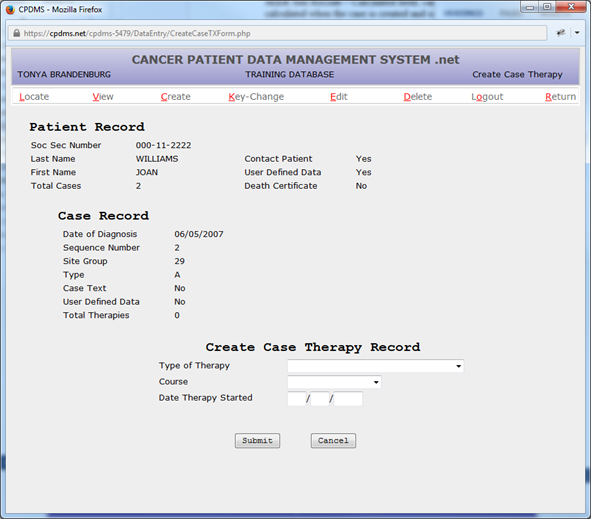
Type of Therapy – Mandatory field; a Choice List is available.
Course – Mandatory field; a Choice List is available.
Date Therapy Started – Mandatory field; must be a valid date on or before the current date and after the date of diagnosis. It must be entered as MMDDYYYY.
After these fields have been completed, choose the ‘Submit’ button to save the record, or “Cancel” to abandon it without saving. The following screen is displayed:
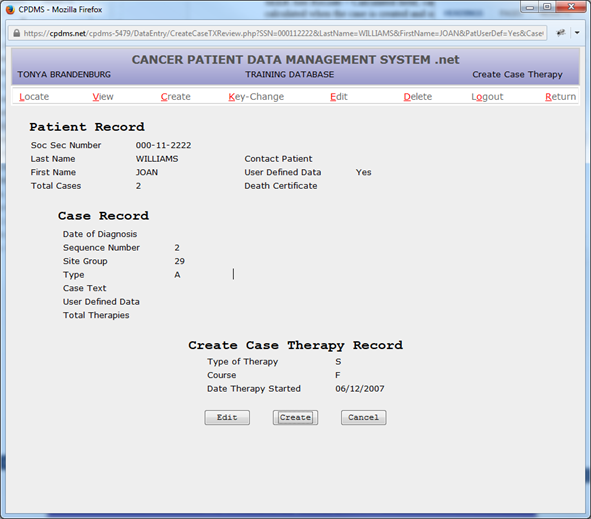
Select “Create” to create a new case therapy record or “Edit” to modify the data that has been entered. Choose “Cancel” to escape from this therapy without saving it.
Now the Case Therapy Edit Form is displayed.
NOTE: All Case Therapy Edit Forms may be abandoned at any time during editing without saving by pressing ESC or selecting the ‘Cancel’ button. Use the ‘Save’ button or the F10 key to exit the form and save any changes.
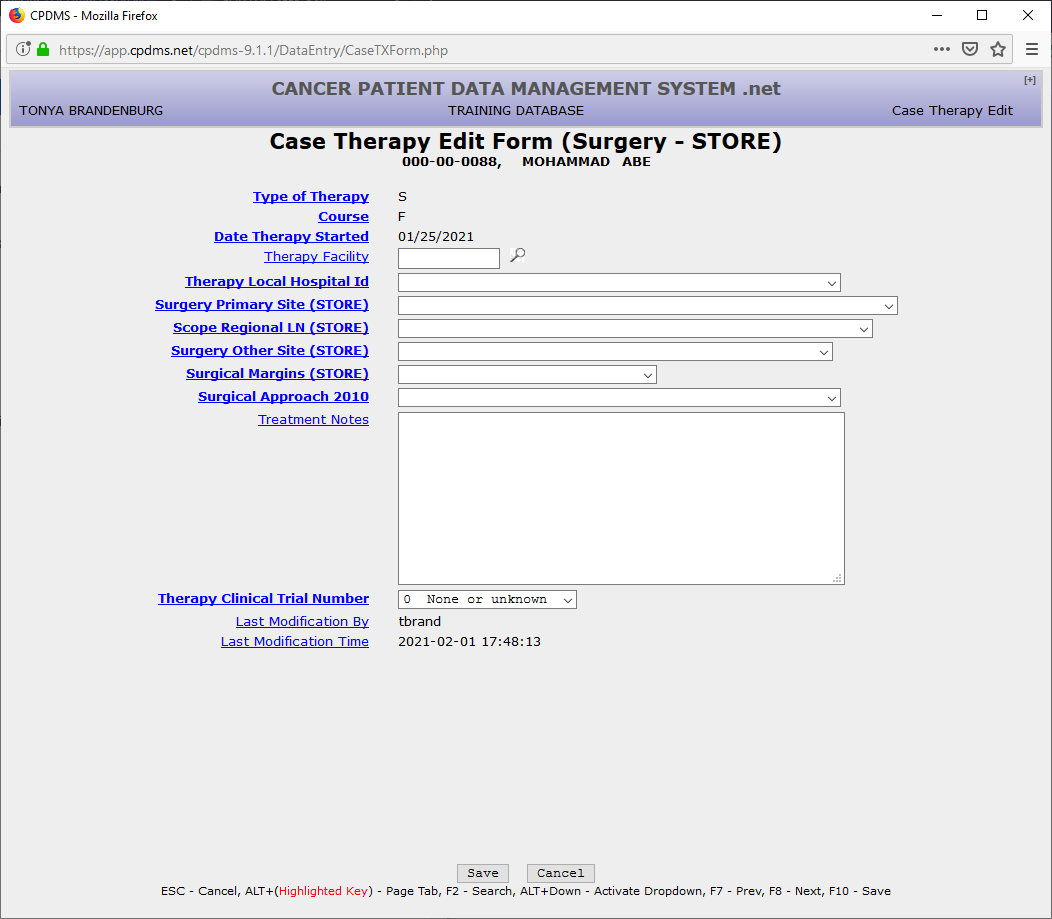
The fields that are present in the Case Therapy Edit Form will vary depending upon the type of therapy. The screen seen above is for surgical therapy.
Therapy Facility – Optional field; a Support File functions as a Choice List. Therapy Local Hospital Id – Mandatory field; a Choice List is available.
Surgery Primary Site (STORE) – Mandatory field; no Choice List is available. Consult Appendix G of the Abstractor’s Manual for the appropriate code. A code validation list exists that has been linked to the topography code so that only relevant surgical codes may be entered.
Scope Regional LN (STORE) – Mandatory field; a Choice List based on topography code is available.
Surgery Other Site (STORE) – Mandatory field; a Choice List based on topography code is available.
Surgical Margins (STORE) – Mandatory field; a Choice List based on topography code is available.
Treatment Notes – Optional field; any alphanumeric or special characters are allowed.
Therapy Clinical Trial Number – Mandatory field; a Choice List is available.
Last Modification By – Calculated field; cannot be entered by the user. The username of the last individual to modify therapy data is recorded by the computer and is updated each time the record is edited.
Last Modification Time – Calculated field; cannot be entered by the user. The computer automatically records the date and time that therapy data was last modified.
Select “Save” to save the therapy record, or “Cancel” to escape without saving.
A confirmation screen is now displayed.
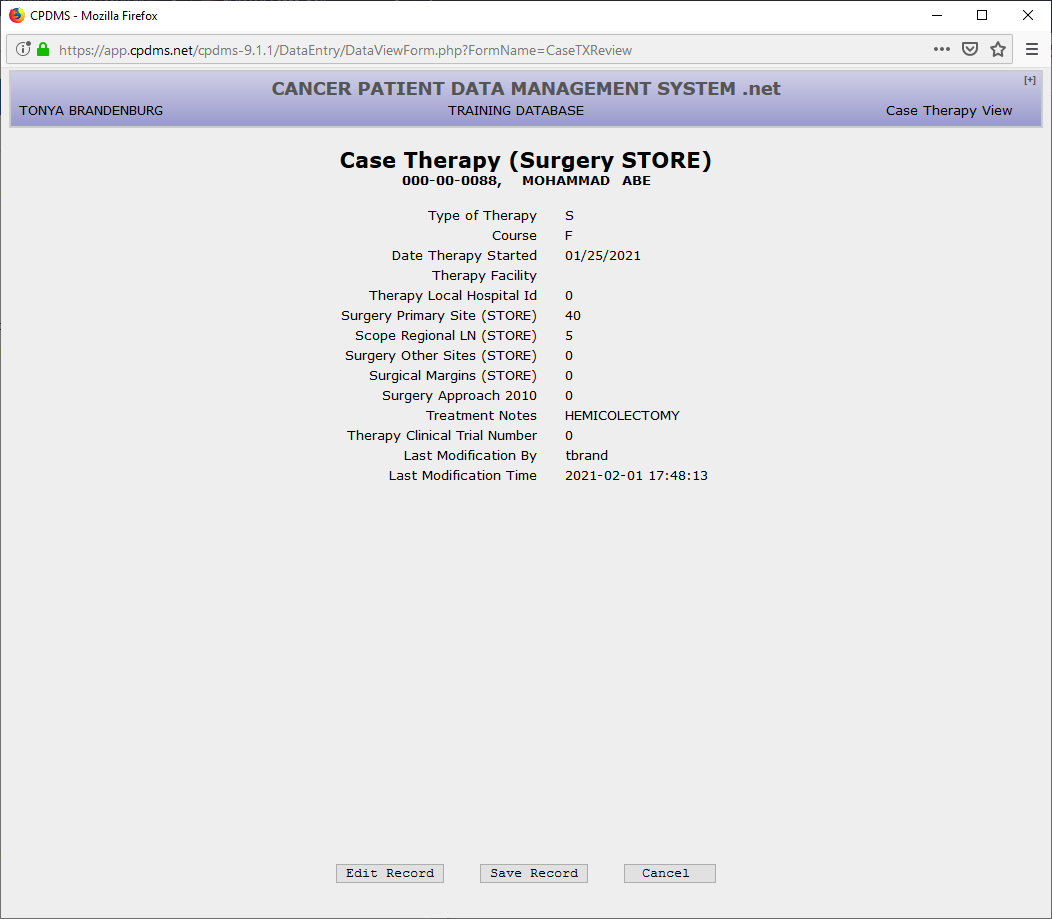
Select “Edit Record” to modify the data that has been entered or “Cancel” to escape without saving the data. Choose “Save Record” to create a case therapy.
There is no limit to the number of therapies that may be created for a patient. Below is an example screen for Radiation Therapy.
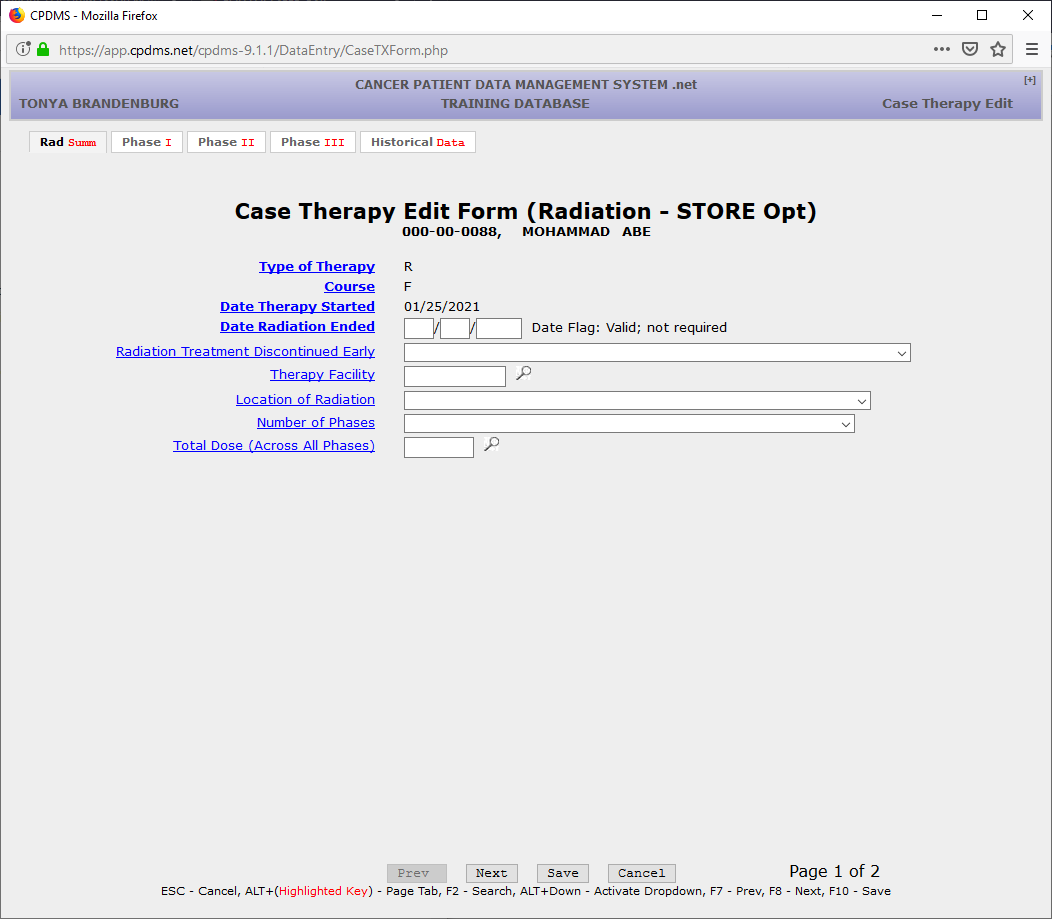
Date Radiation Ended – Mandatory field for ACoS flagged hospitals; must be a valid date on or after Date Therapy Started. It must be entered as MMDDYYYY.
Radiation Treatment Discontinued Early – Mandatory field for ACoS flagged hospitals; a Choice List is available.
Therapy Facility – Mandatory field for ACoS flagged hospitals; a Choice List is available.
Location of Radiation – Mandatory field for ACoS flagged hospitals; a Choice List is available.
Number of Phases – Mandatory field for ACoS flagged hospitals; a Choice List is available.
Total Dose (Across All Phases) – Mandatory field for ACoS flagged hospitals; must be numberical.
Use F8 or the ‘Next’ button to go on to the next page, or use the “Phase I” tab.
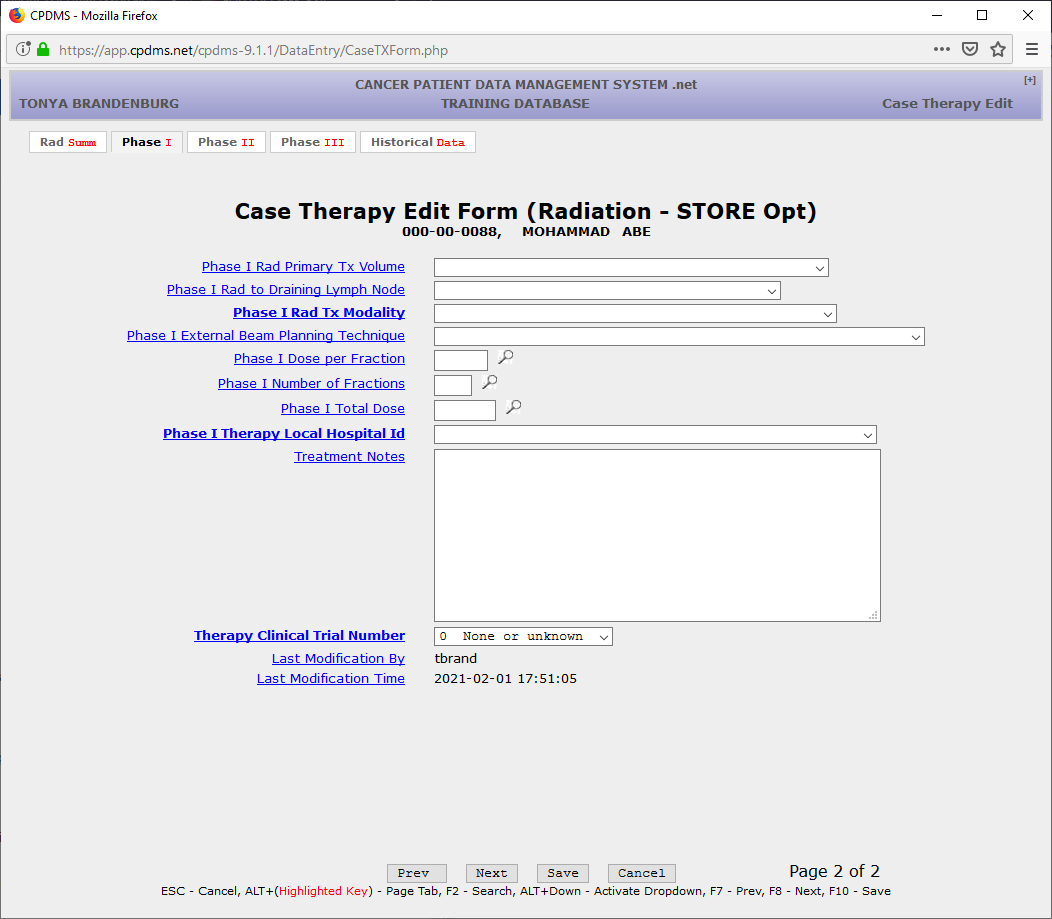
Phase I Rad Primary Tx Volume – Mandatory field for ACoS flagged hospitals; a Choice List is available.
Phase I Rad to Draining Lymph Node – Mandatory field for ACoS flagged hospitals; a Choice List is available.
Phase I Rad Tx Modality Modality – Mandatory field for ACoS flagged hospitals; a Choice List is available.
Phase I External Beam Planning Technique – Mandatory field for ACoS flagged hospitals; a Choice List is available. Boost Tx Modality-- Mandatory field for ACoS flagged hospitals; a Choice List is available.
Phase I Dose per Fraction – Mandatory field for ACoS flagged hospitals; a Choice List is available. Boost Tx Modality-- Mandatory field for ACoS flagged hospitals; a Choice List is available.
Phase I Number of Fractions – Mandatory field for ACoS flagged hospitals; a Choice List is available. Boost Tx Modality-- Mandatory field for ACoS flagged hospitals; a Choice List is available.
Phase I Total Dose – Mandatory field for ACoS flagged hospitals; a Choice List is available. Boost Tx Modality-- Mandatory field for ACoS flagged hospitals; a Choice List is available.
Phase I Therapy Local Hospital ID – Mandatory field; a Choice List is available.
If a patient has a Phase II, Phase III radiation you can input those fields in the next tabs.
Treatment Notes – Optional field; any alphanumeric or special characters are allowed.
Therapy Clinical Trial Number – Mandatory field; a Choice List is available.
Last Modification By – Calculated field; cannot be entered by the user. The username of the last individual to modify therapy data is recorded by the computer and is updated each time the record is edited.
Last Modification Time – Calculated field; cannot be entered by the user. The computer automatically records the date and time that therapy data was last modified.
The chemotherapy Case Therapy Edit Form is displayed below:
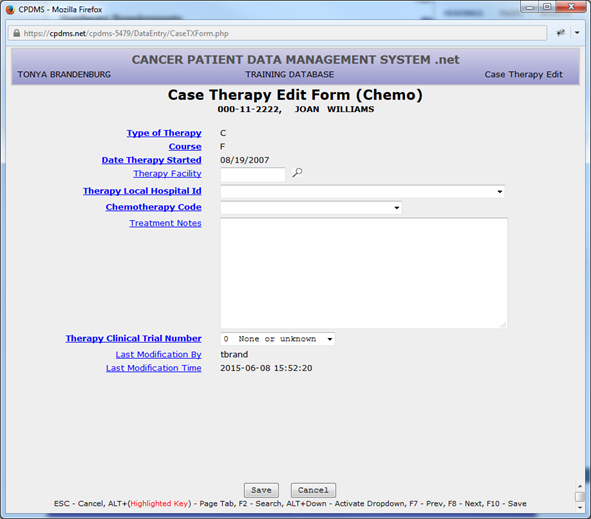
Therapy Facility – Optional field; a Support File functions as a Choice List.
Therapy Local Hospital Id – Mandatory field; a Choice List is available.
Chemotherapy Code – Mandatory field; a Choice List is available.
Treatment Notes – Optional field; any alphanumeric or special characters are allowed.
Therapy Clinical Trial Number – Mandatory field; a Choice List is available.
Last Modification By – Calculated field; cannot be entered by the user. The username of the last individual to modify therapy data is recorded by the computer and is updated each time the record is edited.
Last Modification Time – Calculated field; cannot be entered by the user. The computer automatically records the date and time that therapy data was last modified.
Below is the Case Therapy Edit Form for hormonal therapy:

Therapy Facility – Optional field; a Support File functions as a Choice List.
Therapy Local Hospital Id – Mandatory field; a Choice List is available.
Hormone Therapy Code – Mandatory field; a Choice List is available.
Treatment Notes – Optional field; any alphanumeric or special characters are allowed.
Therapy Clinical Trial Number – Mandatory field; a Choice List is available.
Last Modification By – Calculated field; cannot be entered by the user. The username of the last individual to modify therapy data is recorded by the computer and is updated each time the record is edited.
Last Modification Time – Calculated field; cannot be entered by the user. The computer automatically records the date and time that therapy data was last modified.
Below is the Case Therapy Edit Form for immunotherapy:

Therapy Facility – Optional field; a Support File functions as a Choice List.
Therapy Local Hospital Id – Mandatory field; a Choice List is available.
Immunotherapy Code – Mandatory field; a Choice List is available.
Treatment Notes – Optional field; any alphanumeric or special characters are allowed.
Therapy Clinical Trial Number – Mandatory field; a Choice List is available.
Last Modification By – Calculated field; cannot be entered by the user. The username of the last individual to modify therapy data is recorded by the computer and is updated each time the record is edited.
Last Modification Time – Calculated field; cannot be entered by the user. The computer automatically records the date and time that therapy data was last modified.
Below is the Case Therapy Edit Form for Transplant or Endocrine therapy:

Therapy Facility – Optional field; a Support File functions as a Choice List.
Therapy Local Hospital Id – Mandatory field; a Choice List is available.
Transplant Therapy Code – Mandatory field; a Choice List is available.
Treatment Notes – Optional field; any alphanumeric or special characters are allowed.
Therapy Clinical Trial Number – Mandatory field; a Choice List is available.
Last Modification By – Calculated field; cannot be entered by the user. The username of the last individual to modify therapy data is recorded by the computer and is updated each time the record is edited.
Last Modification Time – Calculated field; cannot be entered by the user. The computer automatically records the date and time that therapy data was last modified.
Below is the Case Therapy Edit Form for other therapies:

Therapy Facility – Optional field; a Support File functions as a Choice List.
Therapy Local Hospital Id – Mandatory field; a Choice List is available.
Other Therapy Code – Mandatory field; a Choice List is available.
Treatment Notes – Optional field; any alphanumeric or special characters are allowed.
Therapy Clinical Trial Number – Mandatory field; a Choice List is available.
Last Modification By – Calculated field; cannot be entered by the user. The username of the last individual to modify therapy data is recorded by the computer and is updated each time the record is edited.
Last Modification Time – Calculated field; cannot be entered by the user. The computer automatically records the date and time that therapy data was last modified.
Non-definitive surgical procedures may also be recorded using a Case Therapy Edit Form, as seen on the screen below:
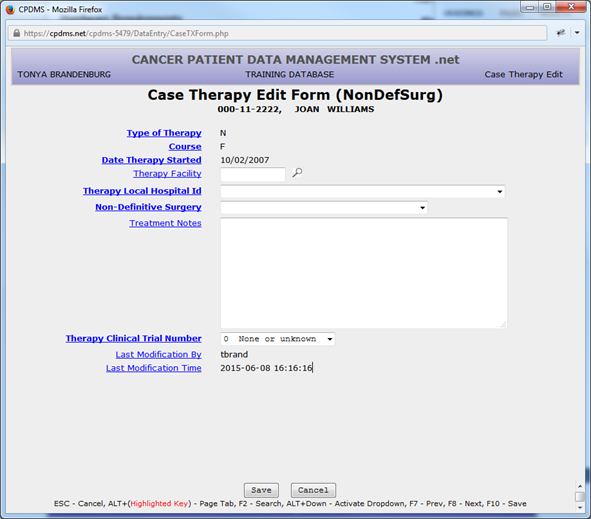
Therapy Facility – Optional field; a Support File functions as a Choice List.
Therapy Local Hospital Id – Mandatory field; a Choice List is available.
Non-definitive Surgery – Mandatory field; a Choice List is available.
Treatment Notes – Optional field; any alphanumeric or special characters are allowed.
Therapy Clinical Trial Number – Mandatory field; a Choice List is available.
Last Modification By – Calculated field; cannot be entered by the user. The username of the last individual to modify therapy data is recorded by the computer and is updated each time the record is edited.
Last Modification Time – Calculated field; cannot be entered by the user. The computer automatically records the date and time that therapy data was last modified.
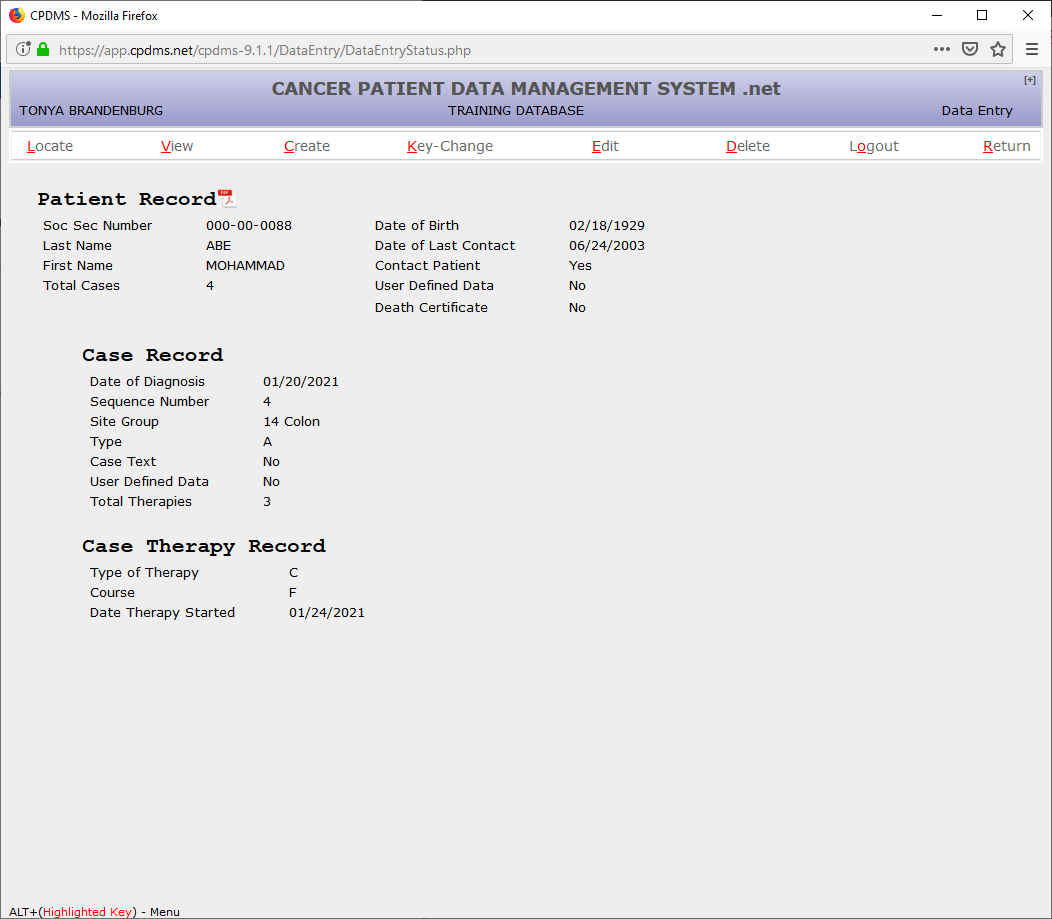
After a therapy is exited, the system returns to the Data Entry Status screen. The key fields for the last therapy entered or viewed are now displayed beneath the Case Record. The total number of therapy records stored for this case is shown in the last line of the Case Record.
The next data items on the CPDMS Abstract Form are the case level user defined fields. Like the patient level user defined fields, these items may be recorded by choosing CREATE, User Defined, and then Case (see below).
The Case User Defined Data Form is seen below:
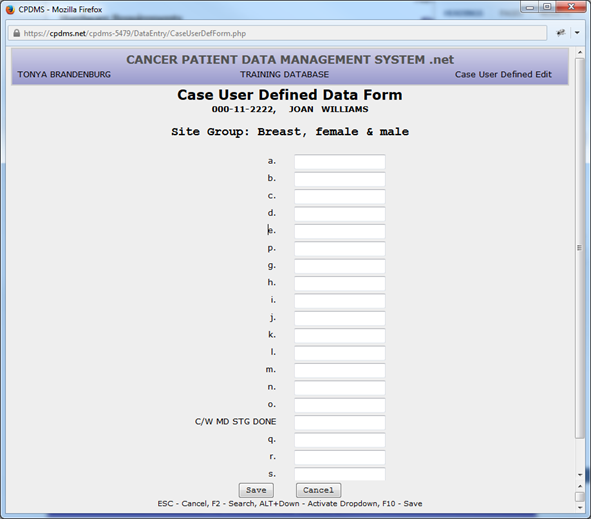
Any alphanumeric or special characters may be entered in any or all of the 20 case level site specific fields. No validity checks are performed on these items. After all relevant data items have been entered, use the “Save” button or F10 to save the record and exit this screen. (If the screen is left entirely blank, the record is not stored.) See the “Maintenance” chapter for instructions regarding assigning meaning to user defined fields. KCR allows hospitals to define their own choice list for custom user defined fields, including the ability to require certain fields to be filled in. In order to get customized user defined fields contact KCR staff.
Note that in the Data Entry Status screen, Case User Defined Data now has a “yes” next to it. This indicates that some or all of the case level user defined fields have been coded and stored for this patient.
To continue entering data related to the current case, move the cursor to CREATE and select ‘Follow-up.’ The following screen appears:
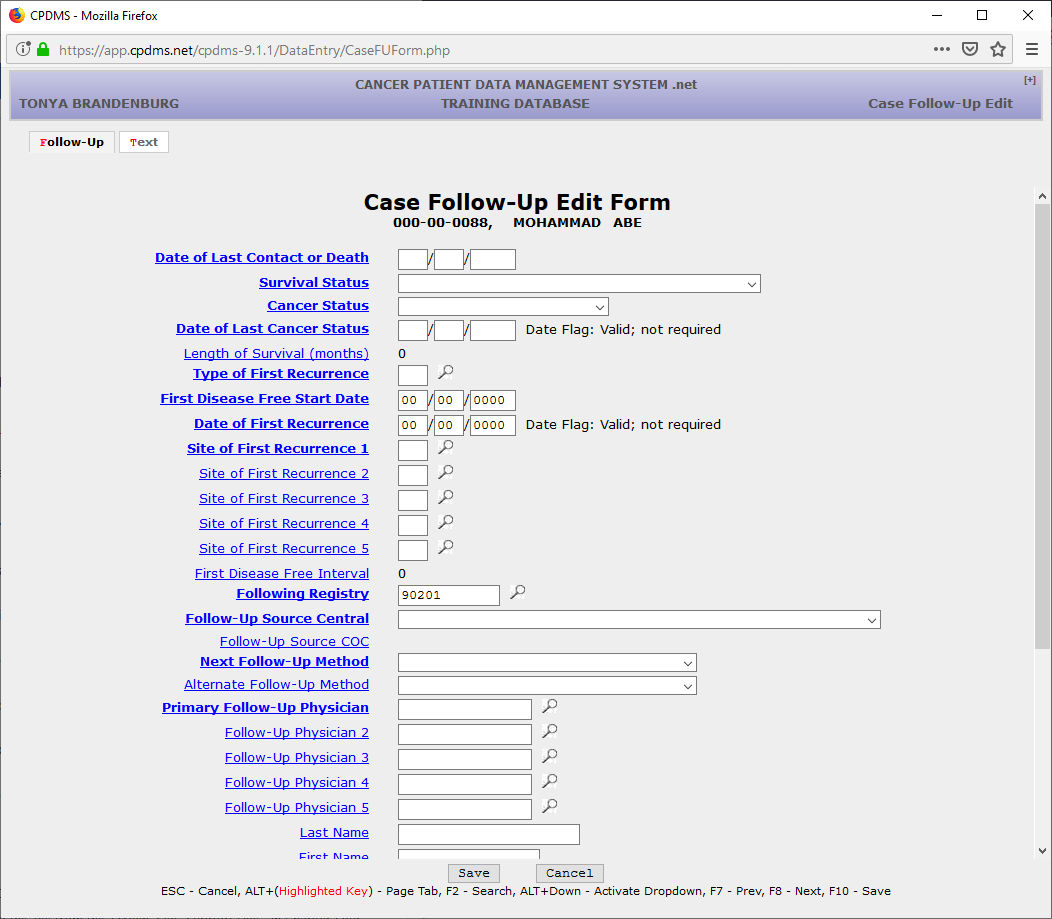
Note that the length of this edit form exceeds the size of the default window, so the scroll bar must be used to view additional fields at the bottom of the page. Text may be added at any time by clicking on the “Text” tab or using ALT + T.
Date of Last Contact or Death – Mandatory field; must be a valid date on or before the current date; entered as MMDDYYYY. The date of last contact must be greater than or equal to the diagnosis date.
Survival Status – Mandatory field; a Choice List is available. This field is used to calculate the field Vital Status in the Patient Data segment of this record.
Cancer Status – Mandatory field; a Choice List is available.
Date of Last Cancer Status – Mandatory field; must be a valid date; entered as MMDDYYYY. The date of last contact must be greater than or equal to the diagnosis date.
Length of Survival (months) – Calculated field; cannot be entered by the user. The cursor will not go to this field; however, it is displayed for informational purposes and it is available for data analysis.
Type of First Recurrence – Mandatory field; a Choice List is available. It is linked to, and must be consistent with, dates being entered for First Disease Free Start Date and Date of First Recurrence.
First Disease Free Start Date – Mandatory field if the patient has ever been considered disease free. It must be a valid date on or before the current date and after the diagnosis date, entered as MMDDYYYY. This field may be left blank if it is not applicable.
Date of First Recurrence – Mandatory field if the patient has had a recurrence after a disease free interval. It must be a valid date on or before the current date and after the diagnosis date, entered as MMDDYYYY. This field may be left blank if not applicable.
Site(s) of First Recurrence – Mandatory field if the patient has had a recurrence. There are five fields available for coding sites of recurrence. A Choice List is available. These fields may be left blank if not applicable.
First Disease Free Interval – Calculated field; cannot be entered by the user. This interval is immediately calculated in months when the Date of First Recurrence is entered and is recalculated any time the First Disease Free Start Date or Date of First Recurrence is changed.
Following Registry – Mandatory field; this field is automatically filled in with the ID number for the user’s hospital. However, it may be written over with any valid facility ID number. A Choice List is available.
Follow-up Source Central – Mandatory field; a Choice List is available.
Follow-up Source COC – Calculated field; this field is calculated from Follow-up Source Central.
Next Follow-up Method – Mandatory field. A Choice List is available. Alternate Follow-up Method – Optional field; a Choice List is available.
Primary Follow-Up Physician – Mandatory field; a Support File acts as a Choice List here. (Codes may be inserted into this file from this screen. See “Support Files” in Chapter Four for instructions.)
Follow-Up Physician 2 – Optional field; a Support File acts as a Choice List here. (Codes may be inserted into this file from this screen. See “Support Files” in Chapter Four for instructions.)
Follow-Up Physician 3 – Optional field; a Support File acts as a Choice List here. (Codes may be inserted into this file from this screen. See “Support Files” in Chapter Four for instructions.)
Follow-Up Physician 4 – Optional field; a Support File acts as a Choice List here. (Codes may be inserted into this file from this screen. See “Support Files” in Chapter Four for instructions.)
Follow-Up Physician 5 - Optional field; a Support File acts as a Choice List here. (Codes may be inserted into this file from this screen. See “Support Files” in Chapter Four for instructions.)
Last Name – Optional field; may contain any alphanumeric or special characters. First Name – Optional field; may contain any alphanumeric or special characters. Address 1 – Optional field; may contain any alphanumeric or special characters. Address 2 – Optional field; may contain any alphanumeric or special characters. City – Optional field; may contain any alphanumeric or special characters.
State – Optional field; a Choice List is available. ZIP Code – Optional field; must be numeric.
Phone – Optional field; must be numeric.
Relationship – Optional field; may contain any alphanumeric or special characters. Follow-up Text - Optional field; may contain any alphanumeric or special characters.
Last Modification By – Calculated field; cannot be entered by the user. The username of the last individual to modify follow-up data is recorded by the computer and is updated each time the record is edited.
Last Modification Time – Calculated field; cannot be entered by the user. The computer automatically records the date and time that follow-up data was last modified.
NOTE: This screen may be abandoned at any time without saving by pressing ESC or the “Cancel” button. Press F10 or the “Save” button to exit and save any changes.
If “Save” is chosen, the Case Follow-Up record will be displayed, as seen below.
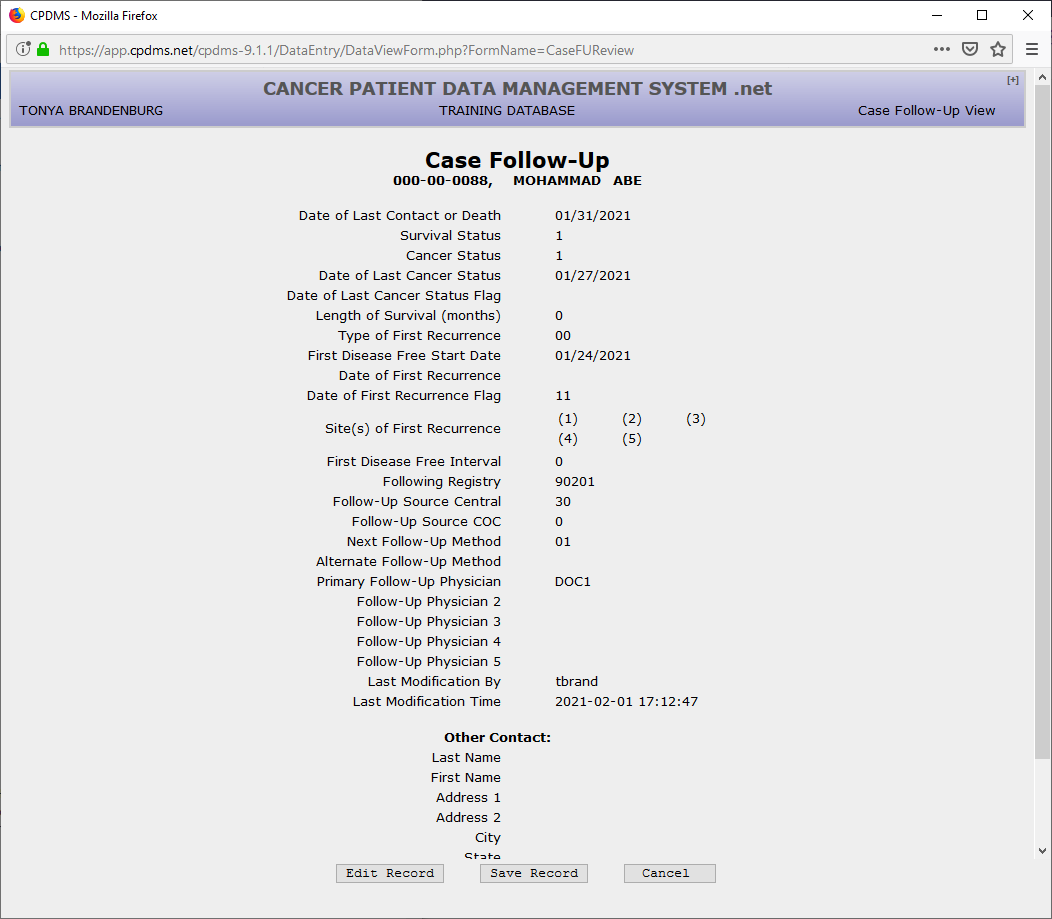
Hit ENTER to accept “Save Record,” or select “Edit Record” to return to the edit form. Choose “Cancel” to escape without saving the record.
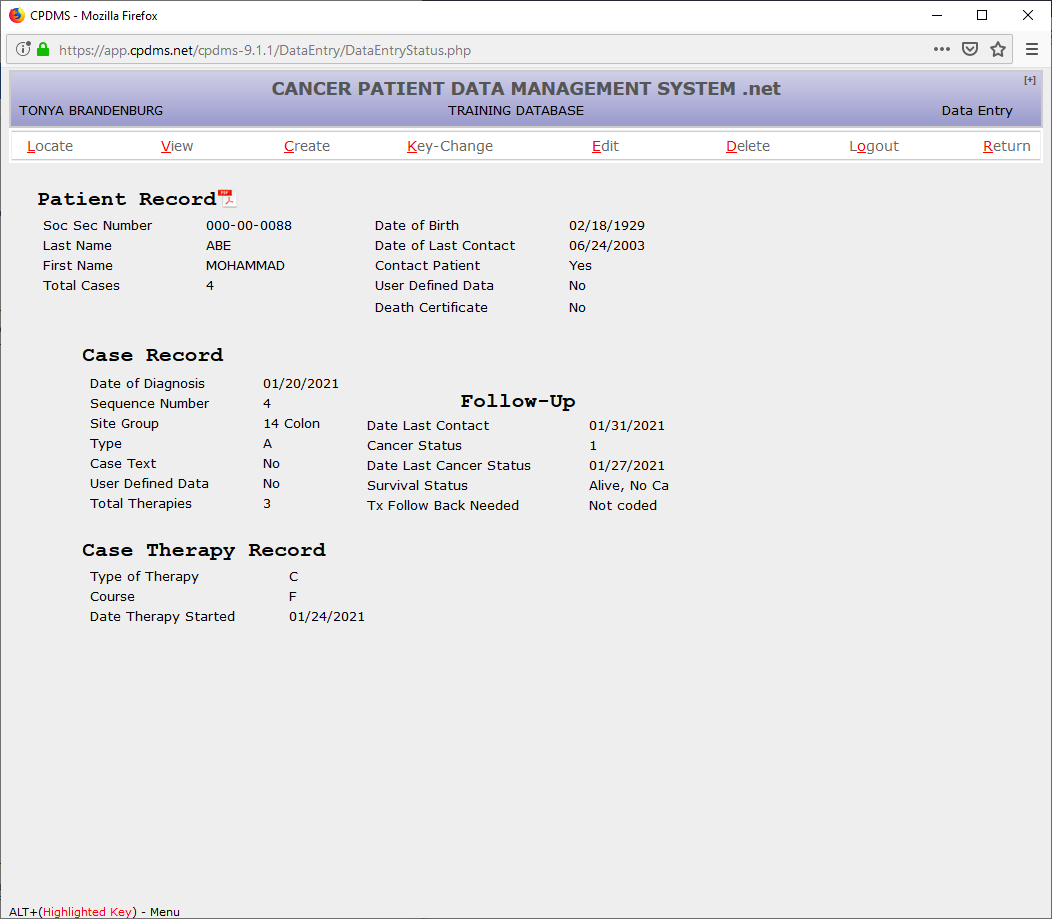
After the follow-up record has been created and saved, the screen returns to the Data Entry Status screen. Notice that now the follow-up key fields appear to the right of the Case Record.
To complete data entry for this abstract, choose CREATE and then “Text.” Text is divided into ten separate categories: History and Physical, X-rays and Scans, Scopes, Lab Tests, Operative Reports, Pathology Reports, Site Text, Histology Text, Staging Text, and General Remarks. A category is selected by clicking on the corresponding bar in the list on the right of the screen. The category for which text is being entered appears at the top of the text entry box. Each category has guidelines for essential data which should be documented in text; these appear to the left of the text entry box (see below).
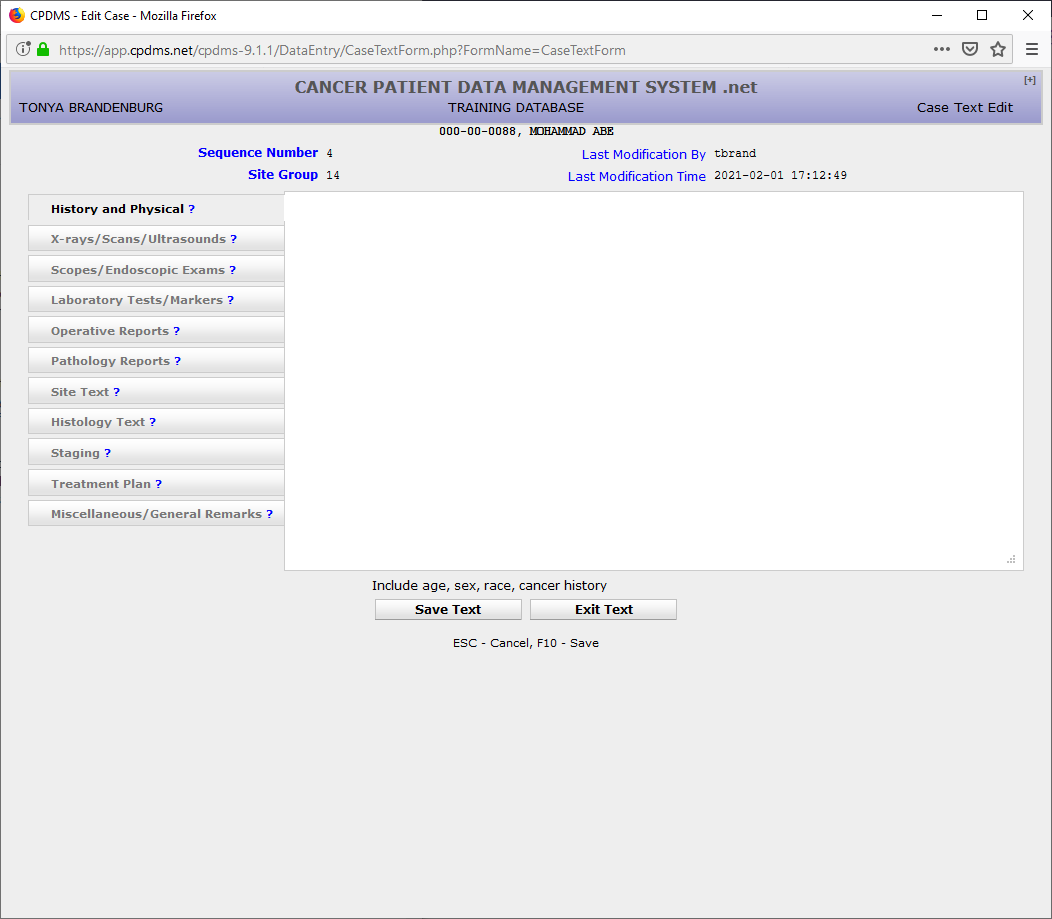
Text may be entered in as many or as few categories as necessary. Up to 3360 characters may be entered for each category. Refer to the CPDMS Abstractor’s Manual for further guidance regarding text entry. Text from other applications (such as Word or another window of Internet Explorer) may be cut and pasted into CPDMS.net. After text data entry is completed, select “Save Text” or press F10. As with other segments of the case, the username and date last modified fields are automatically recorded each time the text is updated. Click “Exit Text” or ESC to exit without saving.
Users may jump directly to the Case Text Edit Form from the Case Data Edit Form or the Case Follow-up Edit Form by clicking on the “Text” tab or hot key. Text may also be entered at any time within the Case Data Edit Form by clicking on the ‘T’ button which appears immediately to the right of field labels. A text box opens, as seen below. Each field is mapped to particular text category. In this example, text documentation for Tumor Grade is mapped to the “Pathology Reports” category. After entering text, simply close the text box to return to the Case Data Edit Form. The text is automatically saved to the case text record.
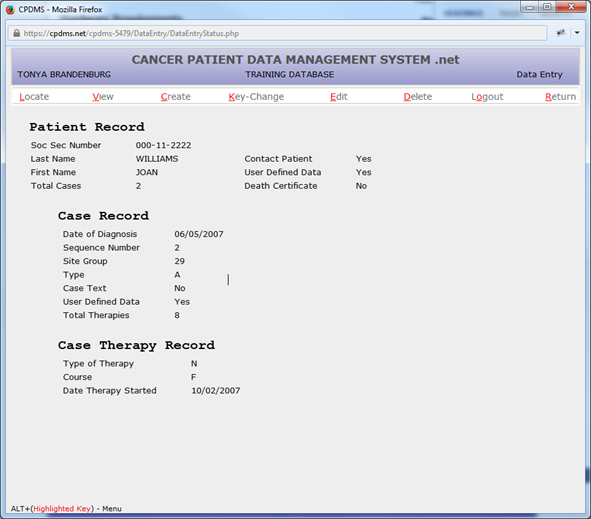
When the system returns to the Data Entry Status screen, note that in the Case Record, the word “Yes” now appears to the right of Case Text.
At this point, a complete new patient record had been created.
Update an Existing Patient
Go to the "Locate Patient" entry screen by selecting Patient Data from the Main Menu or by selecting RETURN from a Patient Record.
In order to locate an existing patient in the database, type the social security number of the desired patient. When the field is filled, the computer immediately searches the existing patient records for that social security number.
If a match is found, the patient record is displayed in a patient list, as in the screen below.

When this list appears, the patient information displayed (name, birth date, sex) should be compared with these data values for the patient being looked up. If it is the same patient, click "Select" to choose this record in order to add or update the existing record with the new information.
If the social security number is entered and no match is found in the existing database, the cursor automatically moves to the Last Name field.
Enter the patient's full last name, with no special characters or punctuation marks. (Embedded blanks are allowed.) Press ENTER and the cursor moves to the First Name field. If ENTER is pressed again, leaving the First Name field blank, the system will display all patients in the database whose last names start with the character string entered. If only part of the last name is entered, leave the First Name field blank.
For example:
The patient's full first name may also be entered-- again, with no special characters or punctuation marks. The computer then searches the existing database for that first and last name combination and displays any matches it finds.
For example:
Click "Select" to select the existing patient record or choose "New Search" to return to "Enter Patient Information."
Patients may also be located using their class accession year and number.
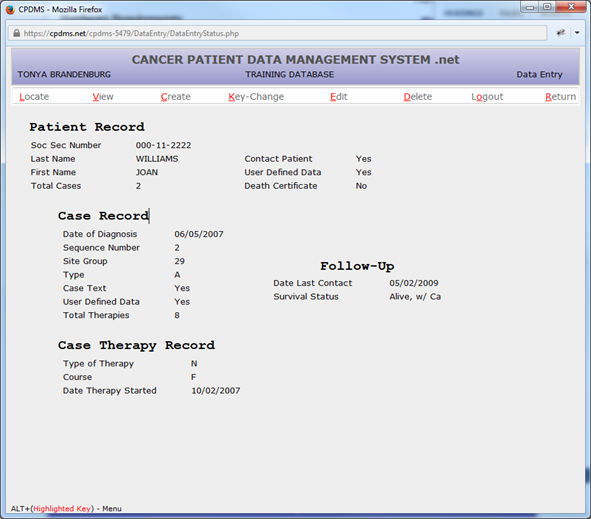
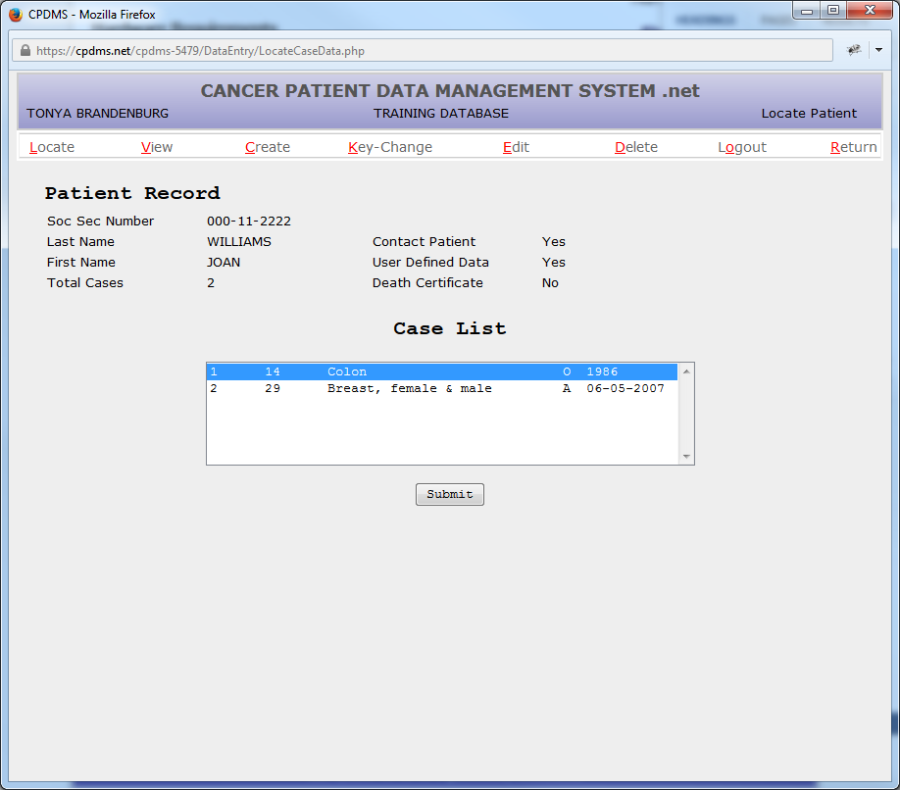
Once an existing patient record has been selected, the patient key field values are displayed in the Data Entry Status screen. The functions available to modify this record are shown across the top of the screen.

LOCATE
LOCATE displays the key fields of a specific case or therapy in the Data Entry Status screen so that other actions may be performed upon that record segment. For example, if a patient record has been selected from the database and a therapy record is to be edited, the corresponding case must first be found by selecting LOCATE and then "Case."
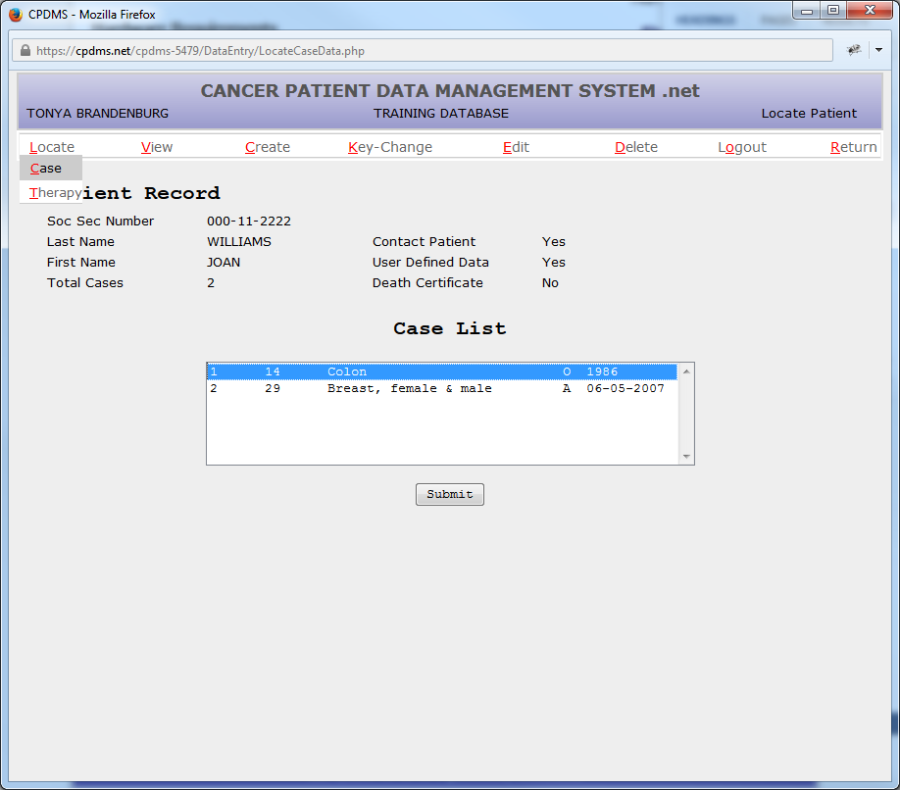
All the cases stored for this patient are then listed:
Highlight the case which is related to the therapy to be edited and select "Submit." The Case Key Field values are displayed beneath the Patient Record. Then LOCATE the therapy record by selecting LOCATE and "Therapy."
All the therapy records stored for this case are then listed:
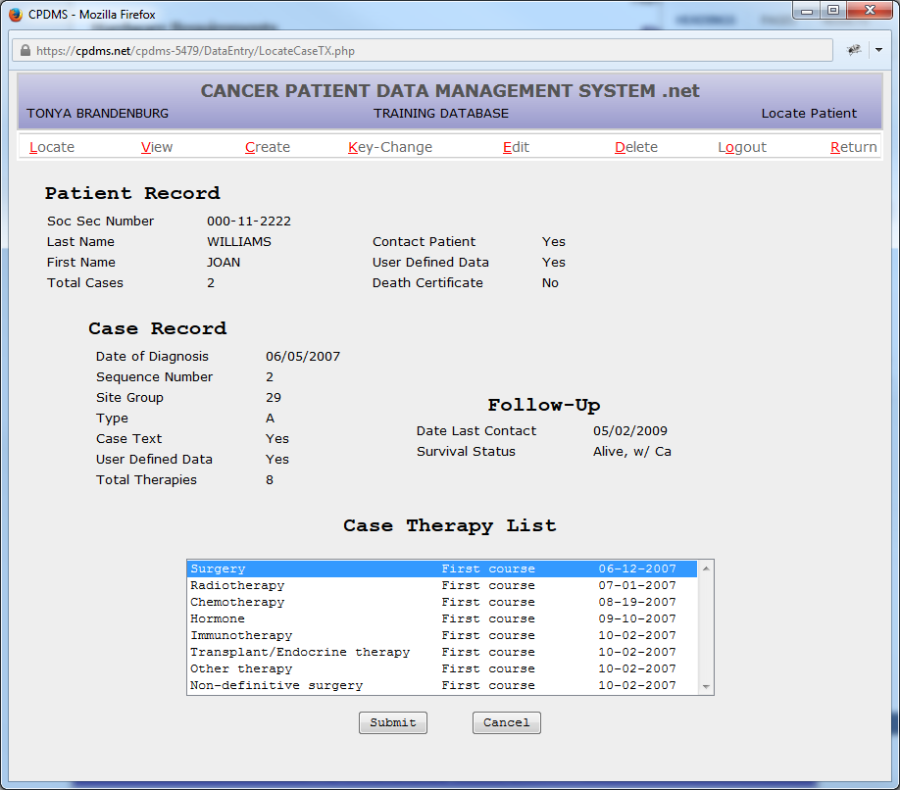
Highlight the record to be edited and select "Submit."
The key field values of the Case Therapy Record are then displayed beneath the Case Record.
Now any of the other functions (VIEW, CREATE, KEY CHANGE, EDIT, or DELETE) may be performed upon the records currently being displayed in the Data Entry Status screen.
In order to view or modify a different case for this patient (or a record segment attached to a different case), first LOCATE that other case and then it may be edited.
If an attempt is made to LOCATE a record that does not exist, an error message will be displayed. If an attempt is made to exit a case record with inconsistent or incomplete data, an error message will be displayed.
Refer to Appendix A for steps to resolve these situations.
VIEW
VIEW allows users to see the data values stored for any segment of a patient record, but not to make any changes to the record. This function also permits the user to view a list of any existing errors, view and print a patient abstract report, view NAACCR Therapy fields (which are automatically calculated), or view the patient's death certificate (if available). For example, to VIEW the Follow-Up information on the current case, click on VIEW and the submenu lists all the possible parts of a record:
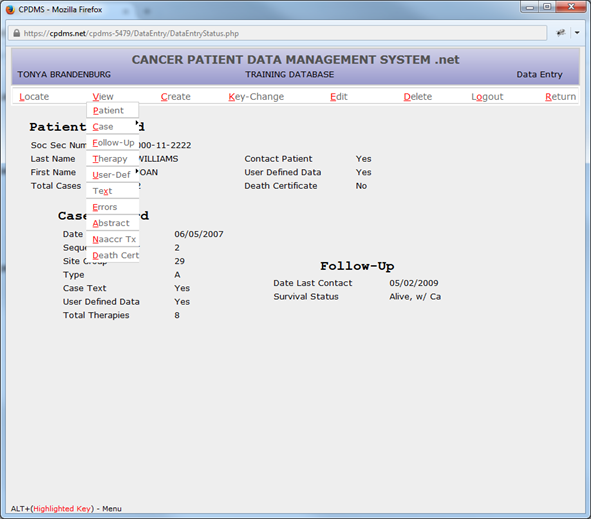
Select "Follow-Up" to display the case follow-up record.
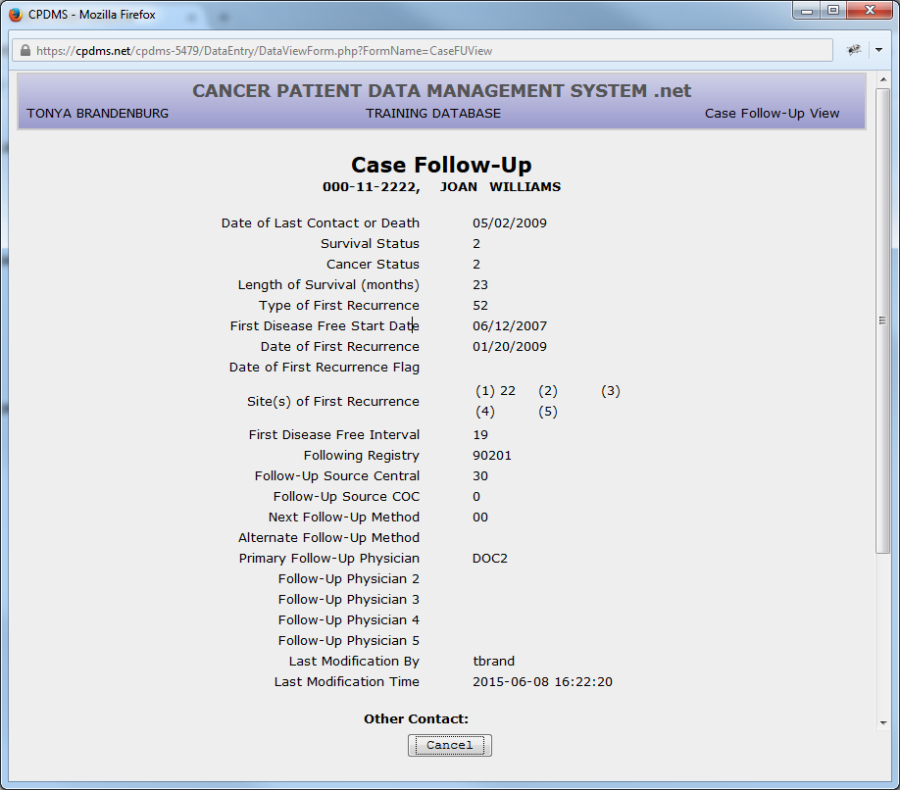
Use the "Cancel" button to leave this screen and return to the Data Entry Status screen. Any record segment indicated as current on the Data Entry Status screen may be viewed by clicking on VIEW and then on the desired segment. However, if an attempt is made to VIEW a record which can have multiple records of that type stored (i.e., therapy), then a list of all existing records of this type is displayed. To view the desired record, highlight that record and select "Submit".
If an attempt is made to VIEW a segment that does not exist, the system will display an error message. In order to VIEW a segment attached to a different case, that case must first be LOCATED.
CREATE
The CREATE function adds new segments to the existing patient record. Choose CREATE from the top menu and the submenu appears.
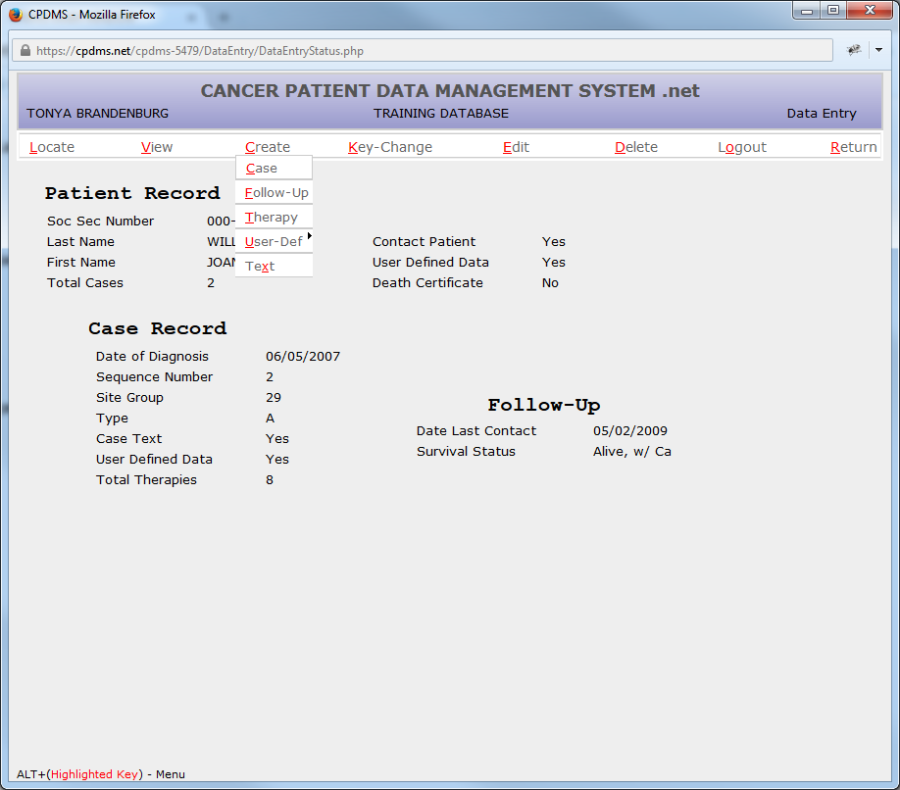
Then select the segment to be created. The steps to create additional segments in an existing record are exactly the same as those outlined earlier in this chapter in the section "Enter a New Patient." If an attempt is made to CREATE a segment that already exists and which can appear only once in a patient record, the system will simply open the edit form for the existing segment.
NOTE: Therapy records cannot be created for cases which were originally abstracted as type S (short forms). Users should contact CPDMS.net technical support if such cases are encountered.
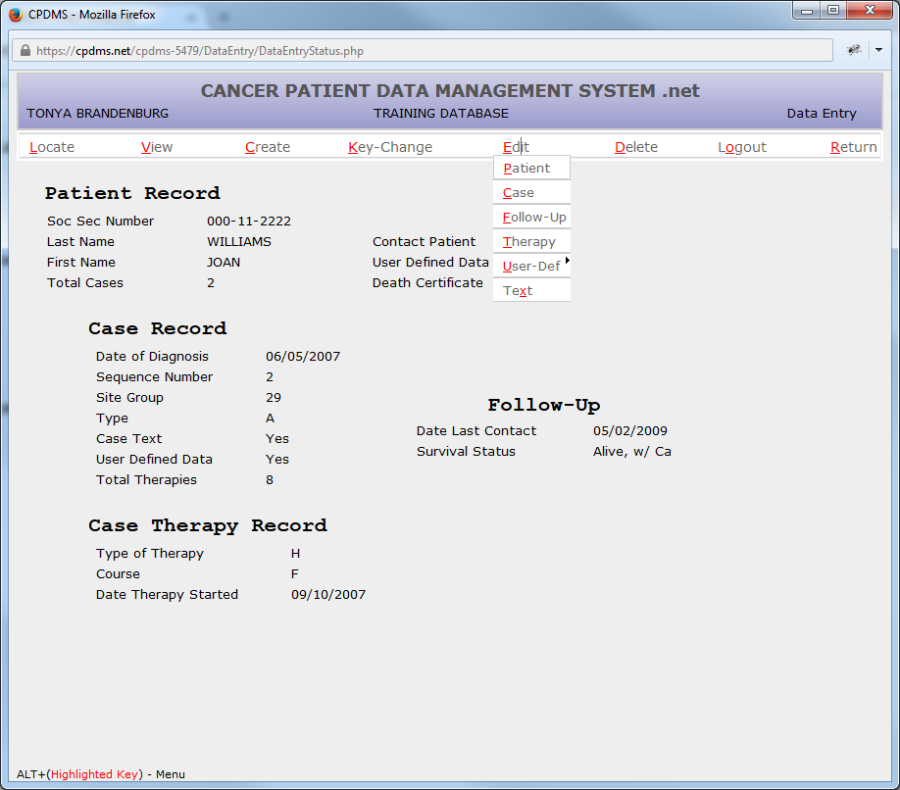
KEY CHANGE
This function changes the values stored in the key fields of the patient, case, or therapy segment of the current patient record. Choose KEY CHANGE from the top menu and the submenu appears:
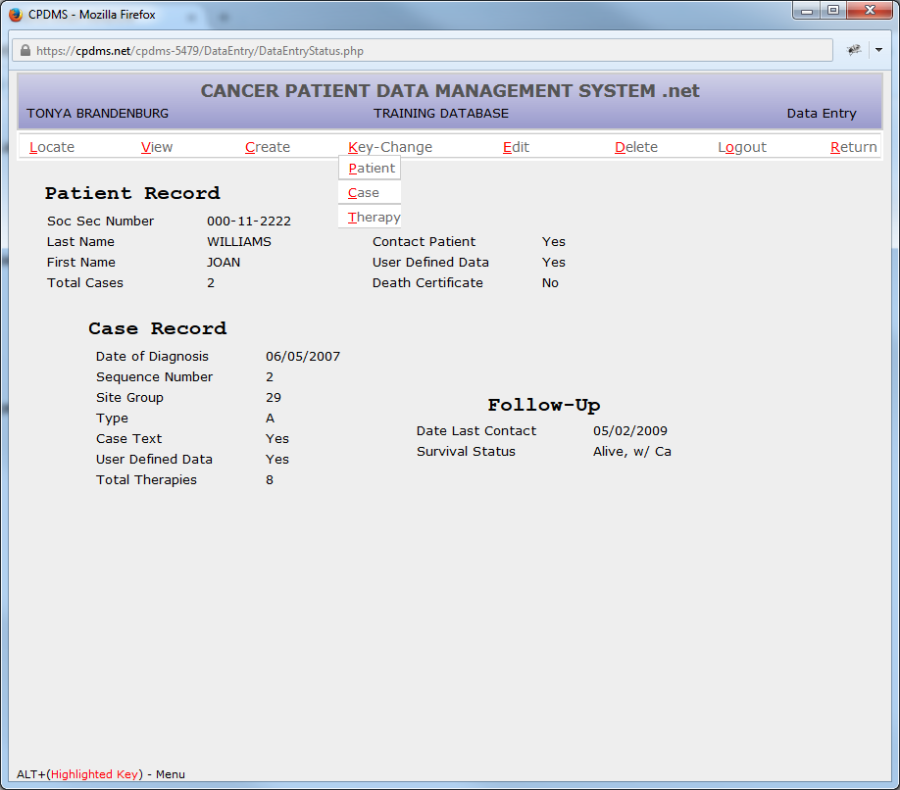
To change Patient level key fields, select Patient from the submenu and the Patient Key Change Form will be displayed. (See example below.)
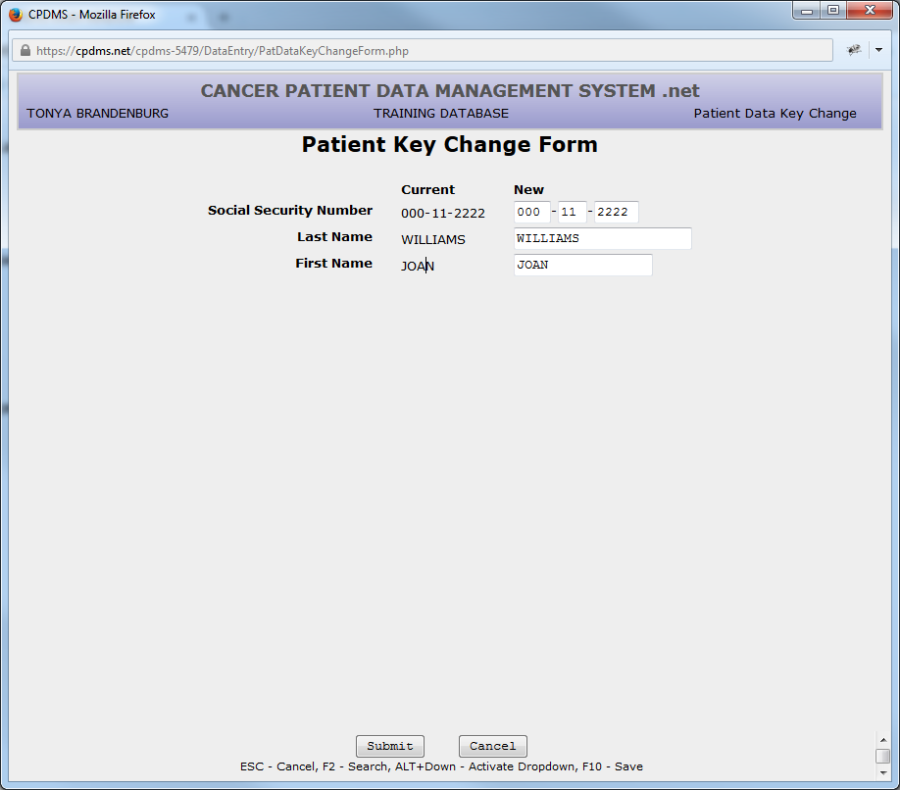
This form allows a patient's SSN, Last Name, or First Name to be edited. Be sure to choose a unique SSN. If a SSN that already exists in the database is entered, an error message will be displayed and the duplicate number will not be accepted. After making the desired changes, choose "Submit" to save the new patient keys or "Cancel" to escape without saving.
If "Submit" is selected, the screen will display the current and new values side by side, so that the changes may be reviewed prior to saving. (See below.)
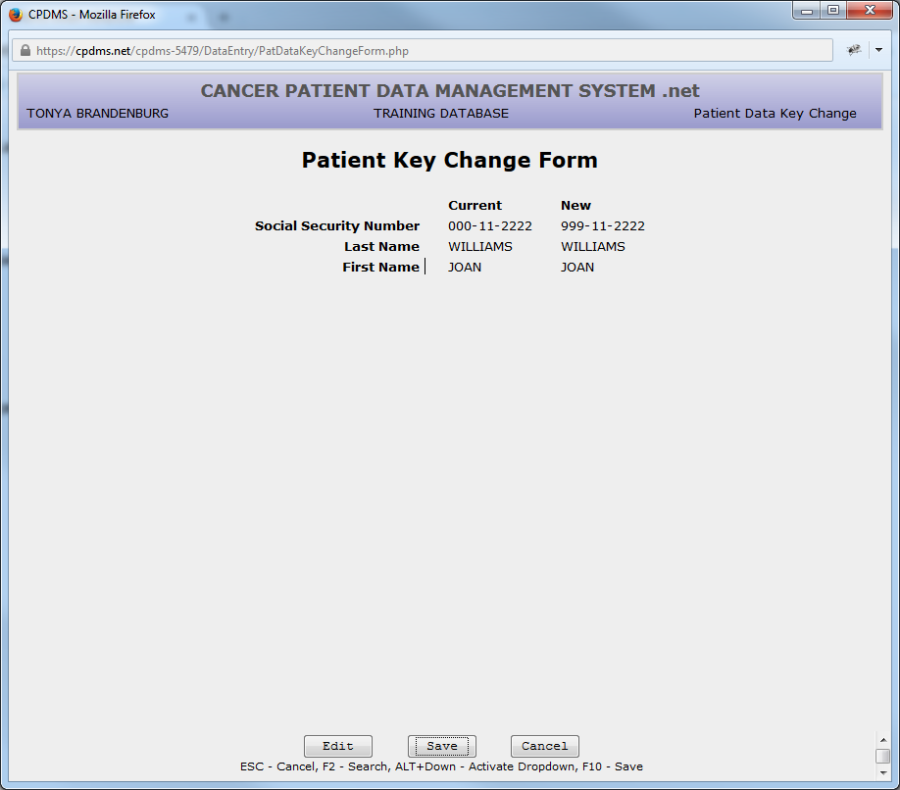
Select "Edit" to return to editing the patient key fields, "Save" to preserve the changes, and "Cancel" to return to the Data Entry Status screen without saving the changes.
To change keys in the current case record, select "Case" from the KEY CHANGE submenu and the Case Key Change Form will be displayed:
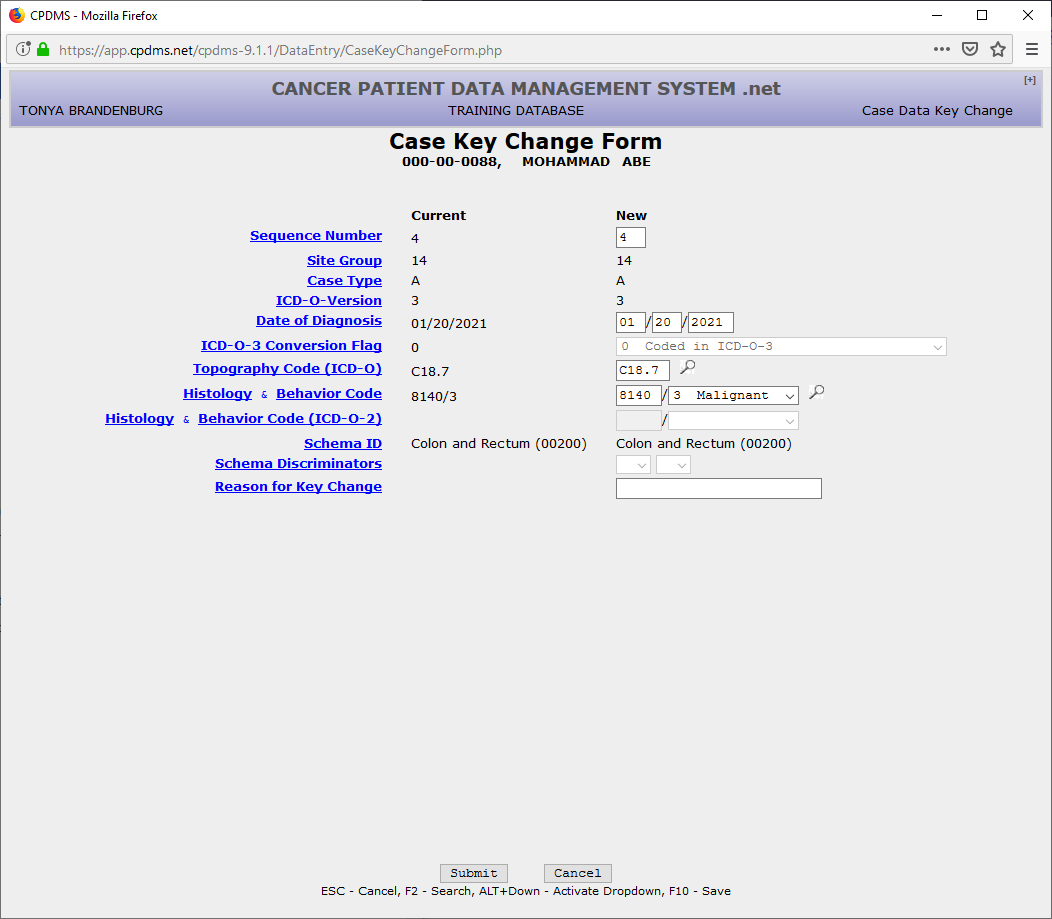
This form allows the case sequence number, date of diagnosis, ICD-O-3 conversion flag, topography, or histology and behavior code to be edited. The "Reason for Key Change" field allows a brief explanation (up to 120 characters) of the impetus for the key change to be recorded. Select "Submit" to save the changes or "Cancel" to escape without saving.
If "Submit" is chosen, the screen will display the current and new key case fields side by side, so that the changes may be reviewed prior to saving. (See example below.)
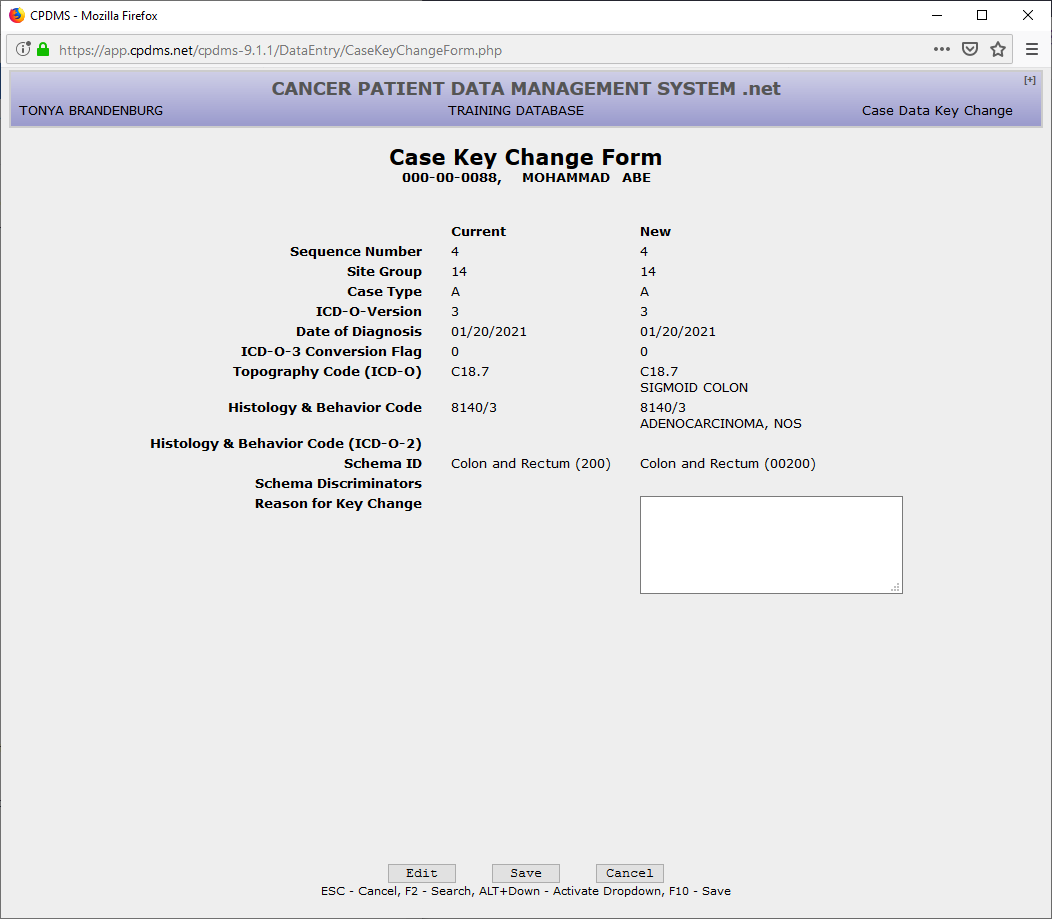
Select "Edit" to return to editing the case keys, "Save" to preserve the changes, and "Cancel" to return to the Patient Record display without saving the changes.
NOTE: If duplicate sequence numbers for the same patient have been stored, an error message will be displayed stating "Case Sequence Numbers must be unique and contiguous."
To edit key fields for the current therapy record, choose "Therapy" from the KEY CHANGE submenu. The Case Therapy Key Change Form is now displayed:
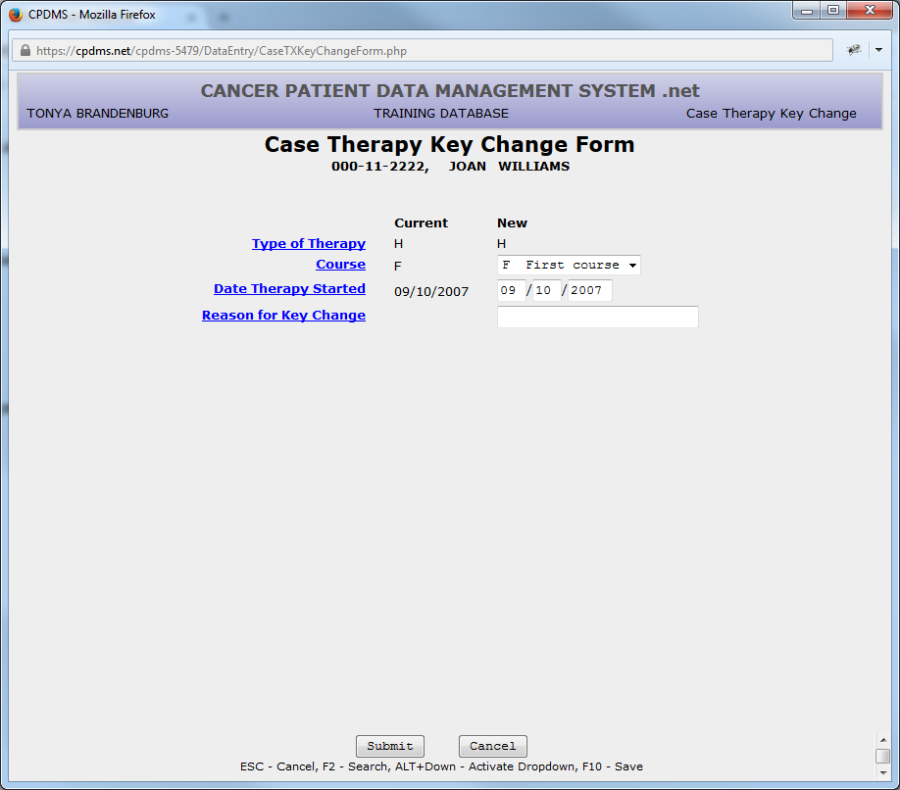
The Therapy Course and Date Therapy Started fields may be edited in this form. A brief (up to 120 characters) explanation for the key change may be recorded here as well.
Select "Submit" to save the changes or "Cancel" to escape without saving.
If "Submit" is chosen, the screen will display the current and new key case fields side by side, so that the changes may be reviewed prior to saving. (See example below.)
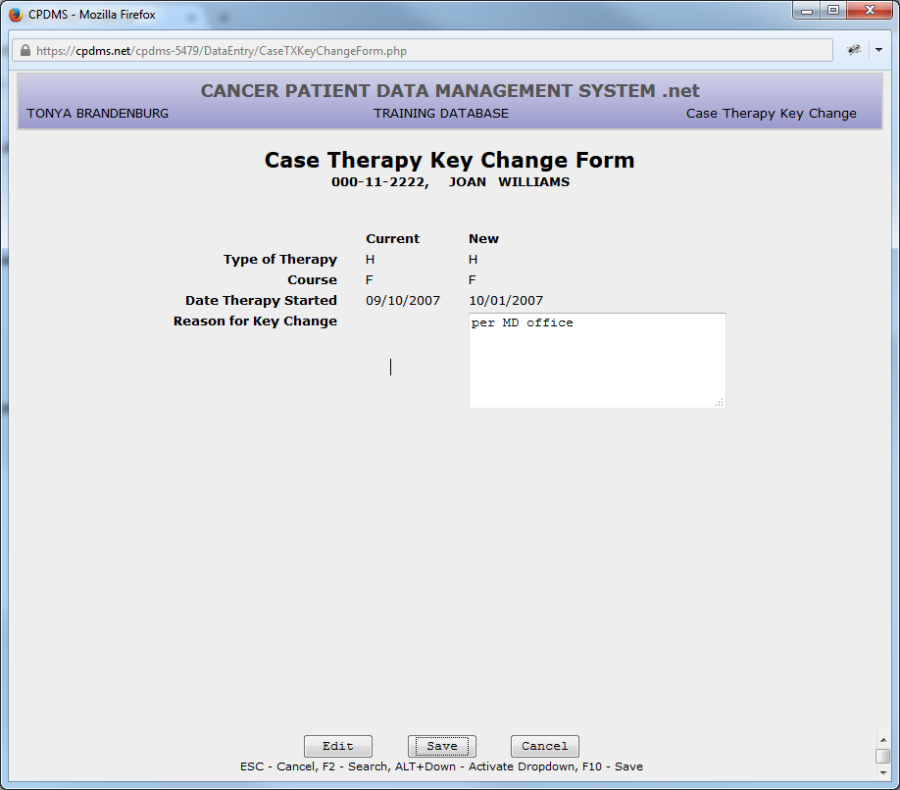
The changes may now be edited, saved, or abandoned without saving and the screen will return to the Data Entry Status screen.
EDIT
EDIT allows users to change the values stored in the data fields (other than the key fields) on any segment of a patient record.
NOTE: If a case was originally abstracted as case type S (short form), some fields in the case and follow-up records will be unavailable for editing. Users should contact CPDMS.net technical support in order to edit these cases.
Select EDIT from the top menu and the following submenu lists all possible segments of a record:
Choose the segment to be edited. For example, if "Patient" is chosen, the Patient Data Edit Form is displayed. Any entry may be written over with another valid value for that field. To escape the form, press F10 or select the "Save" button to save the changes, or press ESC or select the "Cancel" button to exit without saving the changes. The screen then returns to the Data Entry Status screen.
To EDIT a case, choose "Case" and the Case Data Edit Form for the current case is displayed. (To EDIT a different case for a patient, that case must first be located.) Once again, any entry may be overwritten with another valid value for that field. Press F10 or the "Save" button at any time in order to save the changes, or press ESC or the "Cancel" button to quit and abandon the edits. The screen then returns to the Data Entry Status screen.
If an attempt is made to EDIT a case, and no case is currently LOCATED and displayed in the Data Entry Status screen, a list of the cases that exist for the current patient is displayed. Select the case to be edited and the system will immediately display the Case Data Edit Form.
If an attempt is made to EDIT a case when there are no cases stored for a patient, the system will display an error message stating "Case record for the current patient does not exist."
To EDIT a therapy, choose "Therapy" from the submenu. If there is only one therapy record stored for the case, the screen will immediately display the Case Therapy Edit Form. If there is more than one therapy record stored for the case, then a list of the Therapy record keys will be displayed.
Select the desired therapy record and the system will display the Case Therapy Edit Form for that record. Any entries stored for this therapy type may be written over with another valid value for that field. Press F10 or the "Save" button at any time to in order to save the changes, or press ESC or the "Cancel" button to quit and abandon the changes. The screen will then return to the Data Entry Status screen.
If an attempt is made to EDIT a therapy when no therapies are stored for this case, an error message will be displayed stating "Case Therapy Records do not exist for the current case."
To EDIT a Follow-up record, choose "Follow-up" from the submenu and the Case Follow-up Edit Form will be displayed. Any entries may be written over with another valid value for that field. Press F10 or the "Save" button at any time to in order to save the changes, or press ESC or the "Cancel" button to quit and abandon the edits. The screen returns to the Data Entry Status screen.
To EDIT User defined fields, choose "User defined" from the submenu and then "Patient" or "Case." Select the level of user defined fields that to be edited. The screen immediately displays the User defined Data Form for the selected level. Here any entries stored for the user defined fields may be written over with new values. Press F10 or the "Save" button at any time in order to save the changes, or press ESC or the "Cancel" button to quit and abandon the changes. The screen then returns to the Data Entry Status screen.
To EDIT Text, choose "Text" from the submenu and the Case Text Edit screen is displayed. Any comments (up 3360 characters for each category) may be entered. Press F10 or the "Save" button at any time in order to save the changes, or press ESC or the "Cancel" button to quit and abandon the edits. The screen then returns to the Data Entry Status screen.
DELETE
This function deletes an entire patient record or any portion of a record. Choose DELETE and a submenu appears, listing all the segments of a patient record.
To DELETE the entire current patient record, select "Patient" from the submenu and a dialog box opens which prompts the user to record a reason for the deletion. A Choice List is provided. There is also an area for additional comments. (See below.)
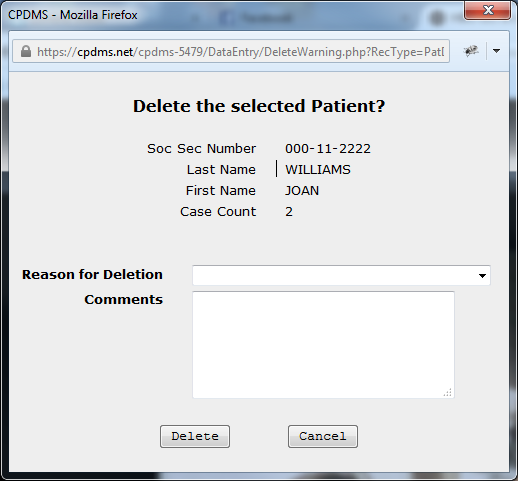
After completing the required fields, choose "Yes," to delete the entire patient record and return to the Enter Patient Information screen.
To DELETE a case record related to the current patient, choose "Case" from the submenu. If no case is currently being displayed in the Data Entry Status screen, a message prompting the user to locate a case will appear. Choose LOCATE and then "Case." From the list presented, select the case to be deleted. Choose DELETE and then "Case." Just as when a patient record is deleted, a dialog box will appear in which the reason for deletion must be entered. Then select "Yes" to delete the case record.
If "No" is selected, the screen returns to the Data Entry Status screen and nothing is deleted. If "Yes" is selected, the case and all related segments at or below case level are deleted. This includes the follow-up record, all therapies, any case level user defined fields, and text. The program returns to the Data Entry Status screen and updates the case count displayed there.
To DELETE a therapy record, choose DELETE, then "Therapy." If no therapy is currently being displayed, the screen will display a message prompting the user to LOCATE a therapy first. Choose LOCATE and "Therapy." The program then displays a list of the keys for all the therapy records stored for the current case. Select the therapy record to DELETE. Then choose DELETE and "Therapy" and the record deletion dialog box will appear. Fill out the required fields and then select "Yes" to delete the therapy record. The screen returns to the Data Entry Status screen. The count of therapies displayed is updated after the DELETE occurs.
To DELETE a Text record, first LOCATE and select a case so that its keys are displayed in the Data Entry Status screen. Choose DELETE, then "Text." The message "Delete the record from the database?" will be displayed.
Select "No" and the text is not deleted. Choose "Yes" and it is deleted. The screen then returns to the Data Entry Status screen. If a DELETE action occurred, the word "No" appears next to "Case Text" on the diagram.
RETURN
This function allows selection of a different patient. Choose RETURN from the top menu and the program returns to the "Enter Patient Information" screen
Edit Checks and Error Messages
Edit checks are available during multiple levels of data entry in CPDMS.net. When invalid or inconsistent data is entered, an error message is displayed in a pop up window which overlays the current window. The message describes which data element(s) are invalid or inconsistent. Most of the messages in CPDMS.net are self-explanatory. This section of the chapter will describe each level of edit checks and specify when they occur.
As data is entered in each field, checks are performed to ascertain that it is in the correct format. For example, date fields must be in the format MM/DD/YYYY. If a year with only three digits is inadvertently entered, an error message will immediately appear in a pop up window (as seen below).

When an error message appears, please read the message to understand why it occurred. Press the ENTER key to acknowledge the error and return to the active window. Users may then continue working normally.
When a record segment is saved (for example, the patient record), all fields are subjected to edit checks. At that time, both single field and inter-field edit checks are performed. An error message appears if an invalid value has been entered in a field (including blanks in mandatory fields) or if related fields contain incompatible values. Any errors found are listed in red text and the error window presents the choice of returning to the edit form to enter a valid value or saving the case with errors. (See below.)
If a user chooses to save the case with errors, this patient will then appear in the Incomplete Case List. See the next section of this chapter for further information regarding the list.
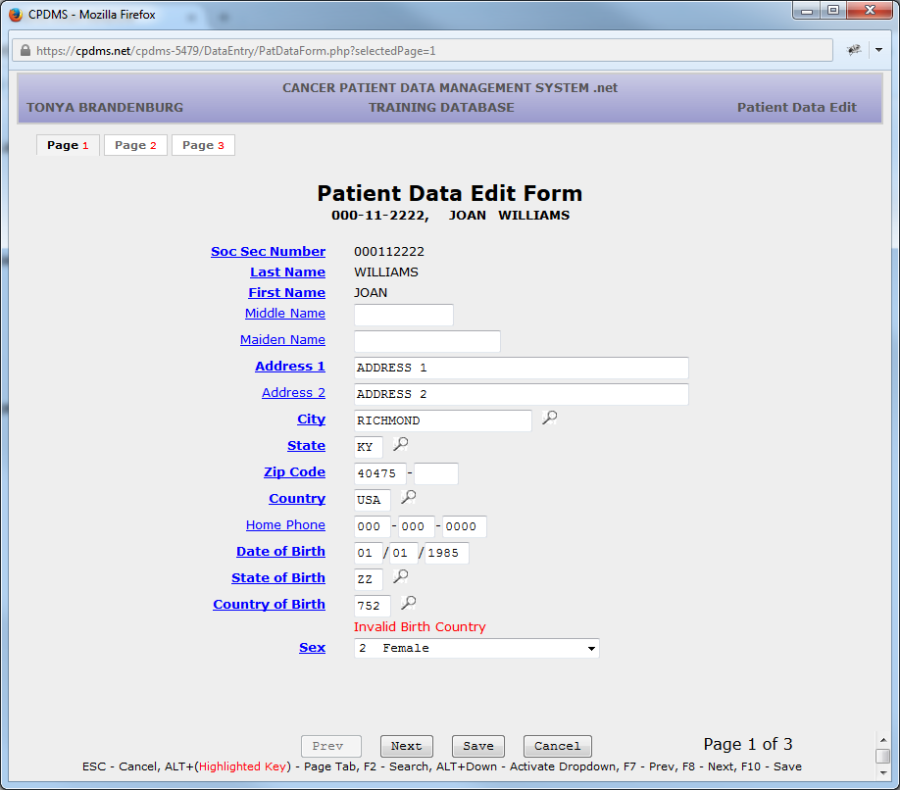
If "Continue Editing" is chosen, when the edit form is displayed, the error will appear in red text immediately beneath the invalid field value.
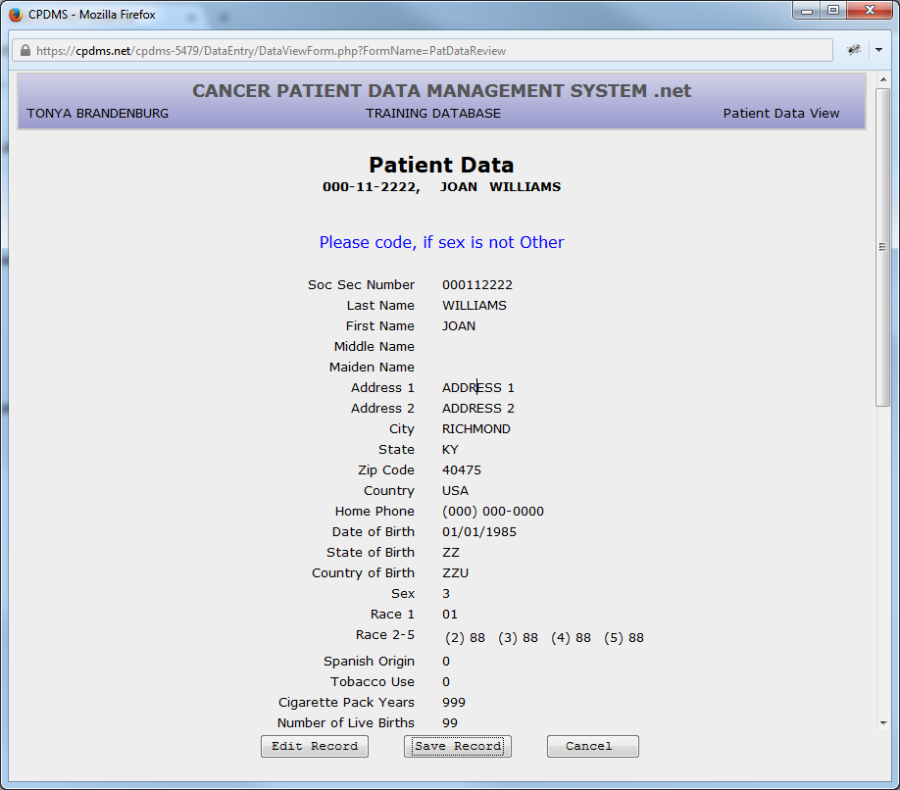
In addition to errors, edit checks may also generate warnings when a record is saved. These appear in blue text at the top of the Data View screen which is displayed prior to saving a record. (See the example below.)
Warnings advise users to double check any unusual field values. Choose "Edit Record" to alter the value, or if the value is correct, the warning may be disregarded. The presence of a warning will not result in a case being incomplete.
The final level of edit checks occur when users choose "Return" or "Logout" from a patient's Data Entry Status screen. At that time, inter-record edit checks are performed and a message displays any errors which are found (see below).
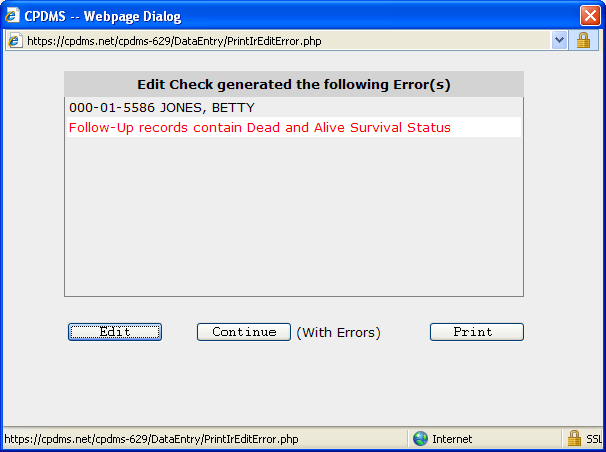
As before, users have the option of editing the case to fix the error, or saving the case with errors (after which it will appear on the Incomplete Patient List). The error message may also be printed using the "Print" button.
Incomplete Patient List
The Incomplete Patient List is a list of all records that have been saved with errors (due to either incomplete or invalid data). It is limited to only 10 records per facility at any given time; once the limit has been reached, no more patient records may be created until some of the incomplete records have been resolved.
The list by may be accessed by choosing "Incomplete Patient List" from the Patient Data Menu. See below for an example:
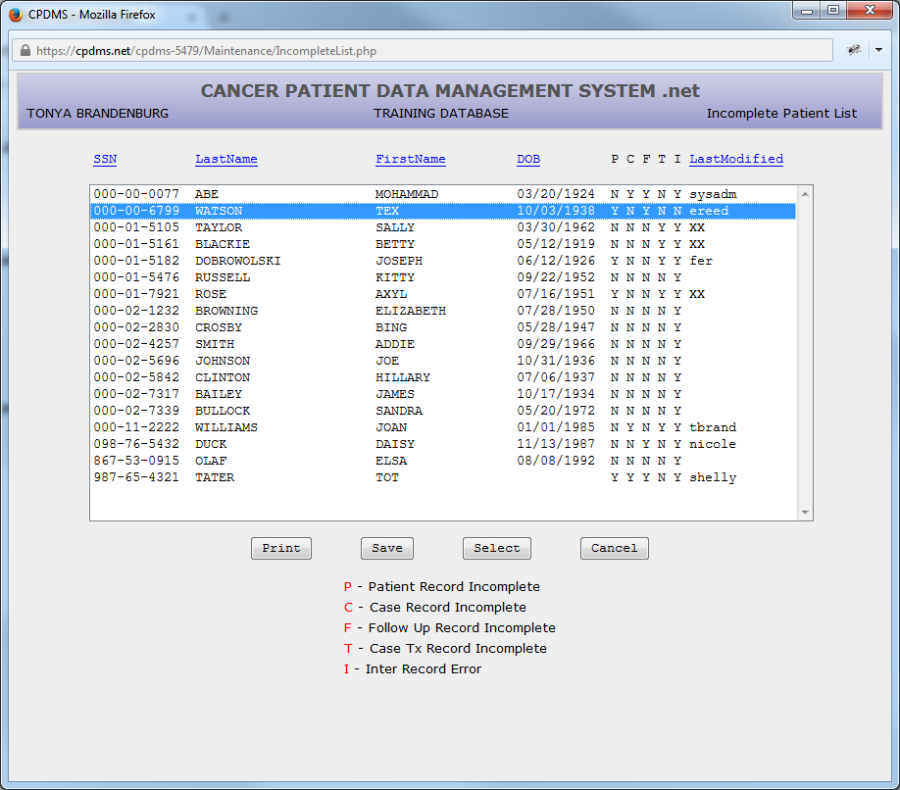
The list may be ordered by SSN, last name, first name, DOB, or last modified by. The order may be changed by simply clicking on the column heading (in blue) that will be used to sort. The presence of one or more errors in the Patient, Case, Follow-Up, or Therapy segments of a record is indicated by a "Y" in the columns labeled P, C, F, and T. The column labeled I indicates whether an inter-record error is present.
An incomplete case may be selected by highlighting it in the list and choosing "Select." The Data Entry Status screen is then displayed and the case may be viewed or edited.
Once a case has been saved without errors, it no longer appears in the Incomplete Patient List.
Choose "Print" to generate a hard copy of the Incomplete Patient List, or "Save" to save the list to a local computer or network drive. Select "Cancel" to return to the Main Menu.
It is important to note that patients in the Incomplete Patient List are NOT included in reports, data analysis, or data exchange.